Third Party Firmware
Introduction
In this article, you will be introduced to some of the third-party firmwares. Upgrading the firmware of your wireless router is one way to upgrade your wireless router to have some more feature. You may want to upgrade your want to update the firmware of your wireless router if you want your router to enhance some of the following features. The factory default firmware may or may not have these feature enable.
- Client mode or Client bridge mode
- Repeater mode or Repeater bridge mode
- WDM mode(Wireless Distribution System)
- bandwidth monitoring
- Virtual WLANs
- Advanced QoS
- IP and MAC filtering (including time and date)
- Filtering by web site and keyword
- Stability under heavy load
- Strengthens the signal and improves signal quality
- Enable VPN Services
- Enhanced Security: WPA and WPA2, both versions for Enterprise,
- Better customizable firmware and so on.
There are many kinds of third-party firmwares available. Here is a list of those third-party firmware available today. http://en.wikipedia.org/wiki/List_of_wireless_router_firmware_projects. DD-WRT and Tomato are the most two popular ones because they are easy to install and configure. Another popular third-party firmware is OpenWRT, but it will no be discussed here because its configuration is more complex compare to DD-WRT and Tomato. Detail about OpenWRT can be found at http://wiki.openwrt.org
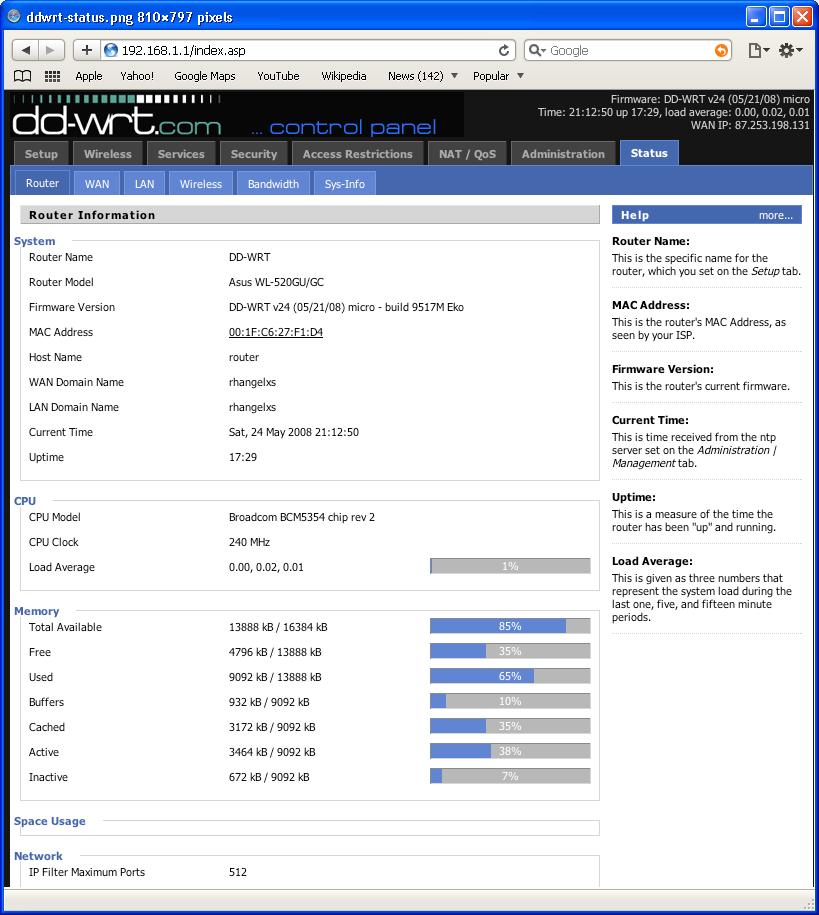
Here is a screen shot of DD-WRT web interface.
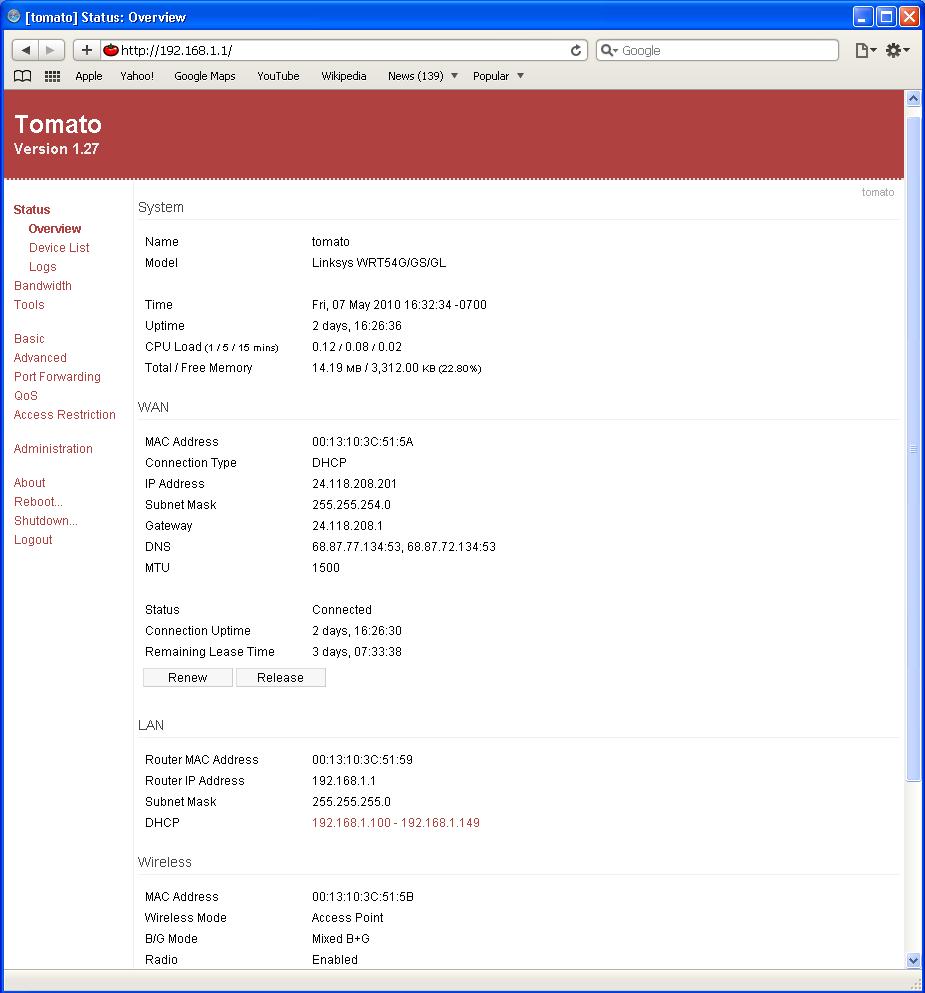
Screen shot of Tomato web interface:
- DD-WRT is an alternate firmware available for many wireless routers. It is the most popular firmware because it has lots of feature and eassy to use. There is a paid and free versions available. DD-WRT is suitable for a great variety of WLAN routers and embedded systems.
- Tomato is a free open source Linux-based firmware. The major emphasis of Tomato is on stability, speed and efficiency. Tomato includes several types of bandwidth usage charts, advanced QoS access restriction features, raised connection limits which enables P2P networking, and more.
In the section below, I will guide you through the processes of downloading and installing DD-WRT firmware.
This is just a brief instruction to DD-WRT firmware. If you need more help, go to http://www.dd-wrt.com for more detail and instruction. Following this instruction at your own risk. I will not responsible for any cause or damage.
DD-WRT Instruction
- NOTE: The following guide is just a brief intruction to DD-WRT firmware. Follow this guide at you own risk. More information and instruction can be found at http://www.dd-wrt.com.
- NOTE: Downloading and installing DD-WRT firmware is easy. However, do it improperly can damage your router, and make your router unusable.
Downloading
Before downloading the firmware images, be sure to check your router's model, version and the manufacture. These informations can be found on the back of your router. Throughout this guide, I will use Linksys with the model WRT54G Version 3.0.
Follow the steps below to download DD-WRT firmware files.
- 1st step
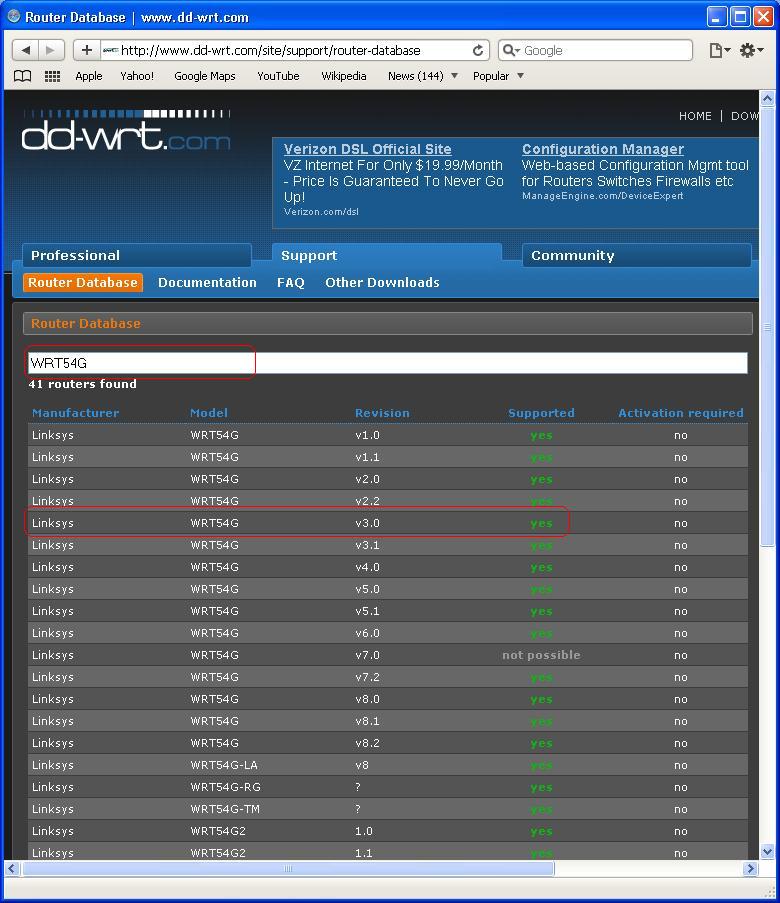
Go to http://www.dd-wrt.com/site/support/router-database, and type you router's model, name, manufacturer and/or revision in the long search box. If you have a supported router, you router's Manufacturer, Model and Version should appear right below the search box. Click on the correct model and version.
- 2nd Step
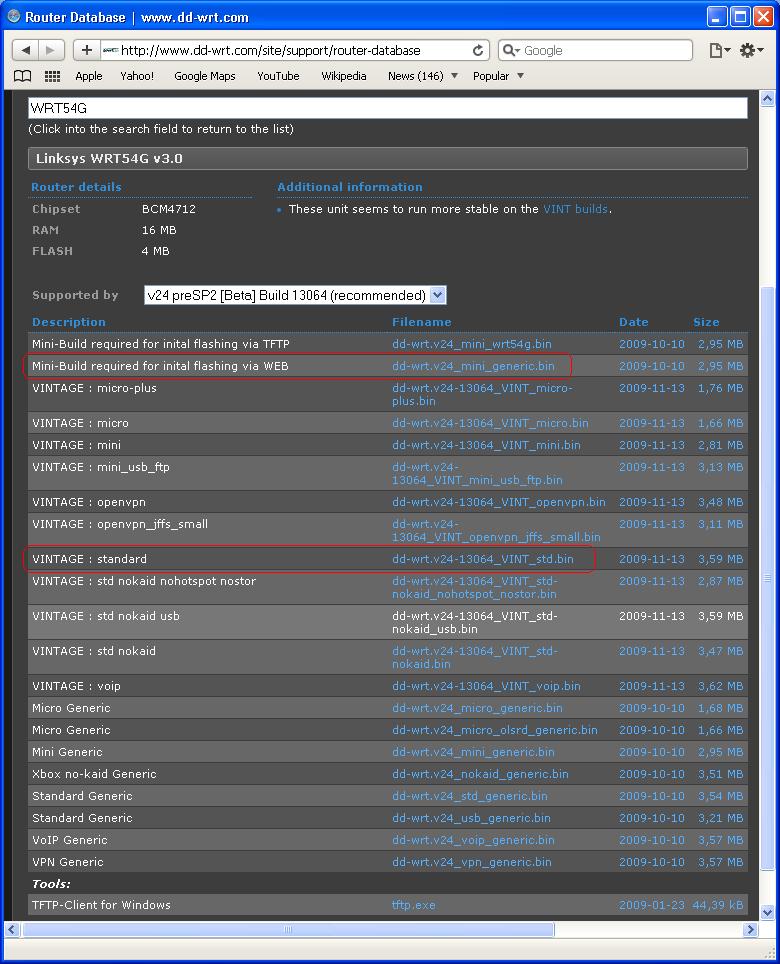
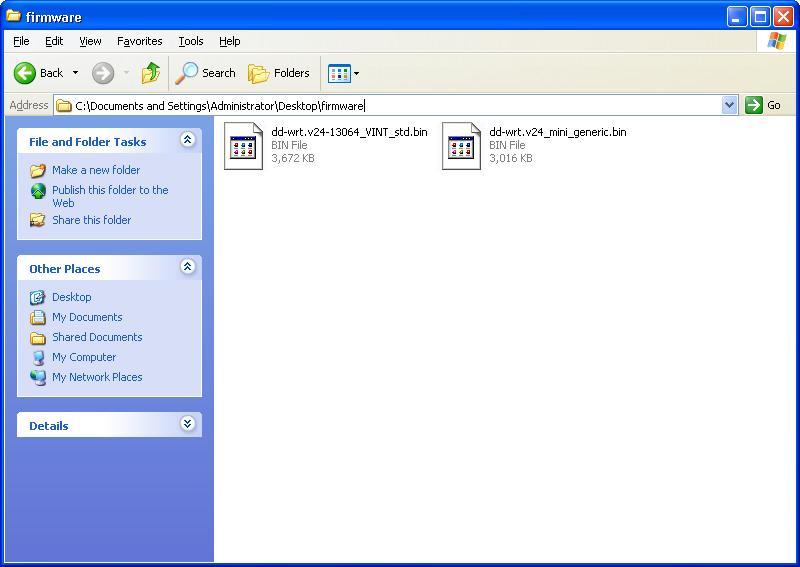
You may need to download multiple files. For my WRT54G, I will download the dd-wrt.v24_mini_generic.bin and dd-wrt.v24-13064_VINT_std.bin and save to a folder called "firmware" on Desktop. The first image, dd-wrt.v24_mini_generic.bin, is required by WRT540 before it can be installed or flashed to any other feature build on image file. The second image, dd-wrt.v24-13064_VINT_std.bin, is a standard build on.
Now you are done with downloading, and you should have two image files as shown below.
Installation
- NOTE: Before you perform this task, it is strongly recommended that you have read the Peacock Thread-FAQ here: http://www.dd-wrt.com/phpBB2/viewtopic.php?t=51486.
Step 1: According to note 1 of the peacock announcement, you should do a "HARD RESET *BEFORE AND AFTER* YOU FLASH FIRMWARE." It says that during your router powered on, you must push the reset button of your router for 30 seconds, then unplug the power core for 30 seconds, and then plug the power core back for 30 more seconds. It mean that during the hard reset, you must continually push the power button without releasing it for 90 seconds.
- NOTE: Doing the hard reset is the most important step you should not forget.
Step 2: statically set the IP Address of your computer's LAN interface with the IP Address 192.168.1.10 and Subnet Mask 255.255.255.0. This step and step 10 below sometime may not necessary because if you wait long enough after doing a hard reset and flashing your router, the IP Address will be assigned dynamically by the router. However, you may need to renew the IP Address, or disable and the re-enable the LAN interface on your PC.
Set 3: Power cycle the router. This means that you should unplug the power from the router and then plug it back in after 30 seconds.
Set 4: Open your web browser and type 192.168.1.1 into the address bar and then press Enter key. When it asks for username and password, leave the username blank and enter admin as the password. I recommend that you use Mozilla Firefox as your web browser; otherwise some of the steps below may not be successful.
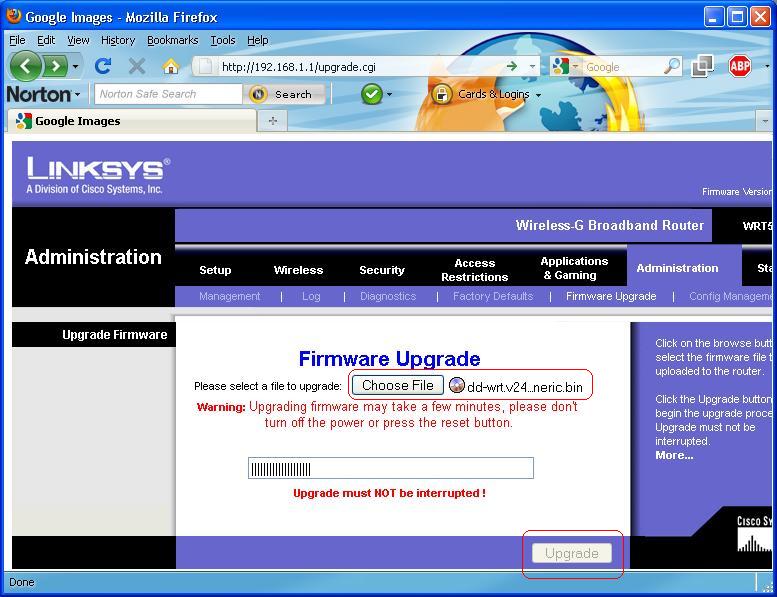
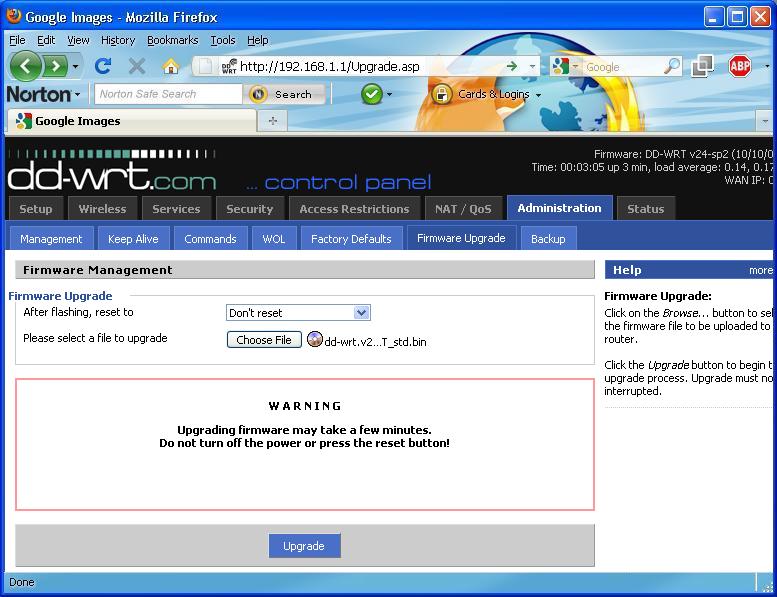
Set 5: Go to administration tab and then click on firmware upgrade.
Set 6: Click the Choose File button and navigate to the the fire files(dd-wrt.v24_mini_generic.bin) we have just downloaded from DD-WRT web site .
Set 7: Click Upgrade button. Wait until the a success massage, and then wait at lease 3 more minutes again before you perform the next step.
Set 8: Open your web browser and brows to 192.168.1.1, if you can access the web GUI, do HARD reset again on the router.
Set 9: Wait until the router is booted into normal and you can access to the router by brows to 192.168.1.1 again. Create you own username and password that you can remember.
At this point, you can repeat from Step 4 to upgrade the router to any build on firmware image. Here I will use the second image file we have downloaded. (dd-wrt.v24-13064_VINT_std.bin)
Set 10: Re-set your computer to obtain an IP Address automatically.
- Note When you login into DD-WRT for the first time, the username is not requiredde, and the password is admin by faultand.
Now You are done with the DD-WRT installion, and you can enjoy the configuration of your router. Configuring routers with DD-WRT are as eassy as the configuring routers with factory default firmware.
Conclusion
This article is just a brief introduction and instruction to third party firmwares. If this guide is not providing enought information for you, search on google.com for more information. I had tried and used many third party firmwares, and now I sticked with Tomato. The reasons I chose Tomato are the stability performance. After upgrading to Tomato, I didn't notice the difference of the wireless signal, but the SPEED was increased. Even though I take my labtop to where the wireless signal was very weak, I could still access the Internet with full-speed as it was connecting to the router using a wire. If you are interested in using Tomato, go to http://www.polarcloud.com for instruction.
Enjoy and good luck!
