Nat Masquerading and Firewall
Nat Masquerading and Firewall
This page will guide you through creating a simple firewall that includes NAT.
- Prep work - Creating or viewing your interfaces
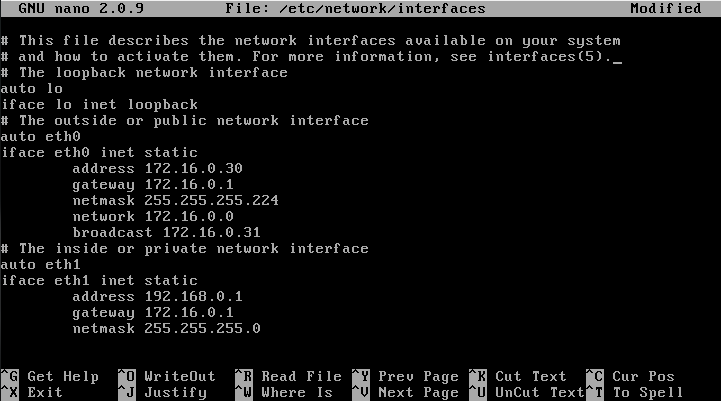
sudo nano /etc/network/interfaces
Edit this file to fit your need for this guide eth0 will be outside or private interface of the network and eth1 will be the inside or private part of your network.
Now restart the network
sudo /etc/init.d/networking restart
Setting up NAT Masquerading
This is pretty easy to setup as it is only three steps. First part is to start the NAT.
modprobe iptable_nat
Second part is to tell your iptables to masquerade things going out of your public interface
iptables -t nat -A POSTROUTING -o eth0 -j MASQUERADE
Third part is to allow packet forwarding
nano /etc/sysctl.conf
Find #net.ipv4.ip_forward=1, uncomment this line and make sure it is equal to 1. You now have Nat configured and should be working if your firewall chains are defaulted to accept all packets.
Firewall Rules
This section will show you examples for rule statements and can be cloned for all ports and protocols.
- Allow established connections
    iptables -A OUTPUT -o eth0 -m state --state ESTABLISHED,RELATED -j ACCEPT
    iptables -A INPUT -j ACCEPT -m state --state ESTABLISHED,RELATED -i eth0 -p tcp
    iptables -A FORWARD -t filter -o eth0 -m state --state NEW,ESTABLISHED,RELATED -j ACCEPT
    iptables -A FORWARD -t filter -i eth0 -m state --state ESTABLISHED,RELATED -j ACCEPT
- Incoming Connections
This for SSH you can change the --dport to whatever port you need for other protocols for example 80 for http. Check if your protocol is udp and if so change tcp to udp.
iptables -A INPUT -p tcp -i eth0 --dport 22 -m state --state NEW -j ACCEPT
or like this for DNS requests
iptables -A INPUT -p udp -i eth0 --sport 53 -j ACCEPT
- Outgoing Connections
This for HTTP and HTTPS and is for multiple ports so all tcp can be added to this and create another for udp and put all your udp ports on that one.
iptables -A OUTPUT -j ACCEPT -m state --state NEW,ESTABLISHED,RELATED -o eth0 -p tcp -m multiport --dports 80,443
or single entries like this for DNS:
iptables -A OUTPUT -p udp -o eth0 --dport 53 -j ACCEPT
- Port Forwarding
This is the fun part and the easily misconfigured so look closely and be careful. First part is tcp or udp. Then look at the -d for your outside ip address. Then -dport is the destination port, in this case http port 80. Then it jumps to DNAT and you then point it to your web server and can change the port number at the : if you changed your port number for the web server.
iptables -t nat -A PREROUTING -p tcp -i eth0 -d 172.16.0.30 --dport 80 -j DNAT --to 192.168.0.3:80
Then you will need to get this accepted through the forward chain
ip tables -A FORWARD -p tcp -i eth0 -o eth1 -d 192.168.0.3 --dport 80 -m state --state NEW -j ACCEPT
- The Reboot (Dont Reboot!)
Your iptables commands will not reapply after a reboot or shutdown. You may want to create a script and apply it to the rc.local to start up or take the easy route and do it in webmin. In webmin after you enter your commands you can hit the revert button and all your rules should pop up in the chains. Then you can hit the activate at boot option and apply the configuration. This will add a line to your eth0 interface so when it comes up it will load the config it has saved in its file.
