Frame relay multipoint lab: Difference between revisions
No edit summary |
|||
| Line 45: | Line 45: | ||
Your network should be able to ping each other at this point in time. | Your network should be able to ping each other at this point in time. | ||
==Phase Five== | ==Phase Five== | ||
Time for some OSPF action. We already set up the OSPF point-to-multipoint in the sub-interfaces. Now you will set up OSPF the same way you always to do but now you will enter the following command. | |||
*(R2 in ospf)neighbor 10.2.2.0 cost 100 (This is saying who your neighbors are) | |||
*(R3 in ospf)neighbor 10.3.3.0 cost 100 | |||
==Troubleshooting and Documentation== | |||
Your lab is now complete and you should be able to ping everything from everything. Your routing tables should have the 10.2.2.0 and 10.3.3.0 networks. Once you are done you may clean up and go have your self a very pleasant day and remember cisco is very very sneakie. :) | |||
Revision as of 17:05, 27 April 2010
Frame Relay Multipoint Lab
Goals of this lab
- To create a network using Multipoint Frame Relay
- Achieve Frame Relay using the Adtran Atlas 550
- Configure OSPF for multipoint routing
Phase One
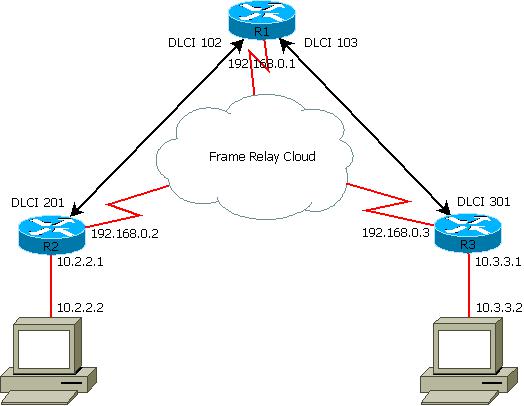
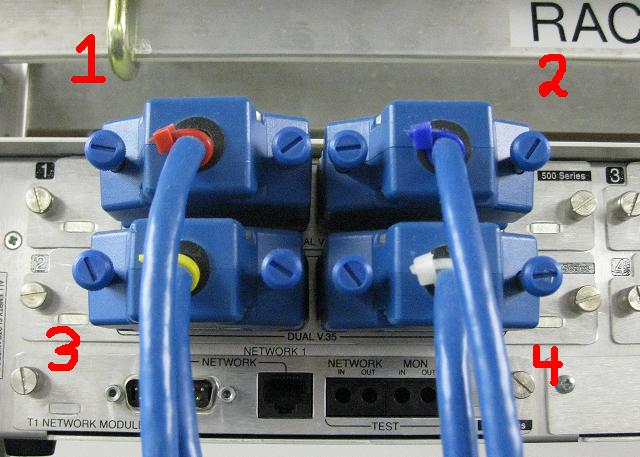
Connect the network according to the diagram. You will need to pay attention to which ports you use on the Adtran as this is be your DLCI numbers. For this lab we will be using Port 1 of the Adtran for R1, Port 2 for R2, and Port 3 for R3. Below is how you determine what is going on with the Adtran.
Phase Two
You will want to do the basics on Routers like:
- Hostname
- Address your Fast Ethernet ports so they can recieve some mail.
- No ip domain-lookup
- Some Banner action
- Password the crap out of your router so demons dont get you while you sleep at night!
Phase Three
This phase will be all about how to setup your frame relay on your routers. We will be starting on R1 so please be there. You will start off by going into global config mode.
- interface s0/0/0
- encapsulation frame-relay
- interface s0/0/0.1 multipoint
- ip address 192.168.0.1 255.255.255.0
- frame-relay interface-dlci 103
- exit (out of the dlci command interface thingy)
- frame-relay interface-dlci 102
- exit
- ip ospf network point-to-multipoint (So OSPF will work in this enviroment)
Now on R2 in global configuration mode
- interface serial0/0/0
- encapsulation frame-relay
- interface s0/0/0.1 point-to-point
- ip address 192.168.0.2 255.255.255.0
- frame-relay interface-dlci 201
- ip ospf network point-to-multipoint
Now on R3 in global configuration mode
- interface serial0/0/0
- encapsulation frame-relay
- interface s0/0/0.1 point-to-point
- ip address 192.168.0.3 255.255.255.0
- frame-relay interface-dlci 301
- ip ospf network point-to-multipoint
Your network should be able to ping each other at this point in time.
Phase Five
Time for some OSPF action. We already set up the OSPF point-to-multipoint in the sub-interfaces. Now you will set up OSPF the same way you always to do but now you will enter the following command.
- (R2 in ospf)neighbor 10.2.2.0 cost 100 (This is saying who your neighbors are)
- (R3 in ospf)neighbor 10.3.3.0 cost 100
Troubleshooting and Documentation
Your lab is now complete and you should be able to ping everything from everything. Your routing tables should have the 10.2.2.0 and 10.3.3.0 networks. Once you are done you may clean up and go have your self a very pleasant day and remember cisco is very very sneakie. :)


