Mail server mnjk: Difference between revisions
Jump to navigation
Jump to search
Power on you Virtual machine
Install Debian Linux
Complete the installation
Complete the installation
Install sudo from the command line using:
For security purposes it is usually the case that you do not want to log in as the root user. Instead, best practice is to log in as a standard user and then execute specific commands that require root access with administrative privileges through the sudo program. The sudo program is not installed by default so after you have logged in to the root account enter apt update and press enter which will update the list of software available for installation and then apt install sudo and press enter to install the sudo software.
Add sudo privileges to our standard user account.
Reboot system
Log in as your standard user account, determine system IP address.
Test sudo privileges
Exit from the local console
(Created page with "==Mail Server Documentation==") |
|||
| Line 1: | Line 1: | ||
==Mail Server Documentation== | ==Mail Server Documentation== | ||
<li>Power on you Virtual machine</li> | |||
: Click the down arrow button on the right side of the "Linux Server" tab at the top of your screen and choose "Power On", or press the blue "Power On" button in the middle of your screen, then press the green "Power On" button to boot your system. | |||
<li>Install Debian Linux</li> | |||
: Once the system has rebooted and is back to the "Debian GNU/Linux installer menu" choose "Install" and '''not''' "Graphical Install". If you make an incorrect choice you can reboot your virtual machine (power off and on) before installing to get back to the menu. | |||
: In the installer you will use the space bar to select and unselect "checkboxes", the tab key to move between fields and buttons, and the enter key to continue. You will be prompted for the following choices | |||
* Select ''English'' as the language, ''United States'' as your location, and ''American English'' as the keymap. | |||
* Set ''ens192'' as your primary network interface. | |||
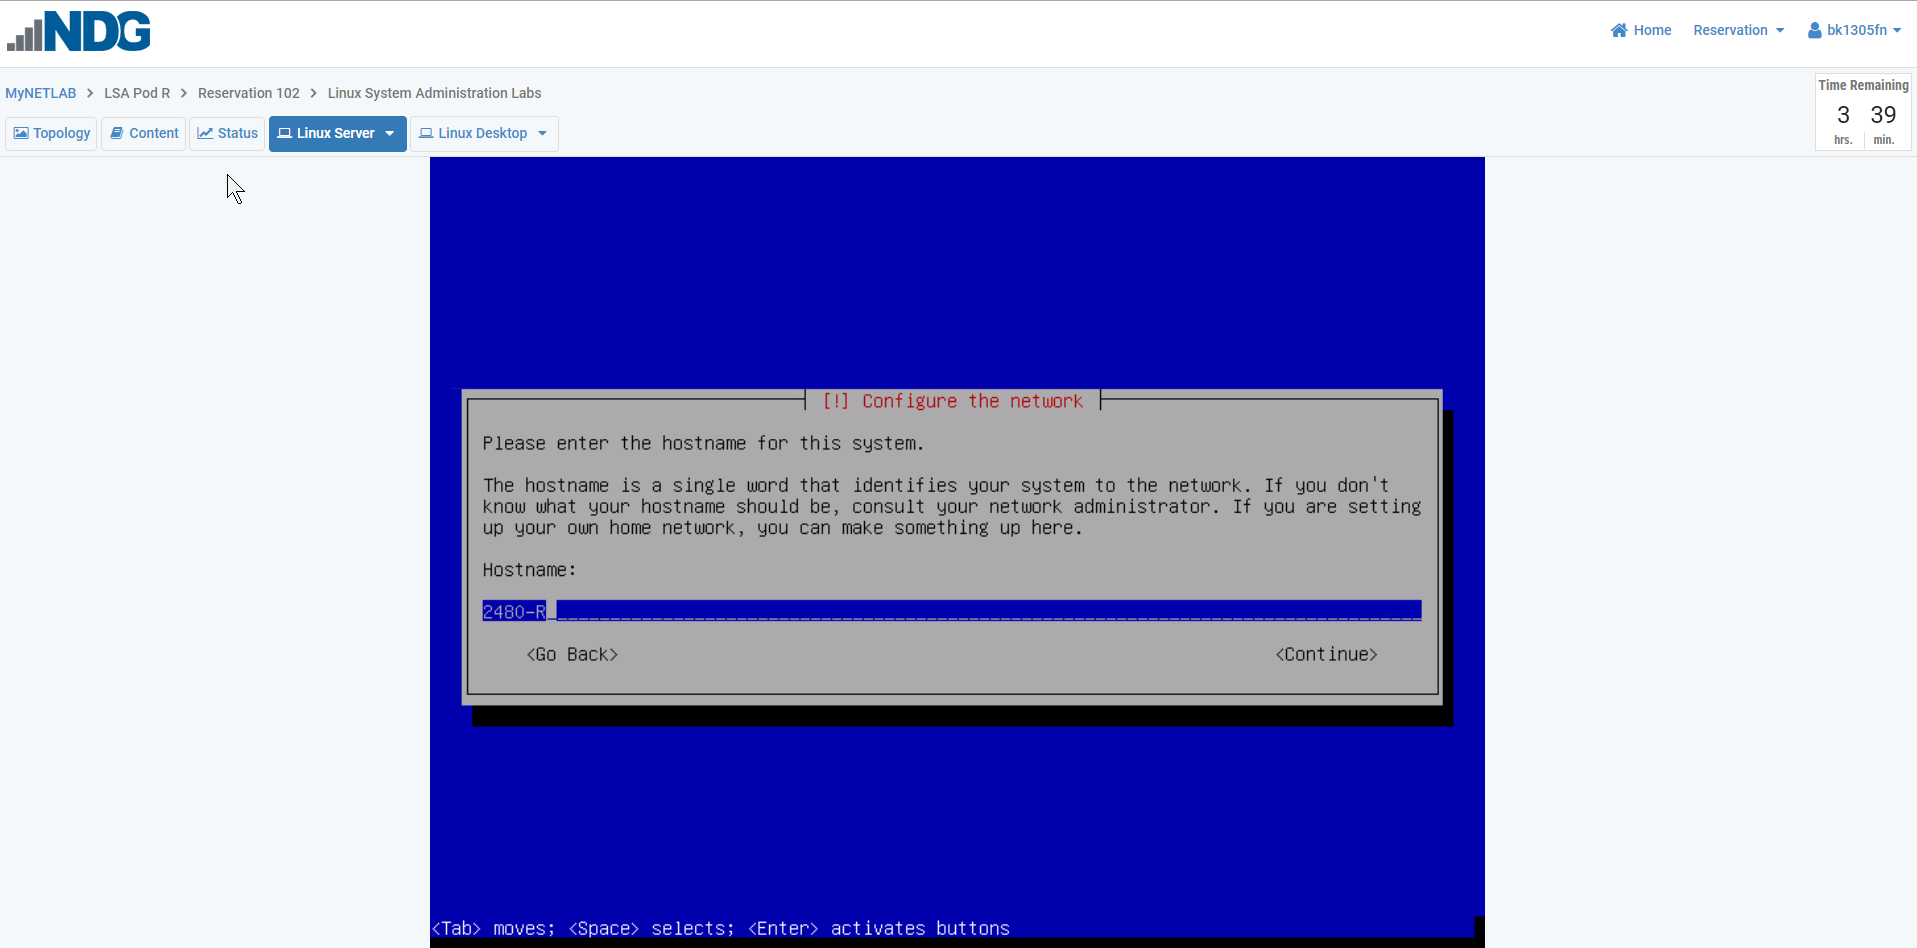
* Set a hostname for the system to 2480 followed by a dash and then your pod ID letter, like ''2480-Z'' for LSA Pod Z. If you have forgotten your pod ID letter look up at the top of your screen above the line with the "Topology" and "Linux Server" tabs and you should see a line with "LSA Pod" followed by a letter, that letter is your pod ID letter. | |||
:'' Note: These steps are critical to future success in labs, check your spelling carefully'' | |||
: [[File:Lab1_hostname.png|link=https://wiki.ihitc.net/mediawiki/images/5/57/Lab1_hostname.png|500px]] | |||
: [[Media:Lab1_hostname.png|Click here for a larger image]] | |||
* Set the domain name to ''itc2480.campus.ihitc.net'' | |||
: [[File:Lab1_domainname.png|link=https://wiki.ihitc.net/mediawiki/images/5/5a/Lab1_domainname.png|500px]] | |||
: [[Media:Lab1_domainname.png|Click here for a larger images]] | |||
* Set the root password to something you will NOT FORGET, this is the administrator account, ''cisco'' might be a good choice for our purposes though that would not be secure for a system directly accessible from the Internet (we are protected by a firewall which you are bypassing via the VPN connection) | |||
* Create a new user account by entering your name. The system will automatically use your first name (all lowercase) as the username and then you should set the password to another password you will not forget | |||
* Select your timezone | |||
* Choose "Guided - Use entire disk" as the partitioning method and select the ''sda'' drive and "All files in one partition" as the partitioning scheme, "Finish partitioning and write the changes to the disk", and then finally confirm you want to write the changes. | |||
* You do not want to scan any other CDs or DVDs at this time. | |||
* You want to select a mirror located close to you with good speed. Because your VM is actually running from the campus and is connected to the campus Internet connection a good option is "debian.uchicago.edu" with no http proxy. | |||
* Choose whether you want to participate in the package usage survey, for our purposes either choice is just fine. | |||
* On the software selection screen UNSELECT "Debian desktop environment" and "Print server" and make sure that "SSH server" and "Standard system utilities" are the only two selected options. | |||
:'' Note: To select and unselect options move your cursor over the option and press the space bar. | |||
* Choose that yes you want to install GRUB to the master boot record on the ''/dev/sda'' device. | |||
<li>Complete the installation</li> | |||
<li>Complete the installation</li> | |||
: When the installation is complete you can select continue to "eject" the virtual CD and reboot into the new install | |||
<li>Install '''sudo''' from the command line using: | |||
: ''Note: A good practice is to update your system before installing any packages, this should be completed using '''apt update''', ensure to use '''sudo''' when not logged in as root. | |||
: <code>apt update</code> | |||
: <code>apt install sudo</code></li> | |||
: For security purposes it is usually the case that you do not want to log in as the root user. Instead, best practice is to log in as a standard user and then execute specific commands that require root access with administrative privileges through the '''sudo''' program. The '''sudo''' program is not installed by default so after you have logged in to the root account enter '''apt update''' and press enter which will update the list of software available for installation and then '''apt install sudo''' and press enter to install the sudo software. | |||
<li>Add sudo privileges to our standard user account. | |||
<code>adduser <username> sudo</code></li> | |||
: We now need to add our standard user account to the group which is allowed to have administrative access to do this enter the command '''sudo adduser ''<username>'' sudo''' and press enter, replacing ''<username>'' with the name of your standard user account (set during the setup process, probably your first name in lowercase). We'll learn more about these commands later in the course. | |||
<li>Reboot system</li> | |||
<code>shutdown -r now</code> | |||
: Reboot your system using the '''shutdown -r now''' command to apply the changes | |||
<li>Log in as your standard user account, determine system IP address. | |||
: Once you are logged in use the following command at the command line to determine the IP address of your system | |||
<code>ip address show</code></li> | |||
: Using the '''ip address show''' command will allow you to check the IP address of your system. The IP address should be something like ''172.17.50.xxx'' and be an ''inet'' address on the ''ens192'' adapter. | |||
[[File:Lab1_ip_address_show2.PNG|500px]] | |||
<li>Test sudo privileges</li> | |||
: Try running the same command as the administrator by typing '''sudo ip address show''', you will need to enter in your password again when you run this command. | |||
<code>sudo ip address show</code> | |||
<li>Exit from the local console</li> | |||
: To log out of the console type '''exit''' and press enter. | |||
: Because your Debian Linux server is running as a virtual machine on a vmWare host system in order to achieve the best performance and driver integration we should install the vmWare Tools software package in your virtual machine. | |||
<ol> | |||
<li>Open a SSH session to your server</li> | |||
: Connect into your system using the remote SSH console method explained above. | |||
<li>Install '''open-vm-tools'''</li> | |||
: Run the '''sudo apt install open-vm-tools''' command to install the vmWare Tools. You will be prompted about several additional software packages required to be installed, type '''y''' and press enter to install the software. | |||
<code>sudo apt install open-vm-tools</code> | |||
:Nmap is a tool we will learn more about later in the course but it will likely be used to check many of the labs for completion while working through the course. This course's labwork often builds upon the work you have done in previous labs. The self-check scripts are to assist you in ensuring you have not missed any ''critical'' steps in your work that would affect your success in subsequent labs. | |||
:* ''NOTE: Before we begin the installation of this tool it is important to remember that scanning a system is often seen as an attack against the system and should not be done unless you are the administrator of both the system that you are scanning from and the system you are scanning or have the explicit permission of the system administrator of those systems! In some areas people have been legally charged and prosecuted for scanning of systems which they are not authorized to do. You have been warned! | |||
:*At this time all you will be doing is installing the tool as it will be used to self-check your lab work to verify you are ready to move on to the next lab. | |||
<ol> | |||
<li>Open a SSH session to your server</li> | |||
: Run the following command at the command line. | |||
<pre>sudo apt install nmap</pre> | |||
: Run the '''sudo apt install nmap''' command to install the nmap tool. You will be prompted about additional software packages required to be installed, type '''y''' and press enter to install the software. | |||
<li>Close the SSH session</li> | |||
: Type '''exit''' to close the connection while leaving your VM running. | |||
</ol> | |||
Revision as of 02:38, 14 February 2021
Mail Server Documentation
- Click the down arrow button on the right side of the "Linux Server" tab at the top of your screen and choose "Power On", or press the blue "Power On" button in the middle of your screen, then press the green "Power On" button to boot your system.
- Once the system has rebooted and is back to the "Debian GNU/Linux installer menu" choose "Install" and not "Graphical Install". If you make an incorrect choice you can reboot your virtual machine (power off and on) before installing to get back to the menu.
- In the installer you will use the space bar to select and unselect "checkboxes", the tab key to move between fields and buttons, and the enter key to continue. You will be prompted for the following choices
- Select English as the language, United States as your location, and American English as the keymap.
- Set ens192 as your primary network interface.
- Set a hostname for the system to 2480 followed by a dash and then your pod ID letter, like 2480-Z for LSA Pod Z. If you have forgotten your pod ID letter look up at the top of your screen above the line with the "Topology" and "Linux Server" tabs and you should see a line with "LSA Pod" followed by a letter, that letter is your pod ID letter.
- Note: These steps are critical to future success in labs, check your spelling carefully

- Click here for a larger image
- Set the domain name to itc2480.campus.ihitc.net

- Set the root password to something you will NOT FORGET, this is the administrator account, cisco might be a good choice for our purposes though that would not be secure for a system directly accessible from the Internet (we are protected by a firewall which you are bypassing via the VPN connection)
- Create a new user account by entering your name. The system will automatically use your first name (all lowercase) as the username and then you should set the password to another password you will not forget
- Select your timezone
- Choose "Guided - Use entire disk" as the partitioning method and select the sda drive and "All files in one partition" as the partitioning scheme, "Finish partitioning and write the changes to the disk", and then finally confirm you want to write the changes.
- You do not want to scan any other CDs or DVDs at this time.
- You want to select a mirror located close to you with good speed. Because your VM is actually running from the campus and is connected to the campus Internet connection a good option is "debian.uchicago.edu" with no http proxy.
- Choose whether you want to participate in the package usage survey, for our purposes either choice is just fine.
- On the software selection screen UNSELECT "Debian desktop environment" and "Print server" and make sure that "SSH server" and "Standard system utilities" are the only two selected options.
- Note: To select and unselect options move your cursor over the option and press the space bar.
- Choose that yes you want to install GRUB to the master boot record on the /dev/sda device.
- When the installation is complete you can select continue to "eject" the virtual CD and reboot into the new install
- Note: A good practice is to update your system before installing any packages, this should be completed using apt update, ensure to use sudo when not logged in as root.
apt updateapt install sudo
adduser <username> sudo- We now need to add our standard user account to the group which is allowed to have administrative access to do this enter the command sudo adduser <username> sudo and press enter, replacing <username> with the name of your standard user account (set during the setup process, probably your first name in lowercase). We'll learn more about these commands later in the course.
shutdown -r now
- Reboot your system using the shutdown -r now command to apply the changes
- Once you are logged in use the following command at the command line to determine the IP address of your system
ip address show- Using the ip address show command will allow you to check the IP address of your system. The IP address should be something like 172.17.50.xxx and be an inet address on the ens192 adapter.

- Try running the same command as the administrator by typing sudo ip address show, you will need to enter in your password again when you run this command.
sudo ip address show
- To log out of the console type exit and press enter.
- Because your Debian Linux server is running as a virtual machine on a vmWare host system in order to achieve the best performance and driver integration we should install the vmWare Tools software package in your virtual machine.
- Open a SSH session to your server
- Connect into your system using the remote SSH console method explained above.
- Install open-vm-tools
- Run the sudo apt install open-vm-tools command to install the vmWare Tools. You will be prompted about several additional software packages required to be installed, type y and press enter to install the software.
- Nmap is a tool we will learn more about later in the course but it will likely be used to check many of the labs for completion while working through the course. This course's labwork often builds upon the work you have done in previous labs. The self-check scripts are to assist you in ensuring you have not missed any critical steps in your work that would affect your success in subsequent labs.
- NOTE: Before we begin the installation of this tool it is important to remember that scanning a system is often seen as an attack against the system and should not be done unless you are the administrator of both the system that you are scanning from and the system you are scanning or have the explicit permission of the system administrator of those systems! In some areas people have been legally charged and prosecuted for scanning of systems which they are not authorized to do. You have been warned!
- At this time all you will be doing is installing the tool as it will be used to self-check your lab work to verify you are ready to move on to the next lab.
- Open a SSH session to your server
- Run the following command at the command line.
- Run the sudo apt install nmap command to install the nmap tool. You will be prompted about additional software packages required to be installed, type y and press enter to install the software.
- Close the SSH session
- Type exit to close the connection while leaving your VM running.
sudo apt install open-vm-tools
sudo apt install nmap