Franske ITC-2480 Lab 3: Difference between revisions
BenFranske (talk | contribs) |
BenFranske (talk | contribs) (Update to mjnk version) |
||
| Line 1: | Line 1: | ||
=Introduction= | =Introduction= | ||
This lab assumes that you know the IP address of your Linux system and are connected to the ITCnet VPN network. If you need help with these steps please see [[ITC_VPN_Instructions | the VPN instructions]] and [[Franske_ITC-2480_Lab_1#Installing_sudo_and_checking_your_IP_address | Lab 1]]. | |||
=Lab Procedure= | In this lab you will perform the following tasks: | ||
*Create a new user account | |||
*Change the ownership and permissions on files and directories | |||
*Install the '''[https://www.webmin.com/ Webmin]''' package. | |||
You will be introduced to the following commands: | |||
*'''[https://www.commandlinux.com/man-page/man8/addgroup.8.html addgroup]''' | |||
*'''[https://linux.die.net/man/1/cat cat]''' | |||
*'''[https://linux.die.net/man/1/more more]''' | |||
*'''[https://linux.die.net/man/1/touch touch]''' | |||
*'''[https://linux.die.net/man/1/chown chown]''' | |||
*'''[https://linux.die.net/man/1/chgrp chgrp]''' | |||
*'''[https://linux.die.net/man/1/dpkg dpkg]''' | |||
= Lab Procedure = | |||
== Prerequisites == | == Prerequisites == | ||
<ol> | |||
<li> Make sure you have an active connection to the ITCnet either by VPN or by directly connectiong to an ITCnet switch on campus</li> | |||
<li> Open an SSH console to your Linux system using the PuTTY software, login with your standard user account</li> | |||
</ol> | |||
== Creating Users and Groups == | |||
'''''[https://www.youtube.com/watch?v=q_tYhIVlhCU&feature=youtu.be Video Tutorial - Creating Users and Groups]''''' <br> | |||
<ol> | |||
<li> Create a new user account '''jsmith''' using the '''adduser''' program</li> | |||
<code> adduser jsmith </code> | |||
<li> Create a new group '''redteam''' using the '''addgroup''' program</li> | |||
<code> addgroup redteam </code> | |||
<li> Add the '''jsmith''' account as well as your own user account to the '''redteam''' group</li> | |||
<li> Close your SSH session and open two new SSH sessions</li> | |||
: ''NOTE: In order for your user accounts to receive their new group permissions they need to be logged out and logged back in.'' | |||
<li> Login as your regular user on one and '''jsmith''' on the other</li> | |||
<li> View a list of all the user accounts on your system by looking at the '''/etc/passwd'''. To output the contents of the '''/etc/passwd''' file you can use the following command:</li> | |||
<code>cat /etc/passwd</code> | |||
: The /etc/passwd file is a plain text file on your system. | |||
<li> View a list of the password data on your system by viewing the '''/etc/shadow''' file</li> | |||
<li> View a list of groups and group members on your system in the '''/etc/group''' file | |||
: ''NOTE: The group list may be longer than one full screen of text (the same is true of the '''/etc/passwd''' or '''/etc/shadow''' file depending on your screen resolution.'' | |||
* To output the contents of the file while pausing after each page of output use the following command: | |||
: <code>more /etc/group</code> | |||
* To output the contents of the file while pausing after each page of output and being able to scroll up and down through the output use the following command: | |||
: <code>less /etc/group</code> | |||
* Press '''q''' to return to the command line | |||
* It may be helpful to try these commands to display an even longer text file like one of the Shakespeare texts you downloaded in an earlier lab in the '''~/sample-files''' directory. You may have to un-tar the files again first.</li> | |||
</ol> | |||
</ol> | |||
== Practice Filesystem Permissions and Ownership == | |||
'''''[https://www.youtube.com/watch?v=5-6dRHTbJfM&feature=youtu.be Video Tutorial - Practice Filesystem Permissions and Ownership]''''' <br> | |||
''NOTE: Working with file and directory ownership and permissions is tricky and there are many, many possible combinations of users, groups, and permissions which can be assigned to both files and folders. The goal of this section of the lab is to familiarize you with how to use the commands for changing ownership and permissions, not to teach you how to read or understand Linux file permissions (see your readings for this, it is important!) Once you understand how to use the commands you should experiment with setting different owners and permissions on a several different files and folders and subfolders until you have a good understanding of how permissions work. The only way to understand these relationships well is to read about it and then try it out. You should be able to set all of these permissions just as regular users (assuming you have access to both of the user accounts) '''you should not need sudo access to change the permissions because one of the the two users owns all the files and directories we're working in. You will need sudo access to change the owner of the files because otherwise it would be possible to accidentally lock yourself out of a file.''''' | |||
''ADDITIONALLY: This table may be helpful:'' | |||
: {| class="wikitable" | |||
|+Linux Permissions | |||
!|Octal | |||
!|Binary | |||
!|File Mode | |||
|- | |||
| 0 | |||
| 000 | |||
| --- | |||
|- | |||
| 1 | |||
| 001 | |||
| --x | |||
|- | |||
| 2 | |||
| 010 | |||
| -w- | |||
|- | |||
| 3 | |||
| 011 | |||
| -wx | |||
|- | |||
| 4 | |||
| 100 | |||
| r-- | |||
|- | |||
| 5 | |||
| 101 | |||
| r-x | |||
|- | |||
| 6 | |||
| 110 | |||
| rw- | |||
|- | |||
| 7 | |||
| 111 | |||
| rwx | |||
|} | |||
''This '''[http://permissions-calculator.org/ permissions calculator]''' may also be helpful.'' | |||
<ol> | |||
<li> Change to the '''/home''' directory.</li> | |||
<li> Check the ownership and permissions on the subdirectories inside of '''/home'''</li> | |||
<li> Try to create new files using the '''touch''' command called '''foo''' and '''foo2''' in the '''/home/jsmith''' directory. | |||
*Try as both your regular user and as '''jsmith''' respectively | |||
: <code>touch foo</code> | |||
: <code>touch foo2</code></li> | |||
<li> Try removing the '''foo''' and/or '''foo2''' files using both your regular user account and '''jsmith'''</li> | |||
<li> Use the '''jsmith''' user to create a new directory '''/home/jsmith/redteam/'''</li> | |||
<li> Use the '''jsmith''' user to create some files: '''/home/jsmith/redteam/theplan''' and '''/home/jsmith/redteam/yours''' '''/home/jsmith/redteam/mine''' and '''/home/jsmith/ours'''</li> | |||
<li> In order to find out more about the '''chown''' and '''chgrp''' programs which you'll use to change the owners and groups for files and directories use the following commands to view the built in manual pages: | |||
: <code>man chown</code> | |||
: <code>man chgrp</code> | |||
: ''NOTE: Almost every command line tool in Linux has a manual page you can view in this way, try accessing a few other man pages for some of the other tools we've been using. You can scroll through the manual pages using the arrow keys and page up/down. To return to the command line press the q key.''</li> | |||
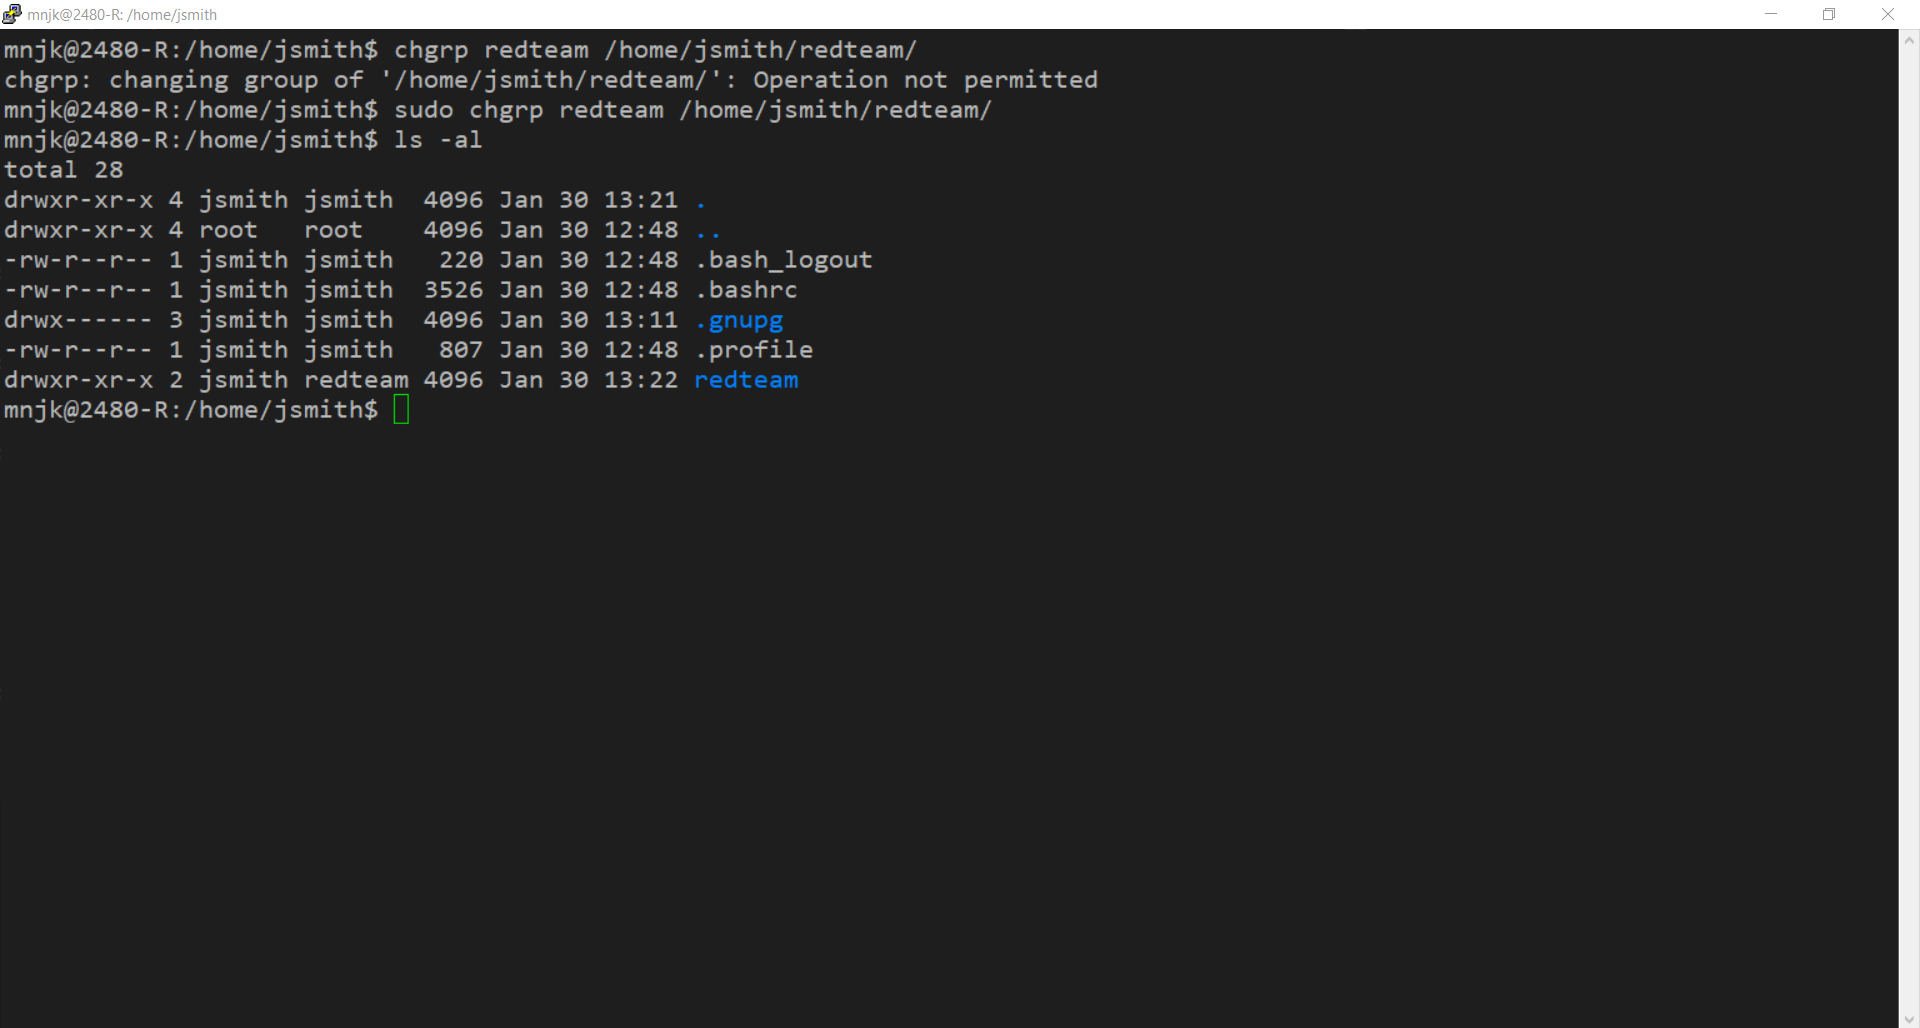
<li> Change the permissions on the '''/home/jsmith/redteam/''' directory so that the group '''redteam''' is the group owner of the directory</li> | |||
: [[File:Change-ownership-directory.png | link=https://wiki.ihitc.net/mediawiki/images/6/61/Change-ownership-directory.png | 500px]] | |||
: [[media:Change-ownership-directory.png | Click for Larger Image]] | |||
<li> Add write permission for the group to the '''/home/jsmith/redteam/''' directory</li> | |||
<li> Change the ownership of the '''yours''' file so that it is owned by your regular user account instead of '''jsmith'''</li> | |||
<li> Change the group owner of the '''ours''' file so that it is controlled by the '''redteam''' group</li> | |||
<li> Experiment with creating and removing files and subdirectories inside of the '''/home/jsmith/redteam/''' directory as well as listing the contents of directories with various permissions applied to them until you have a good understanding of how permissions work.</li> | |||
</ol> | |||
== | == Install the Webmin Control Panel == | ||
'''''[https://www.youtube.com/watch?v=tfthl4jH-jg&feature=youtu.be Video Tutorial - Install the Webmin Control Panel]''''' <br> | |||
<ol> | |||
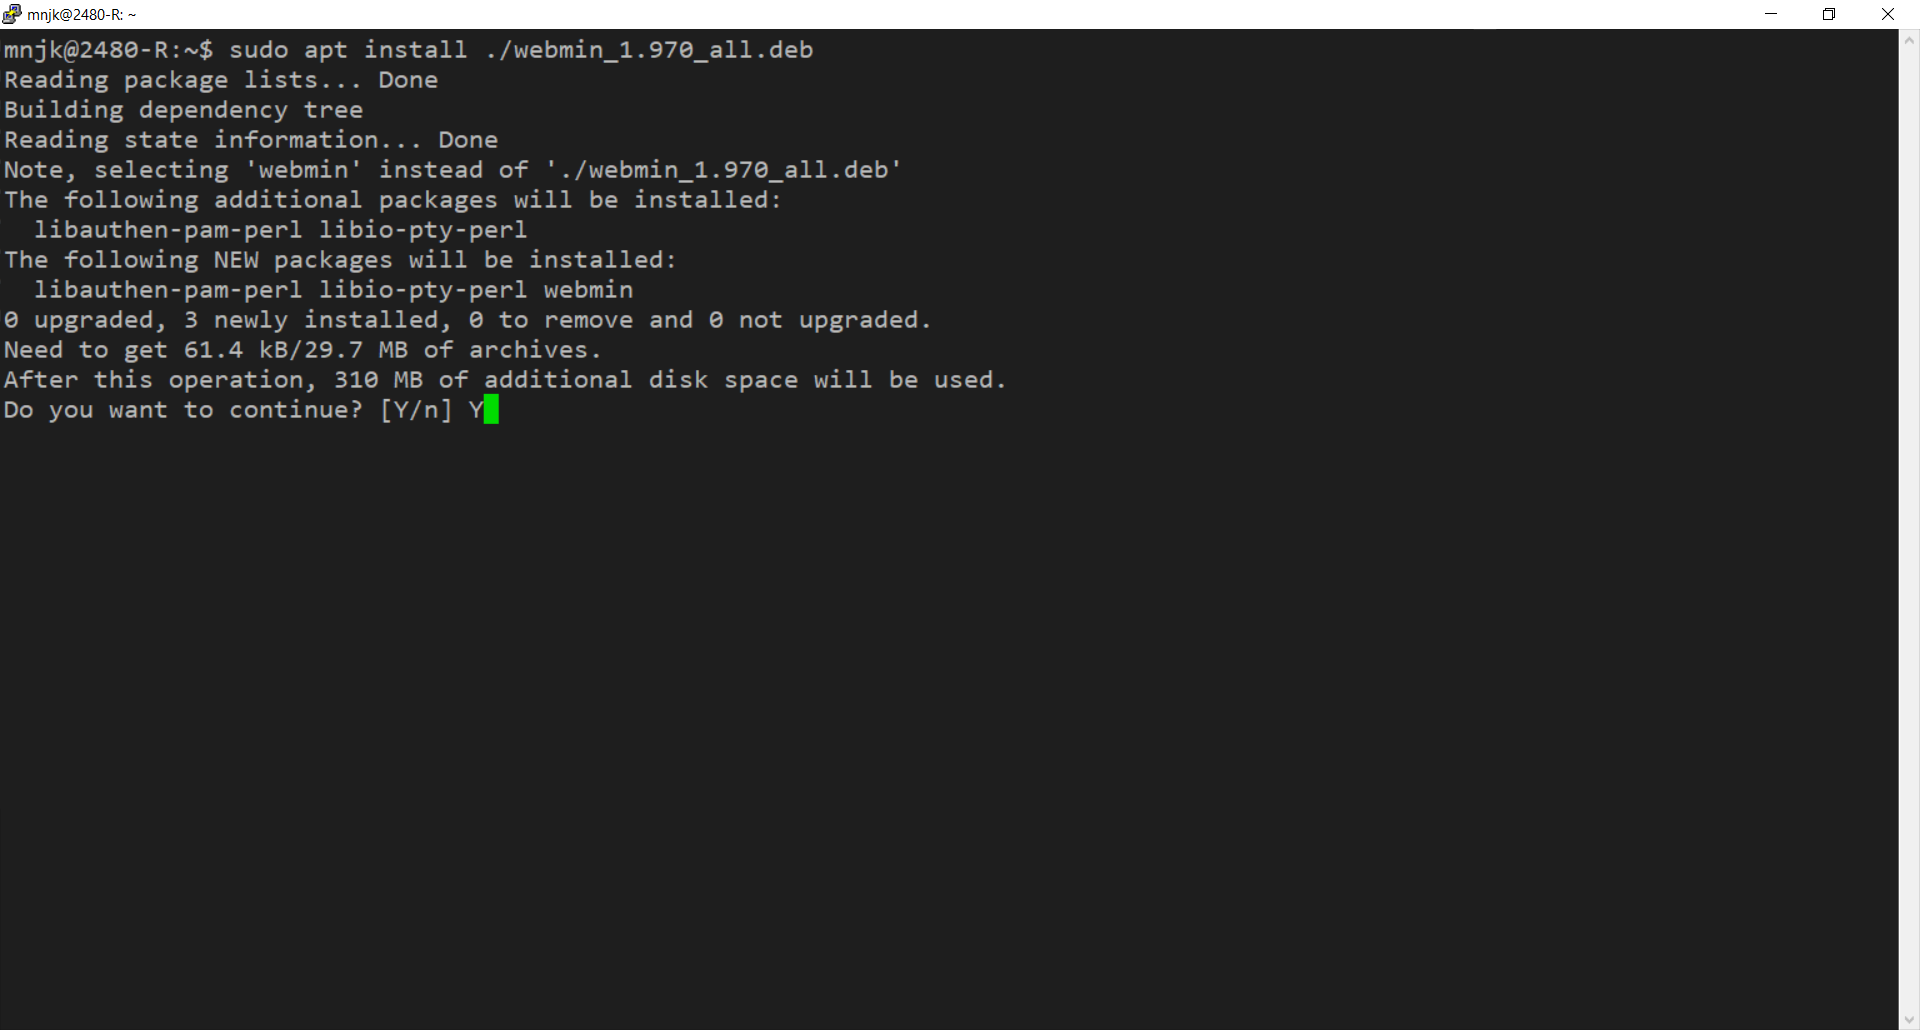
<li> Use the '''links''' browser to download the '''DEB''' package file from '''[https://www.webmin.com www.webmin.com]'''</li> | |||
: ''NOTE: Because this DEB file was downloaded directly instead of automatically by APT from a package repository the installation command is slightly different and some other commands such as '''apt show''' will not work.'' | |||
<li>Install the package with '''apt install''' | |||
<code>apt install ./<filename.deb></code> | |||
: Don't forget that installation of software must be done with system administrator permissions.''</li> | |||
:[[File:Apt-install-webmin.png | link= https://wiki.ihitc.net/mediawiki/images/f/f8/Apt-install-webmin.png | 500px]] | |||
:[[Media:Apt-install-webmin.png | Click for Larger Image]] | |||
: ''NOTE: You can get similar information to what you can get with '''apt show''' from a '''DEB''' package file using the following command:'' | |||
: <code>dpkg -I <filename></code> | |||
<li> Notice the additional packages which are required by Webmin (dependencies) which will be downloaded and installed by '''apt''' from a repository in order to complete the installation.</li> | |||
<li> Open a web browser on your host system and visit https://xxx.xxx.xxx.xxx:10000 where your IP replaces xxx.xxx.xxx.xxx</li> | |||
<li> Login using your Debian username and password </li> | |||
<li> Explore the Webmin interface | |||
:[[file:Webmin-dashboard.png | link= https://wiki.ihitc.net/mediawiki/images/0/0f/Webmin-dashboard.png | 500px]] | |||
:[[media:Webmin-dashboard.png | Click for Larger Image]]</li> | |||
</ol> | |||
== | = Checking Your Work = | ||
<ol> | |||
<li> Run the following command: | |||
<br> | |||
<code> ls -al /home/jsmith/redteam </code> | |||
* Verify the following directories are present: | |||
*: '''/theplan''' | |||
*: '''/yours''' | |||
*: '''/mine''' | |||
*: '''/ours'''</li> | |||
* Verify the '''redteam''' group owns the '''/ours''' directory. | |||
<li>Run the following command: | |||
<br> | |||
<code> ls -al /home/jsmith </code> | |||
* Verify the '''redteam''' group owns and has write permissions of the '''/redteam''' directory.</li> | |||
<br><br> | |||
<li> Automatically check your results by running this command:</li> | |||
<code><nowiki> | |||
curl https://raw.githubusercontent.com/mnjk-inver/Linux-2480-Rebuild/main/lab_03_test.py | python3 | |||
</nowiki></code></ol> | |||
<br><br> | |||
=Web App= | |||
You can check your progress on any of the labs in the ITC-2480 course from a webapp from this link: <br> | |||
[http://webcheck.itc2480.campus.ihitc.net webcheck.itc2480.campus.ihitc.net]<br> | |||
You must be logged into the campus VPN to use this application. | |||
Revision as of 02:49, 25 August 2021
Introduction
This lab assumes that you know the IP address of your Linux system and are connected to the ITCnet VPN network. If you need help with these steps please see the VPN instructions and Lab 1.
In this lab you will perform the following tasks:
- Create a new user account
- Change the ownership and permissions on files and directories
- Install the Webmin package.
You will be introduced to the following commands:
Lab Procedure
Prerequisites
- Make sure you have an active connection to the ITCnet either by VPN or by directly connectiong to an ITCnet switch on campus
- Open an SSH console to your Linux system using the PuTTY software, login with your standard user account
Creating Users and Groups
Video Tutorial - Creating Users and Groups
- Create a new user account jsmith using the adduser program
- Create a new group redteam using the addgroup program
- Add the jsmith account as well as your own user account to the redteam group
- Close your SSH session and open two new SSH sessions
- NOTE: In order for your user accounts to receive their new group permissions they need to be logged out and logged back in.
- Login as your regular user on one and jsmith on the other
- View a list of all the user accounts on your system by looking at the /etc/passwd. To output the contents of the /etc/passwd file you can use the following command:
- The /etc/passwd file is a plain text file on your system.
- View a list of the password data on your system by viewing the /etc/shadow file
- View a list of groups and group members on your system in the /etc/group file
- NOTE: The group list may be longer than one full screen of text (the same is true of the /etc/passwd or /etc/shadow file depending on your screen resolution.
- To output the contents of the file while pausing after each page of output use the following command:
more /etc/group
- To output the contents of the file while pausing after each page of output and being able to scroll up and down through the output use the following command:
less /etc/group
- Press q to return to the command line
- It may be helpful to try these commands to display an even longer text file like one of the Shakespeare texts you downloaded in an earlier lab in the ~/sample-files directory. You may have to un-tar the files again first.
adduser jsmith
addgroup redteam
cat /etc/passwd
Practice Filesystem Permissions and Ownership
Video Tutorial - Practice Filesystem Permissions and Ownership
NOTE: Working with file and directory ownership and permissions is tricky and there are many, many possible combinations of users, groups, and permissions which can be assigned to both files and folders. The goal of this section of the lab is to familiarize you with how to use the commands for changing ownership and permissions, not to teach you how to read or understand Linux file permissions (see your readings for this, it is important!) Once you understand how to use the commands you should experiment with setting different owners and permissions on a several different files and folders and subfolders until you have a good understanding of how permissions work. The only way to understand these relationships well is to read about it and then try it out. You should be able to set all of these permissions just as regular users (assuming you have access to both of the user accounts) you should not need sudo access to change the permissions because one of the the two users owns all the files and directories we're working in. You will need sudo access to change the owner of the files because otherwise it would be possible to accidentally lock yourself out of a file.
ADDITIONALLY: This table may be helpful:
Linux Permissions Octal Binary File Mode 0 000 --- 1 001 --x 2 010 -w- 3 011 -wx 4 100 r-- 5 101 r-x 6 110 rw- 7 111 rwx
This permissions calculator may also be helpful.
- Change to the /home directory.
- Check the ownership and permissions on the subdirectories inside of /home
- Try to create new files using the touch command called foo and foo2 in the /home/jsmith directory.
- Try as both your regular user and as jsmith respectively
touch footouch foo2
- Try removing the foo and/or foo2 files using both your regular user account and jsmith
- Use the jsmith user to create a new directory /home/jsmith/redteam/
- Use the jsmith user to create some files: /home/jsmith/redteam/theplan and /home/jsmith/redteam/yours /home/jsmith/redteam/mine and /home/jsmith/ours
- In order to find out more about the chown and chgrp programs which you'll use to change the owners and groups for files and directories use the following commands to view the built in manual pages:
man chownman chgrp- NOTE: Almost every command line tool in Linux has a manual page you can view in this way, try accessing a few other man pages for some of the other tools we've been using. You can scroll through the manual pages using the arrow keys and page up/down. To return to the command line press the q key.
- Change the permissions on the /home/jsmith/redteam/ directory so that the group redteam is the group owner of the directory
- Add write permission for the group to the /home/jsmith/redteam/ directory
- Change the ownership of the yours file so that it is owned by your regular user account instead of jsmith
- Change the group owner of the ours file so that it is controlled by the redteam group
- Experiment with creating and removing files and subdirectories inside of the /home/jsmith/redteam/ directory as well as listing the contents of directories with various permissions applied to them until you have a good understanding of how permissions work.
Install the Webmin Control Panel
Video Tutorial - Install the Webmin Control Panel
- Use the links browser to download the DEB package file from www.webmin.com
- NOTE: Because this DEB file was downloaded directly instead of automatically by APT from a package repository the installation command is slightly different and some other commands such as apt show will not work.
- Install the package with apt install
apt install ./<filename.deb>- Don't forget that installation of software must be done with system administrator permissions.

- Click for Larger Image
- NOTE: You can get similar information to what you can get with apt show from a DEB package file using the following command:
dpkg -I <filename>- Notice the additional packages which are required by Webmin (dependencies) which will be downloaded and installed by apt from a repository in order to complete the installation.
- Open a web browser on your host system and visit https://xxx.xxx.xxx.xxx:10000 where your IP replaces xxx.xxx.xxx.xxx
- Login using your Debian username and password
- Explore the Webmin interface

Checking Your Work
- Run the following command:
ls -al /home/jsmith/redteam- Verify the following directories are present:
- /theplan
- /yours
- /mine
- /ours
- Verify the redteam group owns the /ours directory.
- Verify the following directories are present:
- Run the following command:
ls -al /home/jsmith- Verify the redteam group owns and has write permissions of the /redteam directory.
- Automatically check your results by running this command:
curl https://raw.githubusercontent.com/mnjk-inver/Linux-2480-Rebuild/main/lab_03_test.py | python3
Web App
You can check your progress on any of the labs in the ITC-2480 course from a webapp from this link:
webcheck.itc2480.campus.ihitc.net
You must be logged into the campus VPN to use this application.