Franske ITC-2480 Lab 10: Difference between revisions
BenFranske (talk | contribs) |
BenFranske (talk | contribs) |
||
| (19 intermediate revisions by the same user not shown) | |||
| Line 1: | Line 1: | ||
=Introduction= | =Introduction= | ||
This lab assumes you have successfully set up [[Lab_8_mnjk#Install_BIND_.26_Enable_Caching | DNS]] and [[Lab_9_mnjk#Install_the_Postfix_MTA |email]]. If you had any issues with those labs, you should resolve them before attempting this lab, since you will be unable to properly test the tasks in this lab if those are not fully functional. | |||
In this lab you will perform the following tasks: | |||
*Configuring a [https://firewalld.org/ Firewall] | |||
*Enabling a 2nd interface | |||
*Configuring [https://en.wikipedia.org/wiki/Network_address_translation NAT] | |||
*Setting up [https://en.wikipedia.org/wiki/Dynamic_Host_Configuration_Protocol DHCP] | |||
*Installing [https://linuxmint.com/ Linux Mint] on a second VM | |||
*Enabling [https://en.wikipedia.org/wiki/Port_forwarding Port Forwarding] | |||
You will be introduced to the following commands: | |||
*'''[https://firewalld.org/documentation/man-pages/firewall-cmd.html firewall-cmd]''' | |||
*'''[https://linux.die.net/man/1/echo echo]''' | |||
*'''[https://linux.die.net/man/8/ifconfig ifconfig]''' | |||
NOTE: This lab does NOT have embedded videos. | |||
=Lab Procedure= | =Lab Procedure= | ||
== Prerequisites == | == Prerequisites == | ||
# Open an SSH console to your Linux system using the PuTTY software | # Open an SSH console to your Linux system using the PuTTY software. | ||
# Login with your standard user account. | |||
# Have a browser window set to the webmin interface for your linux VM. | # Have a browser window set to the webmin interface for your linux VM. | ||
== Configure a Firewall == | |||
''NOTE: It is suggested that instead of managing a firewall directly using nftables tools (which would also require us to create a script to reload our rules each time the system is restarted) we use a firewall daemon program to manage it based on a set of rules we create and automatically setup the firewall based on those rules each time the system boots. There are many command line firewall management programs out there but for this lab we will use the [https://firewalld.org/ firewalld] package suggested by Debian. '' | |||
<ol> | |||
<li>Begin by installing the ''firewalld'' package on your system.</li> | |||
<li>First, let's check to see if the firewall is now up and running using the following command:</li> | |||
<code>firewall-cmd --state</code> | |||
* '''NOTE:''' There is a bug in iptables/nftables 1.8.2 which ships with Debian Buster which causes it to not work correctly with firewalld. If you have issues with firewalld having a state of failed this is likely the issue. Follow the instructions to add [https://backports.debian.org/Instructions/ Debain buster-backports] to your apt sources.list file. After running an apt update you should be able to (re)install iptables/buster-backports which will upgrade your system to newer versions which are compatible with firewalld. | |||
: The firewall has been pre-configured with a couple of rules in it to prevent us from getting locked out. | |||
: [[File:Lab10_firewalld_state.png | link=https://wiki.ihitc.net/mediawiki/images/1/11/Lab10_firewalld_state.png|500px]] | |||
: [[Media:Lab10_firewalld_state.png | Click for larger image]] | |||
<li>Let's see what those rules are by using this command: </li> | |||
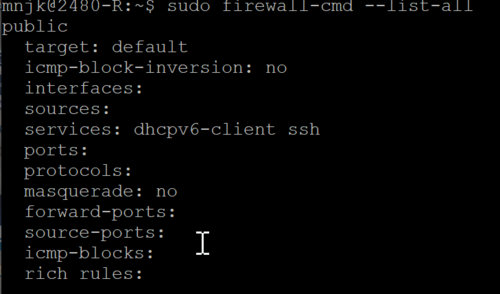
<code>firewall-cmd --list-all</code> | |||
: [[File:Lab10_firewalld_initial_rules.png | link=https://wiki.ihitc.net/mediawiki/images/1/14/Lab10_firewalld_initial_rules.png|500px]] | |||
: [[Media:Lab10_firewalld_initial_rules.png | Click for larger image]] | |||
: By default all interfaces are in the public zone (this is set in the ''/etc/firewalld/firewalld.conf'' file). | |||
: Before we start working on rules for our firewall we should assign our outside interface to the external zone which is designed for NAT routing which we'll be setting up shortly. | |||
<li> We can do this with the command:</li> | |||
<code>firewall-cmd --zone=external --add-interface=ens192</code> | |||
: We can create custom zones or use pre-defined security zones which will speed up configuring the firewall. Learn more about the [https://firewalld.org/documentation/zone/predefined-zones.html pre-defined zones in firewalld documentation]. | |||
<li>Since we have changed zones on our interface let's check and see what rules we have started with. Let's see what those rules are:</li> | |||
<code>firewall-cmd --zone=external --list-all</code> | |||
: ''NOTE: You can also use the '''firewall-cmd --list-all-zones''' command to see a list of all available zones and their rules.</li>'' | |||
: If you were watching carefully you may have noted that the dhcpv6-client service which was allowed in the public zone but is not allowed by default on the external zone. | |||
<li>In our case we want to allow DHCPv6 to operate on our outside interface so we can re-enable it with the following command: </li> | |||
<code> firewall-cmd --zone=external --add-service="dhcpv6-client"</code> | |||
<li>Check to see what other services can be allowed on an interface with:</li> | |||
<code>firewall-cmd --get-services</code> | |||
: If you check you will see that although you can connect with ssh (by default it's on the allowed service list you saw above) you can't connect to your webserver or Webmin anymore. Webmin is not a pre-defined service in the list we saw above so we could either set it up as a new service and then allow it or we could create a manual rule to allow the TCP traffic on port 10000 needed to access Webmin. In this case because the service only uses a single port and to see how manual rules can be created let's manually create a rule to allow access to TCP port 10000. | |||
<li>Do this by running this command: </li> | |||
<code>firewall-cmd --zone=external --add-port=10000/tcp </code> | |||
:You should now be able to access Webmin again. | |||
<li> Using either service rules or manual port rules create additional rules so that the other services on your VM are again accessible from the outside (such as from your home PC over the VPN). </li> | |||
:''HINT: Services we have setup so far include SSH, DNS, SMTP, IMAP, Samba, and HTTP.'' | |||
: Make sure to test and ensure they are all working again! | |||
<li> Once you are satisfied your firewall is running correctly you can use the following command to set these rules to automatically load each time the system is started.</li> | |||
<code> firewall-cmd --runtime-to-permanent </code> | |||
</ol> | |||
== Setup a 2nd NIC Interface == | == Setup a 2nd NIC Interface == | ||
To start this lab we will need to configure a second network interface, named ens224 on our virtual machines. In our simulated setup our existing ens192 interface will be our WAN interface and ens224 will be our LAN interface which could be connected to a switch and then to multiple allow other computers which will connect to the Internet through our server. | |||
<ol> | <ol> | ||
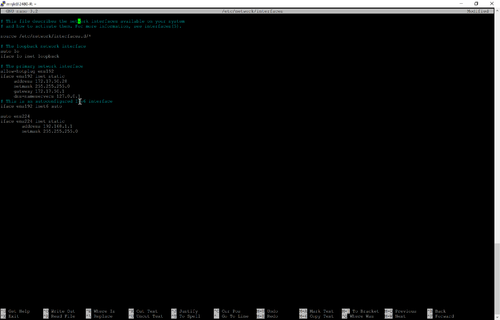
<li> Open ''/etc/network/interfaces'' with your favorite text editor. </li> | |||
<li> Open ''/etc/network/interfaces'' with your favorite text editor. Go to the bottom of the file | * Go to the bottom of the file. | ||
: [[File:Lab10_network_interfaces_before.png | link=https://wiki.ihitc.net/mediawiki/images/f/f8/Lab10_network_interfaces_before.png|500px]] | |||
: [[Media:Lab10_network_interfaces_before.png | Click for larger image]] | |||
* Add the following to configure the second interface with a static IP of 192.168.1.1/24: | |||
<pre>auto ens224 | <pre>auto ens224 | ||
iface ens224 inet static | iface ens224 inet static | ||
address 192.168.1.1 | address 192.168.1.1 | ||
netmask 255.255.255.0</pre></li> | netmask 255.255.255.0</pre></li> | ||
<li>Once this is done, save the file | : [[File:Lab10_network_interfaces_after.png | link=https://wiki.ihitc.net/mediawiki/images/8/80/Lab10_network_interfaces_after.png|500px]] | ||
: [[Media:Lab10_network_interfaces_after.png | Click for larger image]] | |||
: ''NOTE: As this is a LAN only interface, we do not need to define a gateway for the server VM, as the server VM itself will be the gateway for this network.'' | |||
<li>Once this is done, save the file | |||
<li> Run the following command to enable the new interface.</li> | |||
<code>ifup ens224</code> | |||
<li>Verify the second interface is up and running with the correct IP address</li> | <li>Verify the second interface is up and running with the correct IP address</li> | ||
</ol> | </ol> | ||
== Enable Routing | |||
== Enable Routing == | |||
Now we will need to enable NAT so we can route LAN traffic to the Internet and responding Internet traffic back to our LAN interface. | |||
<ol> | <ol> | ||
<li>In your console, you will need to edit ''/etc/sysctl.conf''. This file is used to change and tweak multiple system variables. </li> | |||
<li>In your console, you will need to edit ''/etc/sysctl.conf''. This file is used to change and tweak multiple system variables. Scroll down until you find the following: | * Scroll down until you find the following: | ||
<pre># Uncomment the next line to enable packet forwarding for IPv4 | <pre># Uncomment the next line to enable packet forwarding for IPv4 | ||
#net.ipv4.ip_forward=1 | #net.ipv4.ip_forward=1 | ||
</pre | </pre> | ||
* Follow the instructions in the file to enable packet forwarding in the kernel. | |||
<li>Changes to the ''sysctl.conf'' file require a reboot, but most can be set without a reboot by echoing response codes to "files" in ''/proc''. We will get into that more in a later chapter, but for now run the following command to enable ip_forwarding without rebooting the machine: '''echo 1 > /proc/sys/net/ipv4/ip_forward | : [[File:Lab10_sysctl_after.png | link=https://wiki.ihitc.net/mediawiki/images/1/1e/Lab10_sysctl_after.png|500px]] | ||
: [[Media:Lab10_sysctl_after.png | Click for larger image]] | |||
* When you are done, save the file. | |||
<li> Changes to the ''sysctl.conf'' file require a reboot, but most can be set immediately (without a reboot) but temporarily (will be reset to default at next boot) by echoing response codes to "files" in the ''/proc'' virtual filesystem. We will get into that more in a later chapter, but for now run the following command to enable ip_forwarding without rebooting the machine: </li> | |||
<code>'''echo 1 > /proc/sys/net/ipv4/ip_forward</code> | |||
: ''NOTE: If you are receiving an error when trying to run that command it's likely that the user you are running it as does not have permission to modify the '''/proc/sys/net/ipv4/ip_forward''' file (check the permissions by using '''ls'''). Read [http://stackoverflow.com/questions/82256/how-do-i-use-sudo-to-redirect-output-to-a-location-i-dont-have-permission-to-wr this similar question] for more details and possible solutions.'' | |||
</ol> | </ol> | ||
== Setup a DHCP Server == | == Setup a DHCP Server == | ||
To setup a DHCP server, we will first need to install the required software. | |||
<ol> | <ol> | ||
<li> | <li>In your SSH console use your favorite package manager to install the ''isc-dhcp-server'' package.</li> | ||
: After you install the package you may get a warning about ''isc-dhcp-server'' being unable to start. This is normal as we have yet to define the interface and settings we want used. | |||
<li>Now back in Webmin, select the Refresh Modules option. After it is done, go to Servers, then DHCP Server | <li>Now back in Webmin, select the Refresh Modules option. .</li> | ||
* After it is done, go to Servers, then DHCP Server | |||
<li>Now under Subnets and Shared Networks, select Add a new subnet. Use the following settings: | : Before we define our DHCP range, we need to set our listening interface. | ||
* Click on the ''Edit Network Interface'' option. | |||
*Select ''ens224''. | |||
* Press save. | |||
<li>Now under Subnets and Shared Networks, select Add a new subnet. </li> | |||
* Use the following settings: | |||
<pre>Subnet description: LAN DHCP Range | <pre>Subnet description: LAN DHCP Range | ||
Network Address: 192.168.1.0 | Network Address: 192.168.1.0 | ||
Netmask: 255.255.255.0 | Netmask: 255.255.255.0 | ||
Address Ranges: 192.168.1.100-192.168.1.254</pre> | Address Ranges: 192.168.1.100-192.168.1.254</pre> | ||
: [[File:Lab10_webmin_dhcp_create_subnet.png | link=https://wiki.ihitc.net/mediawiki/images/4/4e/Lab10_webmin_dhcp_create_subnet.png|500px]] | |||
: [[Media:Lab10_webmin_dhcp_create_subnet.png | Click for larger image]] | |||
* When you are done, press Create. | |||
<li>Now that you are back on the DHCP server page, press the Start Server button. If all goes | * Now, click on the network you just created to review the settings, then press Edit Client Options at the bottom. | ||
: From here we will setup the default gateway and DNS servers for the clients to use. | |||
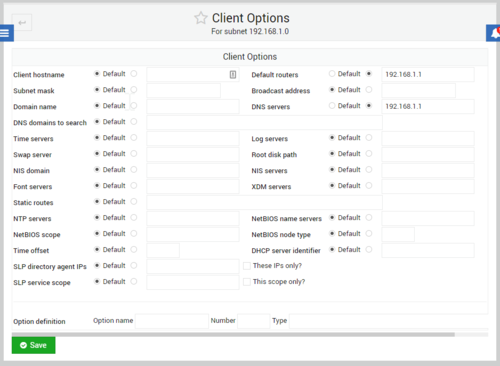
<li> Under Default Routers, set the option to 192.168.1.1 | |||
* Under DNS servers, set it to 192.168.1.1. | |||
: [[File:Lab10_webmin_dhcp_client_options.png | link=https://wiki.ihitc.net/mediawiki/images/d/d7/Lab10_webmin_dhcp_client_options.png|500px]] | |||
: [[Media:Lab10_webmin_dhcp_client_options.png | Click for larger image]] | |||
: Notice how we are setting these options to the IP of ens224 that we setup. This is because our Linux VM will act as the router and DNS for our clients as well. | |||
* When you are done, press save | |||
* Then on the Edit Subnet page, press save again. | |||
<li>Now that you are back on the DHCP server page, press the Start Server button. | |||
: If all goes well, the button should change to "Stop Server". If this does not happen, then the server was unable start. If that happens, re-check your DHCP server configurations to make sure everything is correct. | |||
</ol> | </ol> | ||
== Enabling NAT and Firewall Rules for the LAN == | |||
Now we will use firewalld to setup NAT so that we can use private addresses on our internal LAN but still have access to the public Internet. | |||
<ol> | |||
<li>First, let's set our ens224 interface (LAN) to be in the internal zone with the following command.</li> | |||
<code>firewall-cmd --zone=internal --add-interface=ens224</code> | |||
<li>You should now take a minute to allow all of the same services and ports on the internal network that you have allowed on the external network. </li> | |||
:In other words, make sure that Webmin, Samba, DNS, etc. are also allowed on the internal zone. | |||
<li>In order to activate NAT you need to turn on the "masquerade" feature on your outside interface. This is probably already done if you correctly assigned your outside interface to the pre-defined external zone (it's one of the default features of that zone). | |||
: ''HINT: you can do this manually as well in case you setup a custom zone by running the '''firewall-cmd --add-masquerade --zone=external''' command.'' | |||
<li>While routing and NAT should be working for hosts on your LAN interface now they probably still can't get an IP address! Just like all the other services being blocked by the firewall DHCP is also blocked unless you specifically allow it. To do this run the following command:</li> | |||
<code>firewall-cmd --add-service=dhcp --zone=internal</code> | |||
<li>Once you are satisfied your firewall is running correctly you can use this command to set these rules to automatically load each time the system is started.</li> | |||
<code>firewall-cmd --runtime-to-permanent</code></ol> | |||
== Setup a 2nd VM as a LAN Host == | == Setup a 2nd VM as a LAN Host == | ||
Now we are going to setup a 2nd VM on the VMware server so we can have a client to connect to the LAN network segment we just created. For this though, we will be using Linux Mint instead of Debian so we have a graphical user interface to help us with testing. | |||
<ol> | |||
<li> You'll need to make a Netlab reservation to work with your Mint system's GUI so go ahead and do that. </li> | |||
* Enter the lab on Netlab | |||
* Click the "Linux Desktop" tab to access your Mint machine. | |||
: The VM should be booting from a Linux Mint virtual CD image. | |||
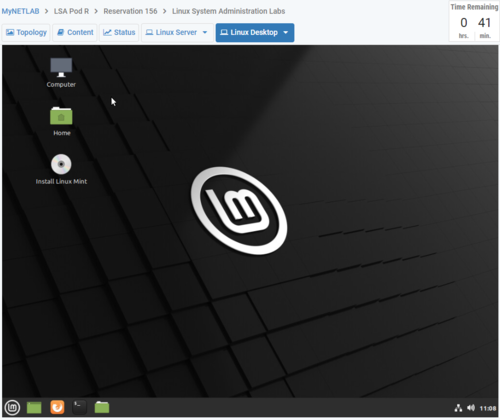
<li> Get Linux Mint installed using the link on the desktop.</li> | |||
: Installation settings are not critical as we'll be using the system primarily to explore a Linux GUI and to test web browsing capability from our private network. | |||
: [[File:Lab10_linux_mint_desktop.png | link=https://wiki.ihitc.net/mediawiki/images/f/f1/Lab10_linux_mint_desktop.png|500px]] | |||
: [[Media:Lab10_linux_mint_desktop.png | Click for larger image]] | |||
: ''NOTE: By default Linux Mint will boot into a "Live CD" environment where you can use the system without installing. However, the Live CD environment is much slower and memory limited compared with a full installation to the hard drive so be sure to start an installation and reboot into the installed copy instead of from the Live CD. You will know you're working from an installed copy if you are prompted for your username and password when logging in and don't see a link on the desktop to Install Linux Mint anymore.'' | |||
<li> Once you have Linux Mint installed, reboot the machine and login. </li> | |||
: Hopefully the machine is able to connect to the Internet through your Debian server which is acting as a DHCP server and router (see the topology diagram tab in Netlab to see a diagram of how they are connected). | |||
<li> Press the Menu icon in the lower left corner, and enter "Terminal". </li> | |||
* Then, open the terminal application. | |||
<li> You now have a shell on the system. From here, use the following command to check your network settings. </li> | |||
<code>ip address show</code> | |||
: Notice how you have a IP from the DHCP pool we created earlier. | |||
<li> Now try pinging ''172.17.50.1''. </li> | |||
: Are you able to ping? If so, NAT is working properly on your network because the 172.17.50.0/24 network is outside of the LAN segment this machine is attached to (192.168.1.0/24). | |||
: ''NOTE: Notice how some Linux distributions like Mint haven't switched from the old naming of network interfaces with ''eth'' to the new ''ens'' style. You can also try using the older '''ifconfig''' way of checking the IP address and compare the output to the new '''ip address show''' method which we have been using so far in Debian.'' | |||
<li> Now run '''ping google.com'''. </li> | |||
: If you are able to ping, this shows that not only is NAT working, but DNS resolving as well. | |||
<li> Open a web browser on the system (you can use a graphical browser this time since you have a GUI) and test browsing to a few websites.</li> | |||
: At this point we have a fully functional LAN environment. | |||
<li> In order to allow automatic safe shutdown of your Linux Mint system and improve speed/efficiency use the package manager to install the ''open-vm-tools-desktop'' package. </li> | |||
:This provides better drivers and integration between the vmWare host which is running your Linux Mint virtual machine and the virtual machine itself. | |||
<li> Finally, in the next section we'll be setting up SSH access to Mint through the Firewall so you'll want to install the ''openssh-server package'' through the package manager. </li> | |||
: Once you've done this you should be able to use the ssh program on the command line in Debian to access your Mint system like '''ssh mintusername@192.168.1.x''' where you are using a valid username on the Mint system and the IP address of the Mint system. | |||
<li> Spend a few more minutes exploring the functionality of the Linux GUI and desktop.</li></ol> | |||
== Port Forwarding and Firewalling == | == Port Forwarding and Firewalling == | ||
Now we are going to enable port forwarding to our VM. This will allow you to access the 2nd VM from the ITC network and VPN. | |||
Because we are already using port 22 on our outside interface to provide SSH access to our main Debian system we need to use a different port to access the Mint system. Instead of changing the port number in the SSH server software on Mint we can have our firewall do it at the same time the NAT masquerading is occurring. | |||
<ol> | <ol> | ||
<li> | <li>Set up a rule by running the following command:</li> | ||
< | <code>firewall-cmd --add-forward-port=port=2222:proto=tcp:toport=22:toaddr=192.168.1.100 --zone=external</code> | ||
:NOTE: this rule is a little unstable because it forwards the port to 192.168.1.100 which is currently the IP of our Mint system (if yours has a different IP you should change it in the command) but because that system gets an IP from DHCP it is subject to change which would break the rule. Therefore, if we wanted this to be stable in the long term, we would want to set up a static IP on any machines we were forwarding ports to. | |||
:''HINT: If your connection is refused, it may be because SSH is not installed in Mint. Try installing SSH using the package manager or apt.'' | |||
<li> From a computer on the ITC network, such as one connected to the VPN, try to SSH to port 2222 on the outside (172.17.50.xx) IP address of your Debian system. </li> | |||
:If everything was set up successfully, you should be able to sign into the Mint VM based on the port forwarding rule we have put in place. | |||
<li> Once you are satisfied your firewall is running correctly you can use the following command to set these rules to automatically load each time the system is started.</li> | |||
<code>firewall-cmd --runtime-to-permanent</code><br> | |||
<li> From a computer on the | |||
<li> | |||
< | |||
</ol> | </ol> | ||
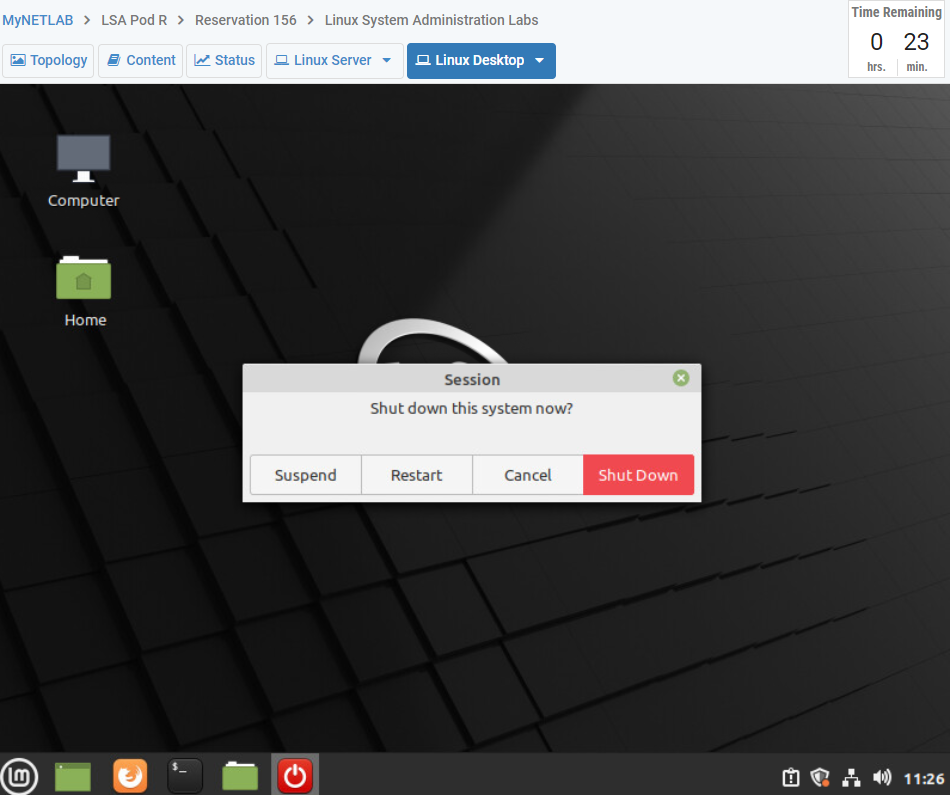
When you are done testing this section of the lab please power off your new Linux Mint VM as these require far more resources to run than the Debian VMs on our servers.<br> | |||
: [[File:Lab10_linux_mint_shutdown.png | link=https://wiki.ihitc.net/mediawiki/images/1/1c/Lab10_linux_mint_shutdown.png|500px]] | |||
: [[Media:Lab10_linux_mint_shutdown.png | Click for larger image]] | |||
== | =Checking your Work= | ||
For this lab there are many things you need to check. | |||
#Firewall - attempt to connect using FTP on port 21, this should fail | |||
< | #SSH - connect using FTP on port 22 | ||
< | #DNS - navigate to url of server | ||
< | #SMTP - send a mail to auto-respond server | ||
#IMAP - receive a mail from auto-respond server | |||
#Samba - Create a file on server using file sharing | |||
#HTTP - Navigate to ip address of server | |||
#Webmin - Navigate to <your-ip>:10000 | |||
#PuTTY into linux mint using your ip address and port 2222 | |||
#Linux Mint DNS/NAT - ping google.com from within Linux Mint<br><br> | |||
<br> | |||
Run this script to automatically check your lab<br> | |||
<code> | |||
<nowiki> sudo curl https://raw.githubusercontent.com/mnjk-inver/Linux-2480-Rebuild/main/lab_10_rewrite.py | sudo python3 </nowiki> | |||
</code> | |||
=Web App= | |||
You can check your progress on any of the labs in the ITC-2480 course from a webapp from this link: <br> | |||
[http://webcheck.itc2480.campus.ihitc.net webcheck.itc2480.campus.ihitc.net]<br> | |||
You must be logged into the campus VPN to use this application. | |||
Latest revision as of 03:58, 8 December 2021
Introduction
This lab assumes you have successfully set up DNS and email. If you had any issues with those labs, you should resolve them before attempting this lab, since you will be unable to properly test the tasks in this lab if those are not fully functional.
In this lab you will perform the following tasks:
- Configuring a Firewall
- Enabling a 2nd interface
- Configuring NAT
- Setting up DHCP
- Installing Linux Mint on a second VM
- Enabling Port Forwarding
You will be introduced to the following commands:
NOTE: This lab does NOT have embedded videos.
Lab Procedure
Prerequisites
- Open an SSH console to your Linux system using the PuTTY software.
- Login with your standard user account.
- Have a browser window set to the webmin interface for your linux VM.
Configure a Firewall
NOTE: It is suggested that instead of managing a firewall directly using nftables tools (which would also require us to create a script to reload our rules each time the system is restarted) we use a firewall daemon program to manage it based on a set of rules we create and automatically setup the firewall based on those rules each time the system boots. There are many command line firewall management programs out there but for this lab we will use the firewalld package suggested by Debian.
- Begin by installing the firewalld package on your system.
- First, let's check to see if the firewall is now up and running using the following command:
- NOTE: There is a bug in iptables/nftables 1.8.2 which ships with Debian Buster which causes it to not work correctly with firewalld. If you have issues with firewalld having a state of failed this is likely the issue. Follow the instructions to add Debain buster-backports to your apt sources.list file. After running an apt update you should be able to (re)install iptables/buster-backports which will upgrade your system to newer versions which are compatible with firewalld.
- The firewall has been pre-configured with a couple of rules in it to prevent us from getting locked out.

- Click for larger image
- Let's see what those rules are by using this command:
- Click for larger image
- By default all interfaces are in the public zone (this is set in the /etc/firewalld/firewalld.conf file).
- Before we start working on rules for our firewall we should assign our outside interface to the external zone which is designed for NAT routing which we'll be setting up shortly.
- We can do this with the command:
- We can create custom zones or use pre-defined security zones which will speed up configuring the firewall. Learn more about the pre-defined zones in firewalld documentation.
- Since we have changed zones on our interface let's check and see what rules we have started with. Let's see what those rules are:
- NOTE: You can also use the firewall-cmd --list-all-zones command to see a list of all available zones and their rules.
- If you were watching carefully you may have noted that the dhcpv6-client service which was allowed in the public zone but is not allowed by default on the external zone.
- In our case we want to allow DHCPv6 to operate on our outside interface so we can re-enable it with the following command:
- Check to see what other services can be allowed on an interface with:
- If you check you will see that although you can connect with ssh (by default it's on the allowed service list you saw above) you can't connect to your webserver or Webmin anymore. Webmin is not a pre-defined service in the list we saw above so we could either set it up as a new service and then allow it or we could create a manual rule to allow the TCP traffic on port 10000 needed to access Webmin. In this case because the service only uses a single port and to see how manual rules can be created let's manually create a rule to allow access to TCP port 10000.
- Do this by running this command:
- You should now be able to access Webmin again.
- Using either service rules or manual port rules create additional rules so that the other services on your VM are again accessible from the outside (such as from your home PC over the VPN).
- HINT: Services we have setup so far include SSH, DNS, SMTP, IMAP, Samba, and HTTP.
- Make sure to test and ensure they are all working again!
- Once you are satisfied your firewall is running correctly you can use the following command to set these rules to automatically load each time the system is started.
firewall-cmd --state
firewall-cmd --list-all

firewall-cmd --zone=external --add-interface=ens192
firewall-cmd --zone=external --list-all
firewall-cmd --zone=external --add-service="dhcpv6-client"
firewall-cmd --get-services
firewall-cmd --zone=external --add-port=10000/tcp
firewall-cmd --runtime-to-permanent
Setup a 2nd NIC Interface
To start this lab we will need to configure a second network interface, named ens224 on our virtual machines. In our simulated setup our existing ens192 interface will be our WAN interface and ens224 will be our LAN interface which could be connected to a switch and then to multiple allow other computers which will connect to the Internet through our server.
- Open /etc/network/interfaces with your favorite text editor.
- Go to the bottom of the file.
- Add the following to configure the second interface with a static IP of 192.168.1.1/24:
- Click for larger image
- NOTE: As this is a LAN only interface, we do not need to define a gateway for the server VM, as the server VM itself will be the gateway for this network.
- Once this is done, save the file
- Run the following command to enable the new interface.
- Verify the second interface is up and running with the correct IP address

auto ens224
iface ens224 inet static
	address 192.168.1.1
	netmask 255.255.255.0

ifup ens224
Enable Routing
Now we will need to enable NAT so we can route LAN traffic to the Internet and responding Internet traffic back to our LAN interface.
- In your console, you will need to edit /etc/sysctl.conf. This file is used to change and tweak multiple system variables.
- Scroll down until you find the following:
- Follow the instructions in the file to enable packet forwarding in the kernel.
- When you are done, save the file.
- Changes to the sysctl.conf file require a reboot, but most can be set immediately (without a reboot) but temporarily (will be reset to default at next boot) by echoing response codes to "files" in the /proc virtual filesystem. We will get into that more in a later chapter, but for now run the following command to enable ip_forwarding without rebooting the machine:
- NOTE: If you are receiving an error when trying to run that command it's likely that the user you are running it as does not have permission to modify the /proc/sys/net/ipv4/ip_forward file (check the permissions by using ls). Read this similar question for more details and possible solutions.
# Uncomment the next line to enable packet forwarding for IPv4
#net.ipv4.ip_forward=1

echo 1 > /proc/sys/net/ipv4/ip_forward
Setup a DHCP Server
To setup a DHCP server, we will first need to install the required software.
- In your SSH console use your favorite package manager to install the isc-dhcp-server package.
- After you install the package you may get a warning about isc-dhcp-server being unable to start. This is normal as we have yet to define the interface and settings we want used.
- Now back in Webmin, select the Refresh Modules option. .
- After it is done, go to Servers, then DHCP Server
- Before we define our DHCP range, we need to set our listening interface.
- Click on the Edit Network Interface option.
- Select ens224.
- Press save.
- Now under Subnets and Shared Networks, select Add a new subnet.
- Use the following settings:
- When you are done, press Create.
- Now, click on the network you just created to review the settings, then press Edit Client Options at the bottom.
- From here we will setup the default gateway and DNS servers for the clients to use.
- Under Default Routers, set the option to 192.168.1.1
- Under DNS servers, set it to 192.168.1.1.
- Click for larger image
- Notice how we are setting these options to the IP of ens224 that we setup. This is because our Linux VM will act as the router and DNS for our clients as well.
- When you are done, press save
- Then on the Edit Subnet page, press save again.
- Now that you are back on the DHCP server page, press the Start Server button.
- If all goes well, the button should change to "Stop Server". If this does not happen, then the server was unable start. If that happens, re-check your DHCP server configurations to make sure everything is correct.
Subnet description: LAN DHCP Range
Network Address: 192.168.1.0
Netmask: 255.255.255.0
Address Ranges: 192.168.1.100-192.168.1.254


Enabling NAT and Firewall Rules for the LAN
Now we will use firewalld to setup NAT so that we can use private addresses on our internal LAN but still have access to the public Internet.
- First, let's set our ens224 interface (LAN) to be in the internal zone with the following command.
- You should now take a minute to allow all of the same services and ports on the internal network that you have allowed on the external network.
- In other words, make sure that Webmin, Samba, DNS, etc. are also allowed on the internal zone.
- In order to activate NAT you need to turn on the "masquerade" feature on your outside interface. This is probably already done if you correctly assigned your outside interface to the pre-defined external zone (it's one of the default features of that zone).
- HINT: you can do this manually as well in case you setup a custom zone by running the firewall-cmd --add-masquerade --zone=external command.
- While routing and NAT should be working for hosts on your LAN interface now they probably still can't get an IP address! Just like all the other services being blocked by the firewall DHCP is also blocked unless you specifically allow it. To do this run the following command:
- Once you are satisfied your firewall is running correctly you can use this command to set these rules to automatically load each time the system is started.
firewall-cmd --zone=internal --add-interface=ens224
firewall-cmd --add-service=dhcp --zone=internal
firewall-cmd --runtime-to-permanentSetup a 2nd VM as a LAN Host
Now we are going to setup a 2nd VM on the VMware server so we can have a client to connect to the LAN network segment we just created. For this though, we will be using Linux Mint instead of Debian so we have a graphical user interface to help us with testing.
- You'll need to make a Netlab reservation to work with your Mint system's GUI so go ahead and do that.
- Enter the lab on Netlab
- Click the "Linux Desktop" tab to access your Mint machine.
- The VM should be booting from a Linux Mint virtual CD image.
- Get Linux Mint installed using the link on the desktop.
- Installation settings are not critical as we'll be using the system primarily to explore a Linux GUI and to test web browsing capability from our private network.
- Click for larger image
- NOTE: By default Linux Mint will boot into a "Live CD" environment where you can use the system without installing. However, the Live CD environment is much slower and memory limited compared with a full installation to the hard drive so be sure to start an installation and reboot into the installed copy instead of from the Live CD. You will know you're working from an installed copy if you are prompted for your username and password when logging in and don't see a link on the desktop to Install Linux Mint anymore.
- Once you have Linux Mint installed, reboot the machine and login.
- Hopefully the machine is able to connect to the Internet through your Debian server which is acting as a DHCP server and router (see the topology diagram tab in Netlab to see a diagram of how they are connected).
- Press the Menu icon in the lower left corner, and enter "Terminal".
- Then, open the terminal application.
- You now have a shell on the system. From here, use the following command to check your network settings.
- Notice how you have a IP from the DHCP pool we created earlier.
- Now try pinging 172.17.50.1.
- Are you able to ping? If so, NAT is working properly on your network because the 172.17.50.0/24 network is outside of the LAN segment this machine is attached to (192.168.1.0/24).
- NOTE: Notice how some Linux distributions like Mint haven't switched from the old naming of network interfaces with eth to the new ens style. You can also try using the older ifconfig way of checking the IP address and compare the output to the new ip address show method which we have been using so far in Debian.
- Now run ping google.com.
- If you are able to ping, this shows that not only is NAT working, but DNS resolving as well.
- Open a web browser on the system (you can use a graphical browser this time since you have a GUI) and test browsing to a few websites.
- At this point we have a fully functional LAN environment.
- In order to allow automatic safe shutdown of your Linux Mint system and improve speed/efficiency use the package manager to install the open-vm-tools-desktop package.
- This provides better drivers and integration between the vmWare host which is running your Linux Mint virtual machine and the virtual machine itself.
- Finally, in the next section we'll be setting up SSH access to Mint through the Firewall so you'll want to install the openssh-server package through the package manager.
- Once you've done this you should be able to use the ssh program on the command line in Debian to access your Mint system like ssh mintusername@192.168.1.x where you are using a valid username on the Mint system and the IP address of the Mint system.
- Spend a few more minutes exploring the functionality of the Linux GUI and desktop.

ip address show
Port Forwarding and Firewalling
Now we are going to enable port forwarding to our VM. This will allow you to access the 2nd VM from the ITC network and VPN. Because we are already using port 22 on our outside interface to provide SSH access to our main Debian system we need to use a different port to access the Mint system. Instead of changing the port number in the SSH server software on Mint we can have our firewall do it at the same time the NAT masquerading is occurring.
- Set up a rule by running the following command:
- NOTE: this rule is a little unstable because it forwards the port to 192.168.1.100 which is currently the IP of our Mint system (if yours has a different IP you should change it in the command) but because that system gets an IP from DHCP it is subject to change which would break the rule. Therefore, if we wanted this to be stable in the long term, we would want to set up a static IP on any machines we were forwarding ports to.
- HINT: If your connection is refused, it may be because SSH is not installed in Mint. Try installing SSH using the package manager or apt.
- From a computer on the ITC network, such as one connected to the VPN, try to SSH to port 2222 on the outside (172.17.50.xx) IP address of your Debian system.
- If everything was set up successfully, you should be able to sign into the Mint VM based on the port forwarding rule we have put in place.
- Once you are satisfied your firewall is running correctly you can use the following command to set these rules to automatically load each time the system is started.
firewall-cmd --add-forward-port=port=2222:proto=tcp:toport=22:toaddr=192.168.1.100 --zone=external
firewall-cmd --runtime-to-permanentWhen you are done testing this section of the lab please power off your new Linux Mint VM as these require far more resources to run than the Debian VMs on our servers.
Checking your Work
For this lab there are many things you need to check.
- Firewall - attempt to connect using FTP on port 21, this should fail
- SSH - connect using FTP on port 22
- DNS - navigate to url of server
- SMTP - send a mail to auto-respond server
- IMAP - receive a mail from auto-respond server
- Samba - Create a file on server using file sharing
- HTTP - Navigate to ip address of server
- Webmin - Navigate to <your-ip>:10000
- PuTTY into linux mint using your ip address and port 2222
- Linux Mint DNS/NAT - ping google.com from within Linux Mint
Run this script to automatically check your lab
sudo curl https://raw.githubusercontent.com/mnjk-inver/Linux-2480-Rebuild/main/lab_10_rewrite.py | sudo python3
Web App
You can check your progress on any of the labs in the ITC-2480 course from a webapp from this link:
webcheck.itc2480.campus.ihitc.net
You must be logged into the campus VPN to use this application.