User:Hess0060
Advanced Storage Configuration
- You can choose from many different advanced storage technologies.
- The book focuses on SCSI and RAID
SCSI Hard Disk Configuration(Small Computer System Interface)
“designed as a way to connect multiple peripherals to the system in a scalable, high-speed manner.” Other types of SCSI disk configurations and technologies available, Parallel SCSI, Serial Attached SCSI, and iSCSI.
Parallel SCSI Configuration
- The traditional SCSI technology
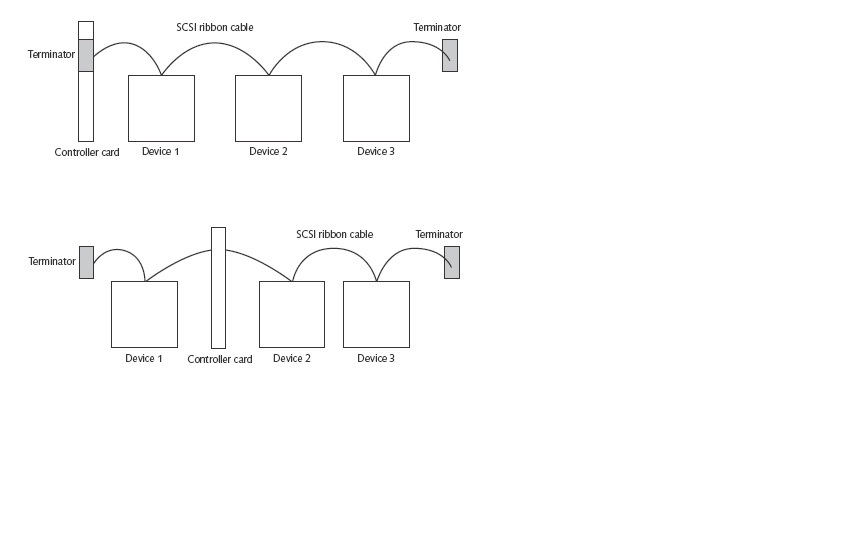
- A device called a terminator is used to stop signals from bouncing back
- Adopted as an industry defined standard in 1986 referred to as SCSI-1
- used an 8-bit-wide data path
- held up to seven devices
- transfer speed of 5MB per second
- By 1994: SCSI-2 had evolved
- 16-bit-wide data path
- hold up to 15 devices
- 20MB per second
- SCSI-3
- speeds of over 160MB per second
Note: a. The SCSI ID of a SCSI hard disk can be configured using software on the SCSI controller or using jumper switches on the physical hard drive itself.
b. Some SCSI devices act as a gateway to other devices; if this is the case, each device is associated with a unique Logical Unit Number (LUN).
Parallel SCSI controllers support up to 15 devices and identify these devices with the numbers 0– 15 The highest priority device is given the number 7, followed by 6, 5, 4, 3, 2, 1, 0, 15, 14, 13, 12, 11, 10, 9, and 8
Above: Two SCSI Configuration examples
[[FILE:File:SCSI2.jpG
Above: Listing of Parallel SCSI Types as well as speed, connector type and number of devices supported per controller card.
Serial Attached SCSI (SAS) Configuration
- recent SCSI technology
- transfer data at up to 768MB/s
Up to 65,535 Serial Attached SCSI hard disks can be connected to a single controller card
- Uses serial connectors (between 7 and 36 pins)
iSCSI Configuration Internet SCSI (iSCSI)
- Recent SCSI technology
- Uses network cables to transfer data to and from remote hard disks
- The computer connected to a remote hard disk via iSCSI is referred to as an iSCSI initiator
- the remote hard disk is called the iSCSI target.
- To connect the Linux computer to the remote iSCSI device (Prior to Install)
- you must specify the configuration settings while installing Linux.
- must understand the configuration settings used by your iSCSI device
- ensure that your computer has an iSCSI-compliant
- network card prior to install
- During installation
- you need to select Specialized Storage Devices (instead of Basic Storage Devices)
Note: A single iSCSI target can be used by multiple computers, or iSCSI initiators. The computers that use the same iSCSI target are said to be part of the same Storage Area Network (SAN). iSCSI is often referred to as a SAN technology as a result
RAID Configuration
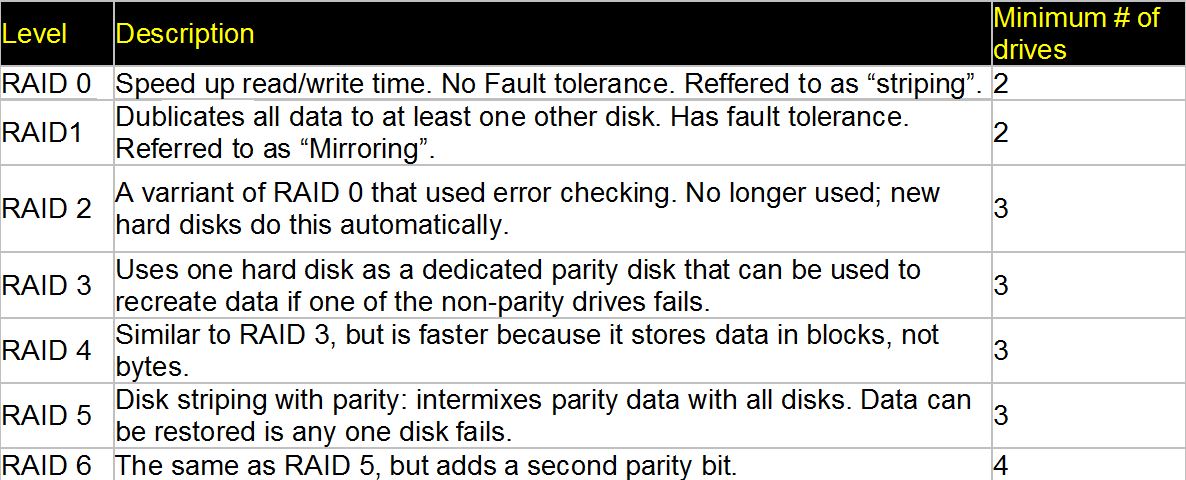
- There are 7 basic RAID configurations (RAID 0 - 6)
Below is an illustration of RAID Level 5 parity bits, parity bits are the sum of the information on the other 2 disks. If one disk fails the remaining bits
[[File:
Side notes: RAID levels are often combined; RAID level 15 refers to a Stripe Set with Parity (RAID level 5) that is mirrored (RAID level 1) to another Stripe Set with Parity.
Installation Methods
There are 4 methods to installing Linux
- DVD Installation / CD Installation
- Fedora 13 ISO will fit on 6 CDs and can be downloaded from the internet. To install from CD or DVD simply put the disk in the CD/DVD drive, set the bios to boot first from that drive.
- USB Flash Drive Installation
- Most modern computers have a BIOS that allows the computer to boot from a flash memory.
'Steps: To install from USB
- 1. download the DVD Fedora 13 ISO image from http://fedoraproject.org
- 2. use disk imaging software to write the ISO image to the USB drive
If you already have an installed Linux system, you can instead use the dd command to write the ISO image to your USB drive
- 3. insert your USB flash memory drive into a free USB slot
- 4. boot your computer from the flash memory drive
Hard Disk Installation ISO must reside on a disk formatted as FAT, FAT32, ext2, ext3, or ext4 filesystem provided that you have free space outside the partition that contains the ISO image. Must boot from a CD / DVD or USB prior to install to locate the ISO on the hard disk.
- Network-Based Installations
(less common than DVD, CD, USB flash memory drive, or hard disk installations) With the network install the ISO image must reside on the server and use one of the following protocols can be installed to the target computer. Network File System (NFS) File Transfer Protocol (FTP) Hypertext Transfer Protocol (HTTP)
Above: Specifying the location of the Fedora ISO image on an NFS server,
Above: Specifying the location of the Fedora ISO image on an HTTP server
Steps to installing over a network
1. Assuming the ISO Image is already on the server
2. boot the computer on which you plan to install Linux using a CD / DVD or USB drive
3. When you reach the welcome screen, press Tab on the keyboard and add askmethod to the end of the boot options line
4. choose an installation language (such as English), a keyboard layout (such as US), and
5. select a network installation method
a. Options should be
i. Local CD/DVD
ii. Hard Drive
iii. NFS Directory
iv. URL
6. configure the IP settings on your computer’ s network adapter
7. enter the address to the location of the ISO image and proceed with the rest of the install process
Automated Installation 267-282
-Instillation script is often called a Kickstart File
-A Kickstart file is automatically made after normal instillation in “/root/anaconda-ks.cfg”
-To view use “Cat ks.cfg” in “/root/anaconda-ks.cfg”.
- Code in a Kick-start file that starts with “#” sing is disregarded and can be used as a comment .
-It is best practice to copy the template Kickstart file and rename it ks.cfg and make changes to ks.cfg if need before mass instillation .
-It is best practice when creating the code for partition configuration to use the # sing till configurations is complete and one is sure of the specifications of the partitions that will be created.
-It Is also advised that one has “zerombr yes” command and “clearpart --all” to make sure that the MBR is created and all other partitions are destroyed before creating new ones.
-The kickstart file can also be created with a too called the “Kickstart Configurator”
- The Configurator can be installed using the “YUM install system-config-kickstart” command in terminal.
-The configurator can started by “system-config-kickstart” command If in a graphical desktop environment.
-To use the ks.cfg. whale booting form the cd or instillation image make confirm that install on new system or upgrade existing system is selected then press. A command line may show up and you can designate the Kick start files path by using “ks=device:absolute path KS file”
-You will still need to use first boot wizard.
Troubleshooting installation 272-274 problems of high Probability Problems starting instillation -Boot order in BIOS
-Bad CMOS battery
Problems during instillation - Video card incompatibility. use “install with basic video driver”
-Instillation environment doesn't recognize mouse. Press escape before graphic instillation appears.
- If instillation locks up disable P&P in BIOS.
-If fatal signal 11 is displayed Then there may be something wrong with the ram. You may need to run memtest86 to test it. If the ram has no errors turn off CPU cache memory or set set more of it to wait state in the Bios.
-Other problems ram motherboard speed miss-mach, improper voltage configuration for CPU and ram. Problems after instillation - After instillation if some somethings like a program is not working correctly or a Peace of hardware is not showing up. you should look at the instillation log found in root/install.log.
-Use /proc to look at hardware settings “ls -f /proc”
-To look up info use “cat /proc/cpuinfo” the same can be done with “/meminfo” and modules
-Modules are used to insert drivers into the Linux kernel.
- To view hardware outputs during boot up use the “Dmesg | tail”
- Review table 6-2 (other log or config files found in /proc directory )
-You can view other logs about services and processes in “/var/log/messages”
System Rescue 281-285 -Instillation files have a bootable kernel of Linux.
-To used insert or mounted instillation image/ files and select rescue system in the instillation welcome-screen
- A menu will prompt you to Mount your Linux instillation under under “mnt/sysimage”
-You will have a menu that will allow you to enter bash shell
- You will also be able to run the fakd diagnostic
-You can check witch root directory is the system that you are trying to rescue with the “System Rescue command.

