How to configure SDM to secure a router
== Segment ONE: ==
Connect to R2 using TFTP Server.
Create a username and password on R2:
R2(config)#username ccna password ciscoccna
Enable the http secure server on R2 and connect to R2 using a web browser on TFTP Server:
R2(config)#ip http secure-server
- Generating 1024 bit RSA keys, keys will be non-exportable...[OK]
R2(config)#
- Nov 16 16:01:07.763: %SSH-5-ENABLED: SSH 1.99 has been enabled
- Nov 16 16:01:08.731: %PKI-4-NOAUTOSAVE: Configuration was modified. Issue "write memory" to save new certificate''
R2(config)#end
R2#copy run start
From TFTP Server, open a web browser and navigate to https://192.168.20.1/
Login with the previously configured username and password:
username: ccna
password: ciscoccna
Select Cisco Router and Security Device Manager
Open Internet Explorer and enter the IP address for R2 in the address bar
Make sure that you have all popup blockers turned off in your browser.
Also make sure that JAVA is installed and updated.
This window opens.
After it is done loading, a new window opens for SDM like this one:
== Segment TWO: ==
Navigate to the Security Audit feature.
Click the . Configure . button in the top left side of the window

Now navigate down the left panel to Security Audit and click on it.
== Segment THREE: ==
When you click on Security Audit, the next window will gives you a brief explanation of what the Security Audit feature does.
Click on
Next
to open the Security Audit Interface configuration window.
An interface should be classified as outside (untrusted).
After selecting outside and inside interfaces, click
Next
A new window opens indicating that SDM is conducting a security audit check:
Now we can discover that the default configuration is not secure.
Click
Close
to continue.
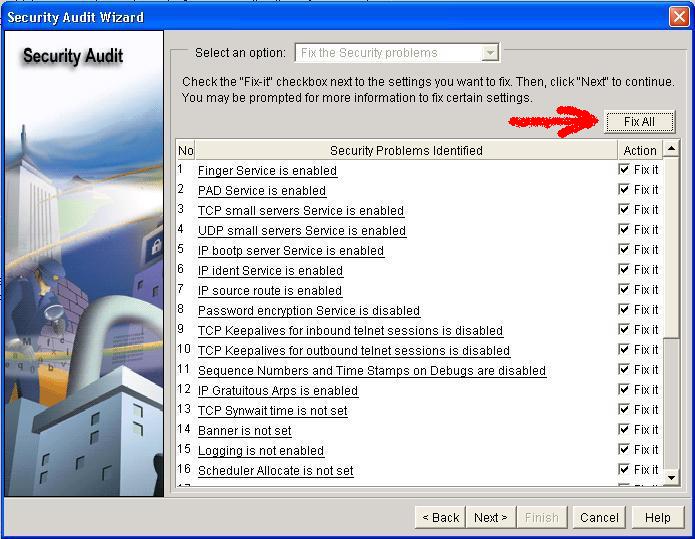
== Segment 4: Applying settings to the router. ==
Click
Fix All
to make all the suggested security changes.
Then click
Next
Enter your banner message to use as the message of the day for the router, and then click
Next
Now set the level of severity of log traps that you want the router to send to the syslog server.
The severity level is set to debugging for this scenario.
To view a summary of the changes about to be made to the router.
Click
Next
== Segment 5: Commit the configuration to the router. ==
After you review the changes, click
Finish
preparing... ...
Click
Ok
Now you can use the command
show run
and see the new configuration of your router.


