Openvpn
Steps to setting up a VPN on a Ubuntu server
so you are brave enough to venture in the installing and configuring of a VPN but do not fear this page can give you a heads up. what is a VPN? well it is creating a tunnel from one network to another over the internet in a private LAN. once it is setup you will be able to access computers or servers as if you were at a local network.
1. First install the openvpn software with the command.
aptitude install openvpn
- all of the files will be located in the:
/etc/openvpn
2. to make things easier you can copy the dir "easy-rsa" from the samples dir to the current dir of "/etc/openvpn".
cp -R /usr/share/doc/openvpn/examples/easy-rsa/ ./
3. after copying the easy-rsa dir switch to easy-rsa/2.0/ where we will build the Certificates of Authority with some scripts provided.
4. edit the vars file and add in information for KEY_COUNTRY, KEY_PROVINCE, KEY_CITY, KEY_ORG, and KEY_EMAIL parameters. save and exit out back to easy-rsa/2.0/.
Nano vars
- then after you edit the file use the command source vars
5. now we are going to run some scripts starting with the clean-all
./clean-all
- followed up by the
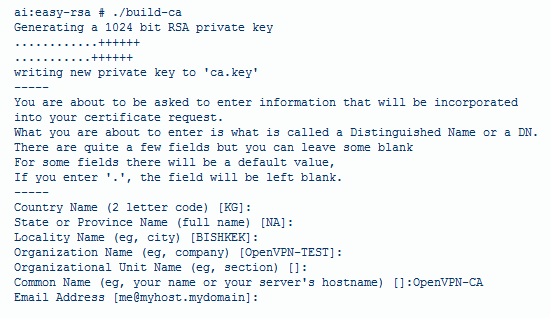
./build-ca
- the text showing up should look somewhat like this
- this picture will not look 100% like your printout based on the facts that you changed the country, city etc from the vars file, and the CA key is finished.
6. time to make the server key with the script
./build-key-server server
- you will be prompted the same message as above but you will have the added Sign the Certificate which you want to say yes.
7. the last key required is the client key and is created by doing
./build-key client1
- this will create a key for the first client and if you want more just name it "client2" for the next one. also don't forget the get the client key signed. you should have created 3 keys for CA, server, and client at this point.
8. the DH(Diffie Hellman) parameters need to be genterated for the OpenVPN server
./build-dh
- this really does take a long time depending on the machine so take a bathroom break or something.
9. after all that you are ready to copy all those keys you have created and transfer them to a client computer. if you are having problems finding a way to copy the files think about using Filezilla and connecting to the server to the 22 port.
Configuring the server and clients
1.this part can get kinda crazy on editing the text files for each system. making this easier on ourselfs we will copy the sample configuration files from the download to make life easy. take note that the server.conf file is zipped.copying the files to the /etc/openvpn dir.
cp /usr/share/doc/openvpn/examples/sample-config-files/server.conf.gz ./
- then for client configuration
cp /usr/share/doc/openvpn/examples/sample-config-files/client.conf ./
- unzipping the server.conf file with
gunzip server.conf.gz
2.since we moved all the certificates around we now need to edit the server file to point to the right location to access the certificates.
nano server.conf
- scroll down a bit until you reach the part that looks like this:
ca ca.crt
cert server.crt
key server.key
- editing them to look like or where you have all the keys located.
ca /etc/openvpn/easy-rsa/2.0/keys/ca.crt
cert /etc/openvpn/easy-rsa/2.0/keys/server.crt
key /etc/openvpn/easy-rsa/2.0/keys/server.key
- then do the same for DH dh1024.pem which should only be a few lines down.
2. then you can continue to configure the client.conf file as well to use for another Linux machine or use a windows client. you will just need to update the keys locations in the configuration file and change the ip address to the server. there are a ton of configurations in the files so you can play around with what you need.
3. testing the server to see if it is working by turning it on with the command inside the /etc/openvpn/ location.
openvpn server.conf
- if everything worked as planned a bunch of text will flash the screen and end with initialization sequence completed meaning its working : ). the server that is.
4.testing the client side in Linux on a different system by typing this command and don't forget to copy all the files needed.
openvpn client.conf
- if the gods are on your side and a initialization sequence completed statement shows up on the client it worked!
Problems with not connecting
There can be a huge range of problems with a VPN not working heck even i didn't make it but i was close. problems such as ports being blocked, Windows being a pain or not having both the networks talking is a never ending cycle of playing with the configuration files until something works. by reading this page will give anyone a jump start on creating your own VPN.

