Linux VLAN Trunking: Difference between revisions
Jump to navigation
Jump to search
(→Step 3) |
(→Step 3) |
||
| Line 27: | Line 27: | ||
:[[File:Vconfig.jpg|middle]] | :[[File:Vconfig.jpg|middle]] | ||
:VLAN's 10,20,30, and 40 are now created, labeled as eth0.10, eth0.20, eth0.30, eth0.40 | :VLAN's 10, 20, 30, and 40 are now created, labeled as eth0.10, eth0.20, eth0.30, eth0.40 | ||
==Step 4== | ==Step 4== | ||
Revision as of 05:02, 7 May 2010
Basic VLAN Trunking in Debian based Linux.
Goal of Lab
- Create sub-interfaces with VLAN tagging enabled
Scenario
Step 1
The first thing you'll want to do is install the VLAN package using aptitude.
Note: if aptitude can't find the package, use the command "aptitude update" before trying to install the package.
Step 2
Load the 802.1Q module into the kernel
- sudo modprobe 8021q
Then verify the module has been loaded into the kernel
- lsmod | grep 8021q
The output on your screen should look similar:
Step 3
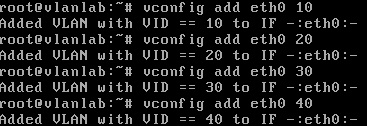
Use vconfig to add VLANS
- vconfig add "interface" "vlan"
- VLAN's 10, 20, 30, and 40 are now created, labeled as eth0.10, eth0.20, eth0.30, eth0.40
Step 4
Configure IP Addresses on the sub-interfaces.
- ifconfig "interface.sub-interface" "ip address" netmask "subnet mask"
Step 5
Configure the default gateway for each sub-interface / VLAN
- route add -net "ip address" netmask "subnet mask" gw "default gateway"
- The server should now be trunking VLANS 10,20,30, and 40 on eth0


