DynDns: Difference between revisions
| (34 intermediate revisions by the same user not shown) | |||
| Line 1: | Line 1: | ||
== What is DynDNS? == | == What is DynDNS? == | ||
If you are bored at work and some kind of security implementation is blocking your web browser from displaying facebook, myspace, ESPN360 and so on, what can you do? Well, that's no problem!!! If you are setup with DynDNS, you will be able to remote into your home computer and access all your files and softwares, and let's not forget you will be able to access any web page your home computer permits. Since most of the company/corporation have port 3389 enable for remote workers to access their files or computer from a different location, a remote connection shouldn't be impossible. | |||
According to Wikipedia, Dynamic Network Services, Inc. (Dyn Inc.) is a network services company best-known for its free DynDNS dynamic DNS service, which allows users to have a subdomain that points to a computer with regularly-changing IP addresses, such as those served by many consumer-level Internet service providers. An update client installed on the user's computer, or built into a networked device such as a router or webcam, keeps the hostname up to date with its current IP address. Another popular free service provided by the company is internet content filtering. DynDNS also offers paid domain registrations, recursive DNS, e-mail forwarding and redirection, SSL certificates, network monitoring, URL redirection, and Virtual private server hosting. It has its corporate headquarters in Manchester, New Hampshire. | According to Wikipedia, Dynamic Network Services, Inc. (Dyn Inc.) is a network services company best-known for its free DynDNS dynamic DNS service, which allows users to have a subdomain that points to a computer with regularly-changing IP addresses, such as those served by many consumer-level Internet service providers. An update client installed on the user's computer, or built into a networked device such as a router or webcam, keeps the hostname up to date with its current IP address. Another popular free service provided by the company is internet content filtering. DynDNS also offers paid domain registrations, recursive DNS, e-mail forwarding and redirection, SSL certificates, network monitoring, URL redirection, and Virtual private server hosting. It has its corporate headquarters in Manchester, New Hampshire. | ||
All it requires is, a free domain account from www.DynDNS.com, email access, DynDNS update client, port forwarding, firewall configuration, and windows' Remote Desktop Connection, and an internet connection. You wont need a static IP address as different ISPs claim. We will demonstrate how it is done. Besides, this is a free service. | |||
All it requires is, a free domain account from www.DynDNS.com, email access, DynDNS update client, port forwarding, firewall configuration, and windows' Remote Desktop Connection. | |||
*note: Computer you are trying to remote into must be turned on. | |||
== Account Setup == | == Account Setup == | ||
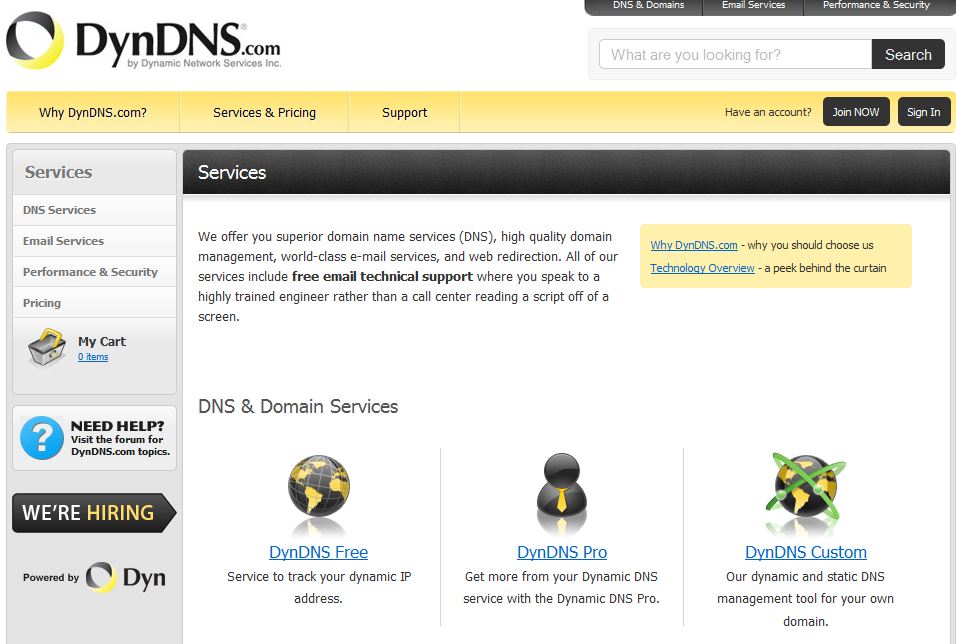
*Register and create an account at [http://www.DynDNS.com www.DynDNS.com] | |||
*Choose the free domain option | |||
[[File:1_DynDNS.JPG]] | [[File:1_DynDNS.JPG]] | ||
---- | |||
---- | |||
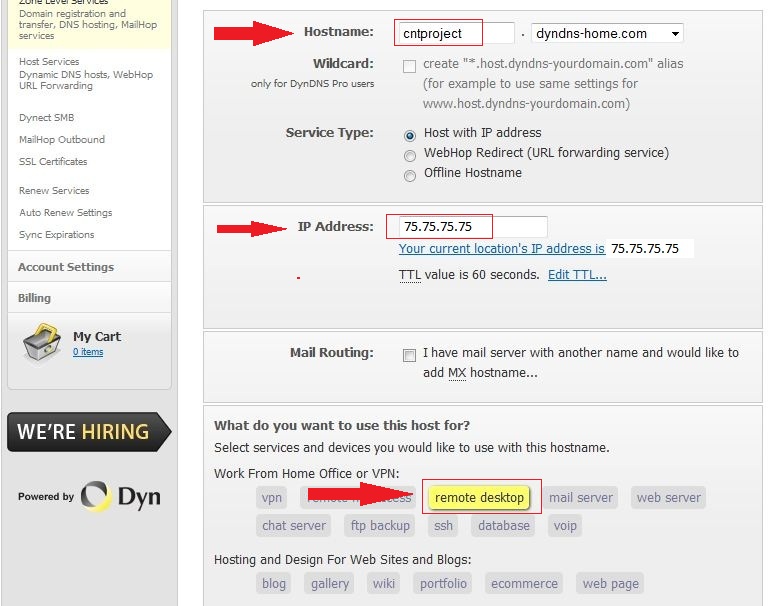
*Create a domain name | |||
*Update your IP address (*note ip address should be updated automatically, if not click on green link) | |||
*Choose "remote desktop" as use for host. | |||
[[File:2_registration.JPG]] | [[File:2_registration.JPG]] | ||
---- | |||
---- | |||
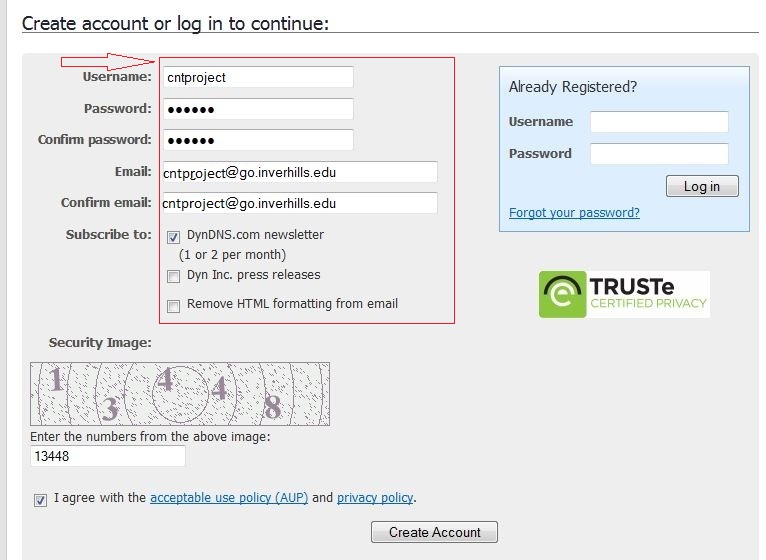
*Create an account (username, password, email) | |||
[[File:3_creating_an_account.JPG]] | [[File:3_creating_an_account.JPG]] | ||
---- | |||
---- | |||
*Check your email to confirm the account you created. | |||
[[File:4_check_email.JPG]] | [[File:4_check_email.JPG]] | ||
---- | |||
---- | |||
*If the account was validated, you should be at this screen | |||
[[File:5_registration_completed.JPG]] | [[File:5_registration_completed.JPG]] | ||
---- | |||
---- | |||
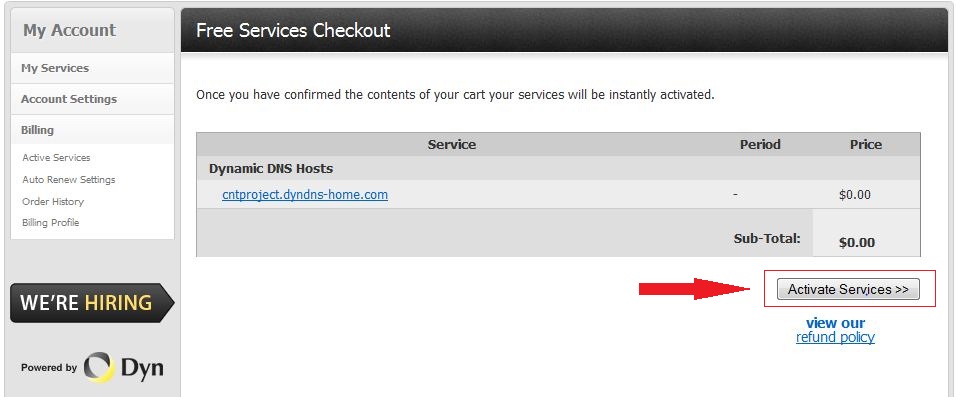
*You should be redirected to the "Free Service Checkout". Make sure you activate service. | |||
[[File:6_activate_services.JPG]] | [[File:6_activate_services.JPG]] | ||
---- | |||
---- | |||
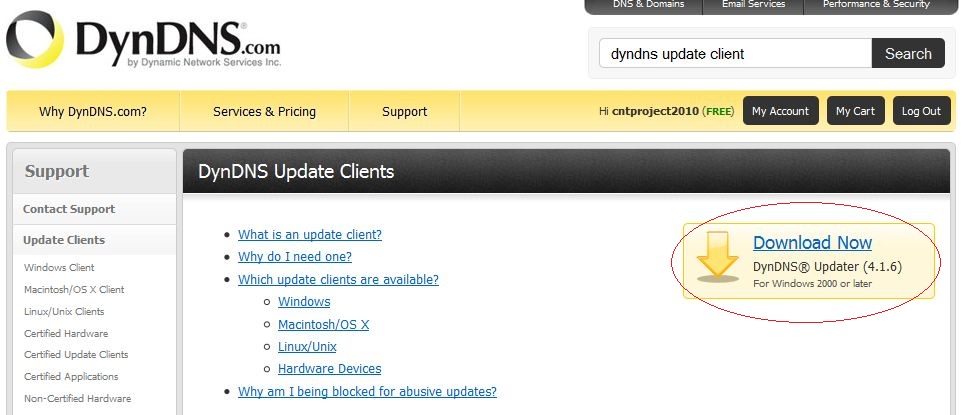
*Now, it is time to download the DynDNS client and install it. An update client is a computer application or a feature in your router that keeps your hostname's IP address up-to-date. The update client periodically checks your network's IP address; if it sees that your IP address has changed, it sends (updates) the new IP address to your hostname in your DynDNS.com account. | |||
[[File:7_dyndns_client.JPG]] | |||
---- | |||
---- | |||
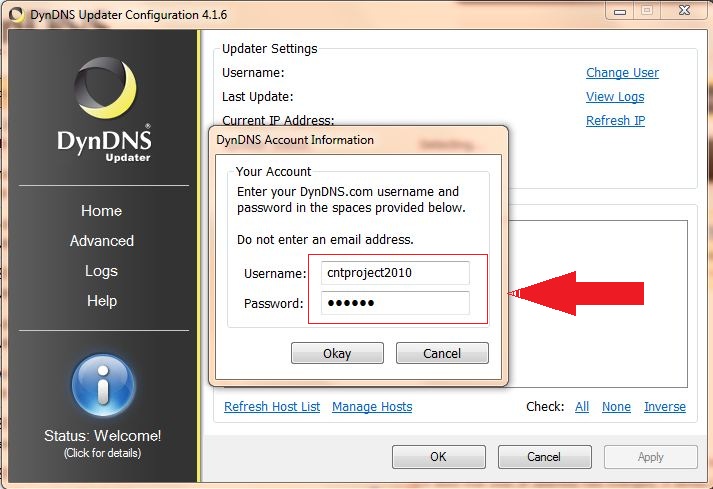
*Once installed on the Host, login with the credential created earlier | |||
[[File:8_login.JPG]] | |||
---- | |||
---- | |||
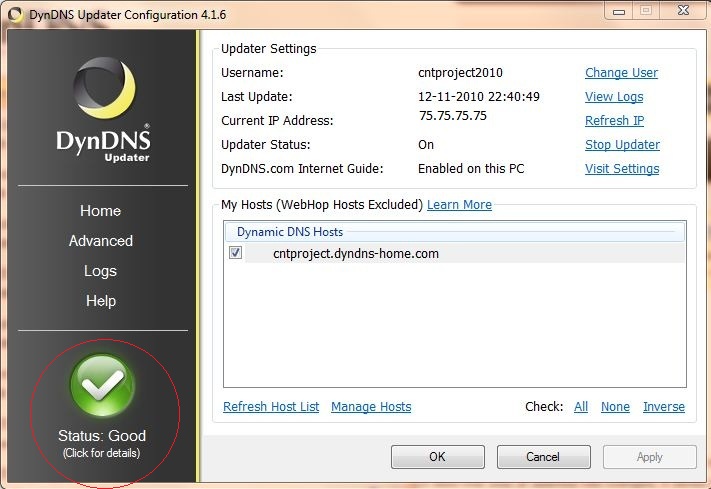
*Apply the settings, and status should be "Good", which means the IP address and domain name are synchronized. | |||
[[File:10_status_is_good.JPG]] | |||
== Configure Router == | |||
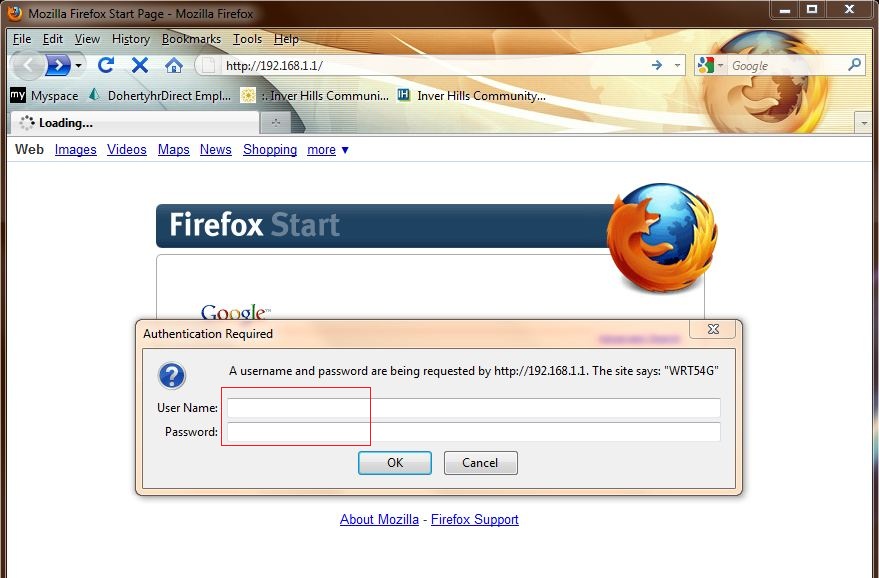
*Open a web browser, type in "192.168.1.1", default password and username should be admin depending on your configuration. | |||
[[File:11_router_login.JPG]] | |||
---- | |||
---- | |||
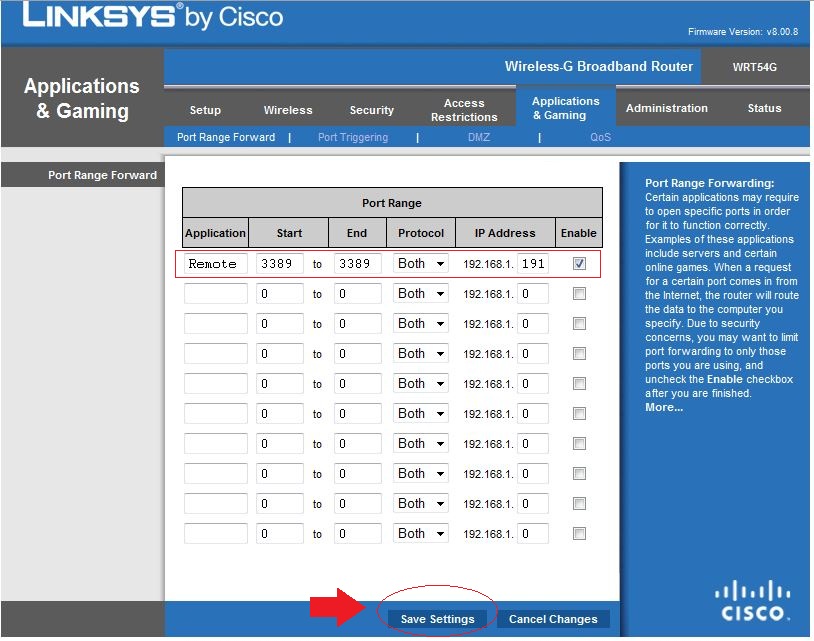
*Choose the "Application & Gamings" and enter the port number as 3389, and enter IP address of the Host/computer you want to remote into . Check the enable case, and save settings. | |||
[[File:12_changing_the_port_number.JPG]] | |||
== Firewall Settings == | |||
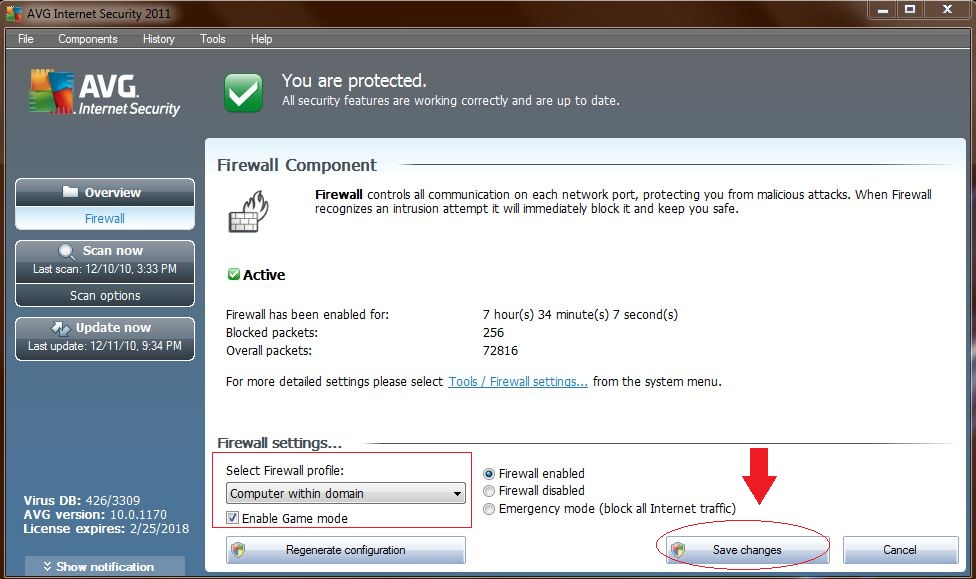
*Depending on your firewall, Remote Desktop will not work if it is blocked. I am using AVG Internet Security, which features a Firewall profile "Computer in Domain" and will allow remote desktop. | |||
[[File:13_changing_firewall.JPG]] | |||
---- | |||
---- | |||
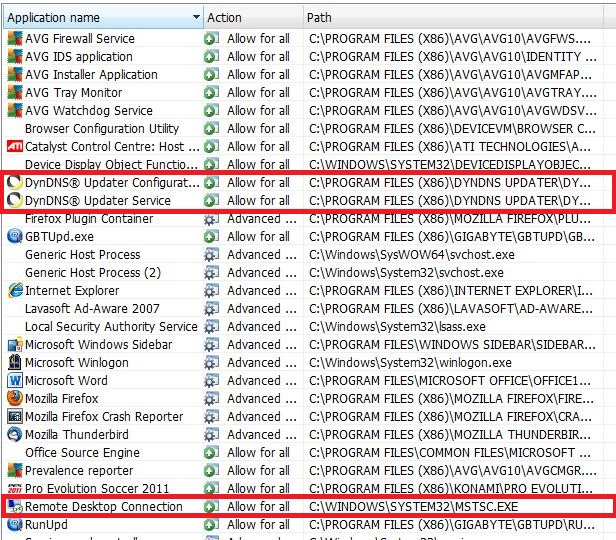
*You can always allow the application manually. | |||
[[File:14_firewall_config.JPG]] | |||
== Remote Desktop Access == | |||
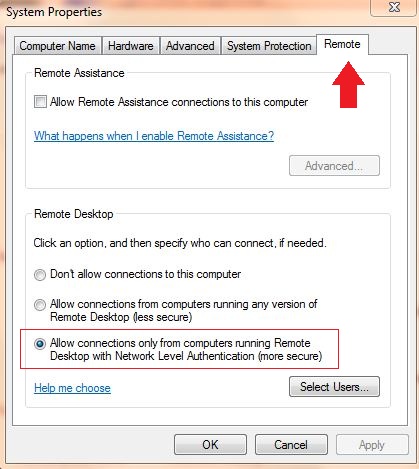
[[File: | *Remote Access Has to be enabled. | ||
*Right click on computer/properties/advanced settings/remote tab. | |||
*Choose the last option. | |||
[[File:16_remote_config.JPG ]] | |||
---- | |||
---- | |||
*Find your Remote Desktop application and lauch it by typing "Remote Desktop" in the search box. | |||
---- | |||
---- | |||
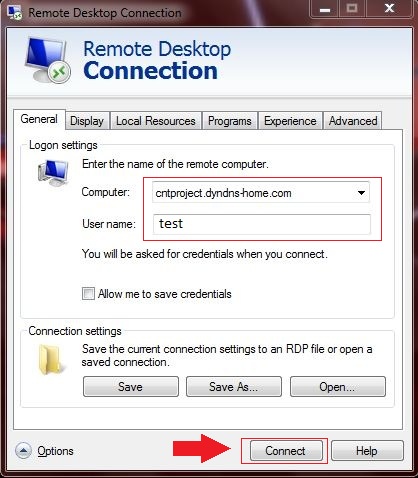
*Remote Desktop Connection should appear. Enter the domain we created earlier, and enter the host user name you are trying to remote into. | |||
[[File:17_remote_info.JPG]] | |||
---- | |||
---- | |||
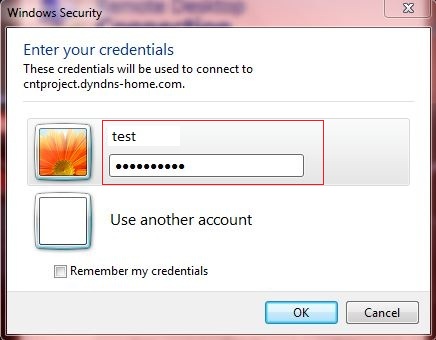
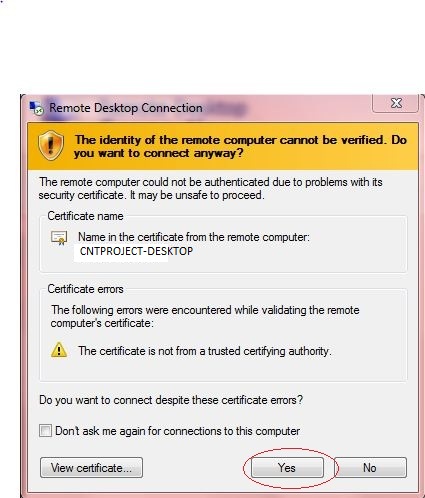
*It a connection was established, it should ask for credentials, then display a certificate warning. | |||
[[File:18_loggin_in.JPG]] | |||
[[File:19_certificate.JPG]] | |||
---- | |||
---- | |||
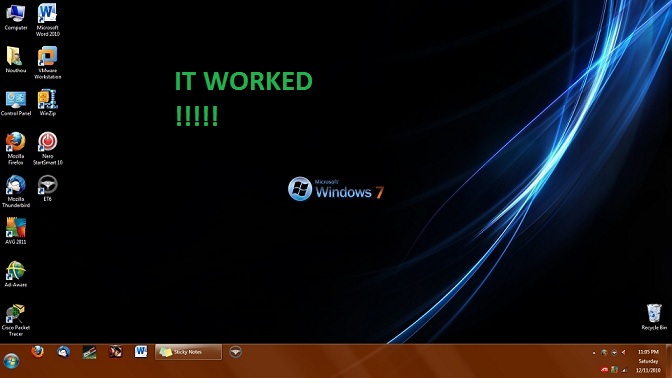
*Once verified, you should be able to remote into the Host. | |||
[[File:20_last_step.jpg]] | |||
Latest revision as of 14:04, 12 December 2010
What is DynDNS?
If you are bored at work and some kind of security implementation is blocking your web browser from displaying facebook, myspace, ESPN360 and so on, what can you do? Well, that's no problem!!! If you are setup with DynDNS, you will be able to remote into your home computer and access all your files and softwares, and let's not forget you will be able to access any web page your home computer permits. Since most of the company/corporation have port 3389 enable for remote workers to access their files or computer from a different location, a remote connection shouldn't be impossible.
According to Wikipedia, Dynamic Network Services, Inc. (Dyn Inc.) is a network services company best-known for its free DynDNS dynamic DNS service, which allows users to have a subdomain that points to a computer with regularly-changing IP addresses, such as those served by many consumer-level Internet service providers. An update client installed on the user's computer, or built into a networked device such as a router or webcam, keeps the hostname up to date with its current IP address. Another popular free service provided by the company is internet content filtering. DynDNS also offers paid domain registrations, recursive DNS, e-mail forwarding and redirection, SSL certificates, network monitoring, URL redirection, and Virtual private server hosting. It has its corporate headquarters in Manchester, New Hampshire.
All it requires is, a free domain account from www.DynDNS.com, email access, DynDNS update client, port forwarding, firewall configuration, and windows' Remote Desktop Connection, and an internet connection. You wont need a static IP address as different ISPs claim. We will demonstrate how it is done. Besides, this is a free service.
- note: Computer you are trying to remote into must be turned on.
Account Setup
- Register and create an account at www.DynDNS.com
- Choose the free domain option
- Create a domain name
- Update your IP address (*note ip address should be updated automatically, if not click on green link)
- Choose "remote desktop" as use for host.
- Create an account (username, password, email)
- Check your email to confirm the account you created.
- If the account was validated, you should be at this screen
- You should be redirected to the "Free Service Checkout". Make sure you activate service.
- Now, it is time to download the DynDNS client and install it. An update client is a computer application or a feature in your router that keeps your hostname's IP address up-to-date. The update client periodically checks your network's IP address; if it sees that your IP address has changed, it sends (updates) the new IP address to your hostname in your DynDNS.com account.
- Once installed on the Host, login with the credential created earlier
- Apply the settings, and status should be "Good", which means the IP address and domain name are synchronized.
Configure Router
- Open a web browser, type in "192.168.1.1", default password and username should be admin depending on your configuration.
- Choose the "Application & Gamings" and enter the port number as 3389, and enter IP address of the Host/computer you want to remote into . Check the enable case, and save settings.
Firewall Settings
- Depending on your firewall, Remote Desktop will not work if it is blocked. I am using AVG Internet Security, which features a Firewall profile "Computer in Domain" and will allow remote desktop.
- You can always allow the application manually.
Remote Desktop Access
- Remote Access Has to be enabled.
- Right click on computer/properties/advanced settings/remote tab.
- Choose the last option.
- Find your Remote Desktop application and lauch it by typing "Remote Desktop" in the search box.
- Remote Desktop Connection should appear. Enter the domain we created earlier, and enter the host user name you are trying to remote into.
- It a connection was established, it should ask for credentials, then display a certificate warning.
- Once verified, you should be able to remote into the Host.
