Packet Tracer Instructions: Difference between revisions
No edit summary |
No edit summary |
||
| Line 1: | Line 1: | ||
'''Package Tracer Instructions:''' | '''Package Tracer Instructions:''' | ||
Packet Tracer is a powerful network simulation program that allows us to create a network with an almost unlimited number of devices, encouraging practice, discovery, and troubleshooting | Packet Tracer is a powerful network simulation program that allows us to create a network with an almost unlimited number of devices, encouraging practice, discovery, and troubleshooting. The main objective of Packet Tracer is to serve as a support tool for the Cisco Academy. This tool is extremely useful for both students and teachers. | ||
In this page, I will show you step by step of how to download, install and build a network that we use a lot in the CCNA1 using Package Tracer. | In this page, I will show you step by step of how to download, install and build a network that we use a lot in the CCNA1 using Package Tracer. This instruction is only for a student who have an account to login to the Cisco Networking Academy home page. | ||
==Downloading & Installing Package Tracer== | |||
Packet Tracer 5.2 is the latest version of Cisco's simulation software available. To download Package Tracer, follow the instruction below: | |||
*Step 1 | |||
Go to Cisco Networking Academy home page | |||
*'''NOTE''': Make sure to hold control to open the link in a new tab. | |||
[http://cisco.netacad.net Go to Cisco Networking Academy home page] | |||
###################### | |||
*Step 2 | |||
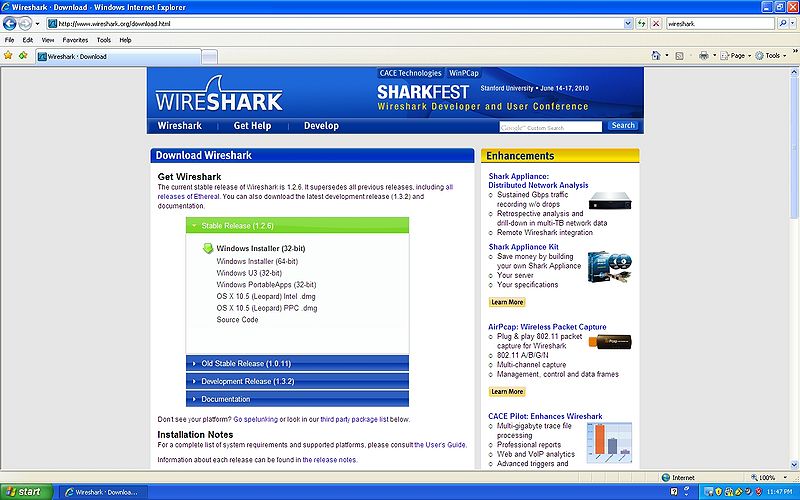
Click on the Windows Installer (32-bit). | |||
[[File:Wireshark.2.jpg|800px]] | |||
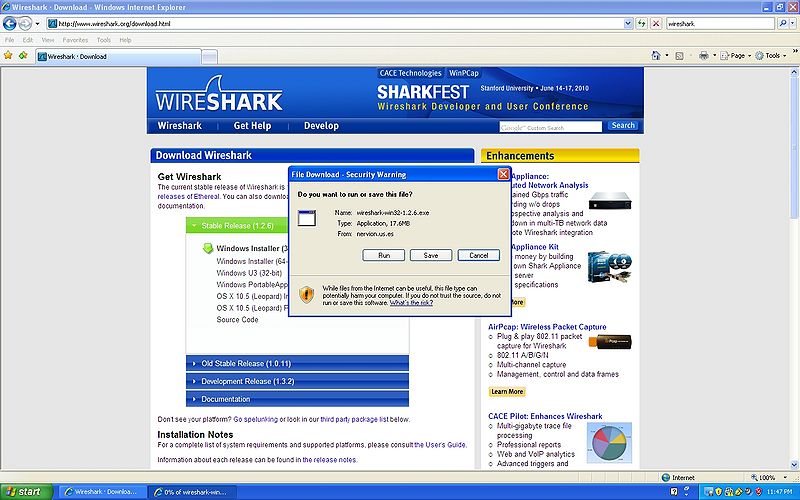
*Step 3 | |||
Click the Save button. | |||
[[File:Wireshark.3.jpg|800px]] | |||
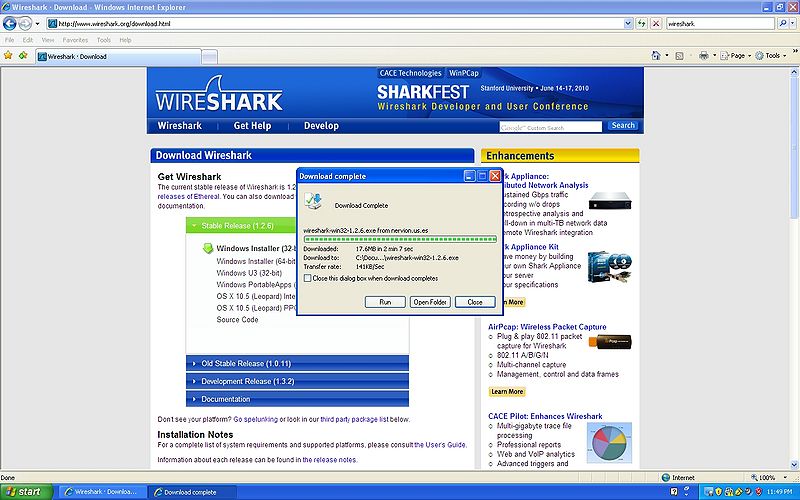
*Step 4 | |||
Click the Run button after the file has been downloaded. | |||
[[File:Wireshark.4.jpg|800px]] | |||
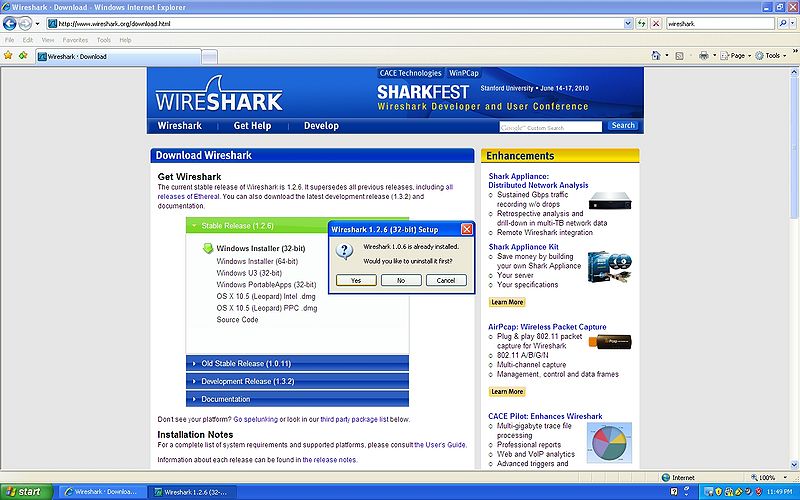
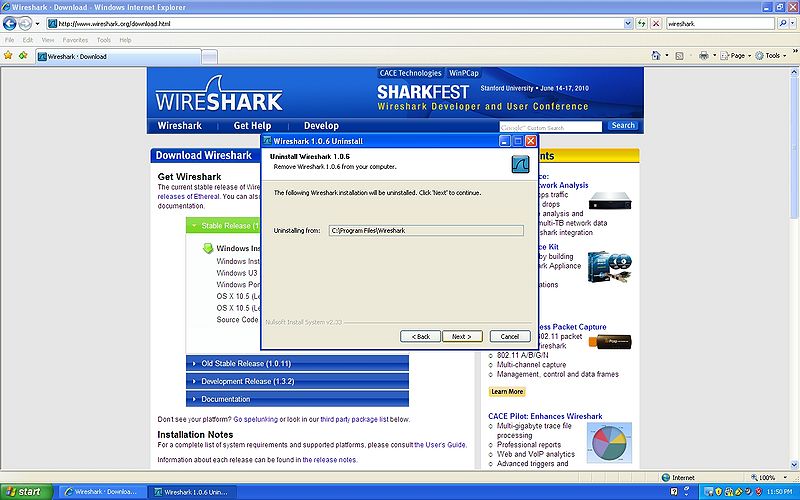
*Step 5 | |||
If an older version is installed replace it by clicking the Yes button. | |||
[[File:Wireshark.6.jpg|800px]] | |||
*Step 6 | |||
Click the Next button until you arrive at the Finish button. | |||
[[File:Wireshark.8.jpg|800px]] | |||
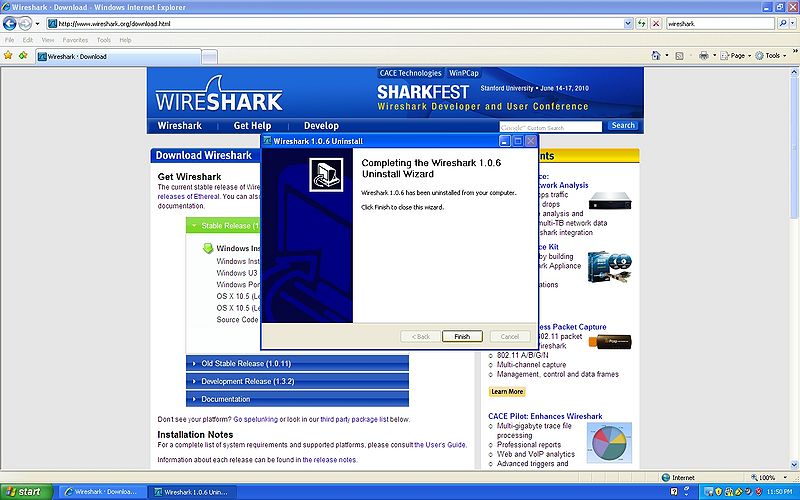
*Step 7 | |||
Click the Finish button. | |||
[[File:Wireshark.10.jpg|800px]] | |||
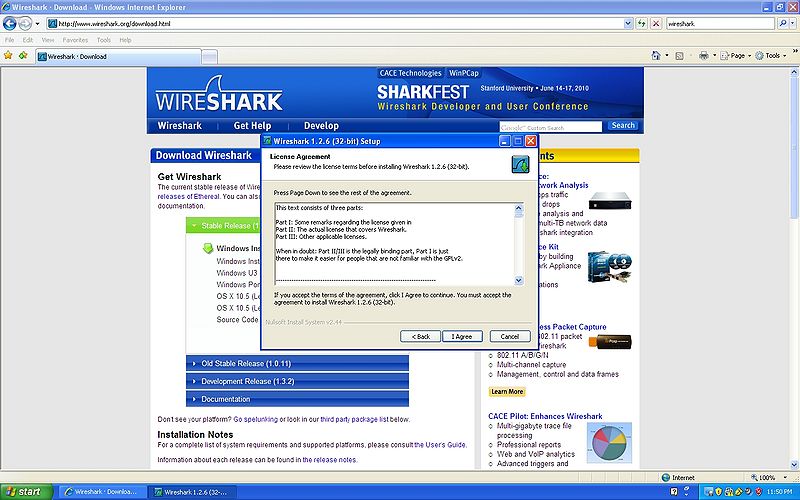
*Step 8 | |||
Click the I Agree button to start the install. | |||
[[File:Wireshark.12.jpg|800px]] | |||
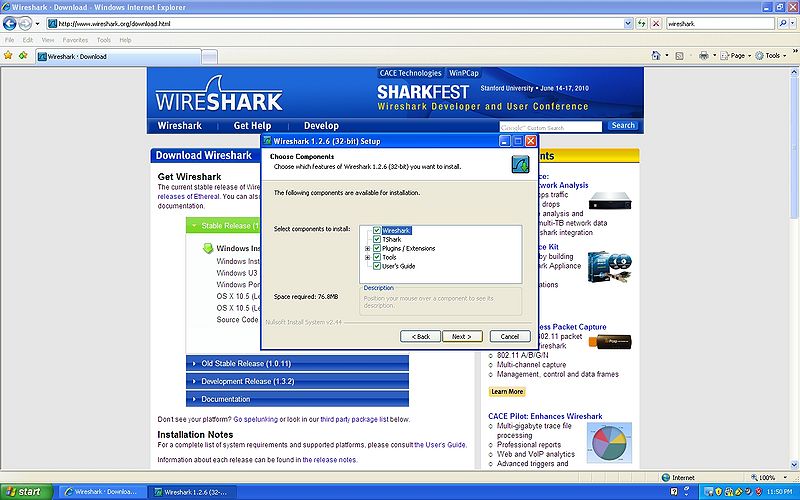
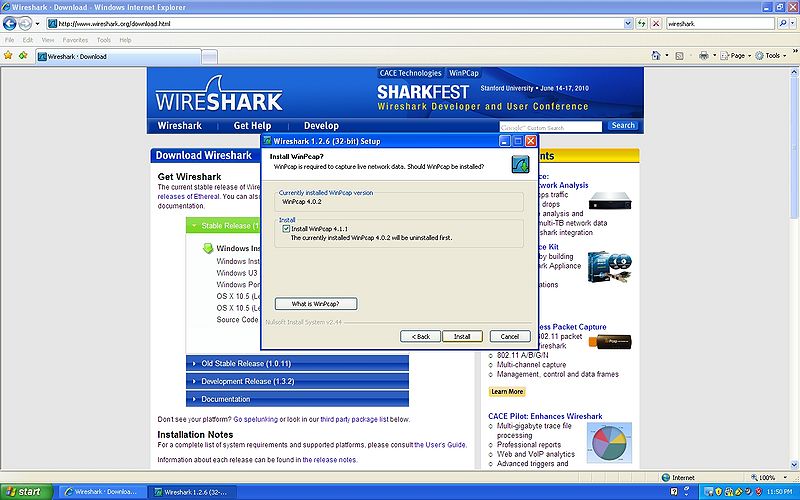
*Step 9 | |||
Click the Next button until you arrive at the Install WinPcap. | |||
[[File:Wireshark.13.jpg|800px]] | |||
*Step 10 | |||
Click the Install button. | |||
[[File:Wireshark.16.jpg|800px]] | |||
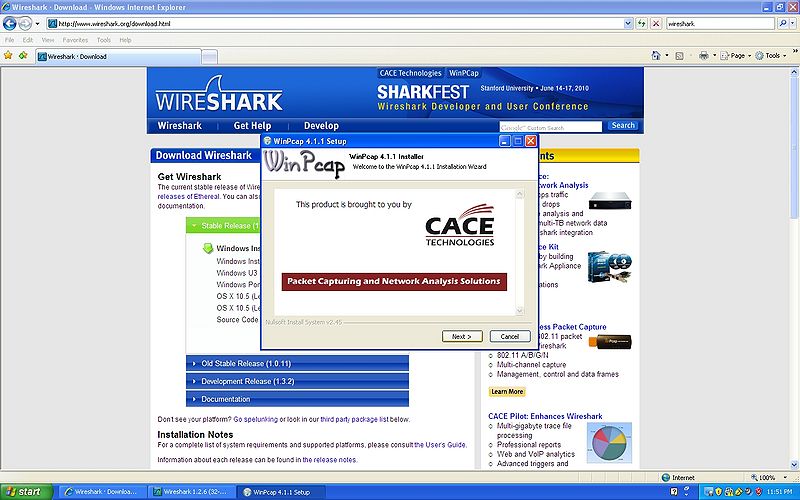
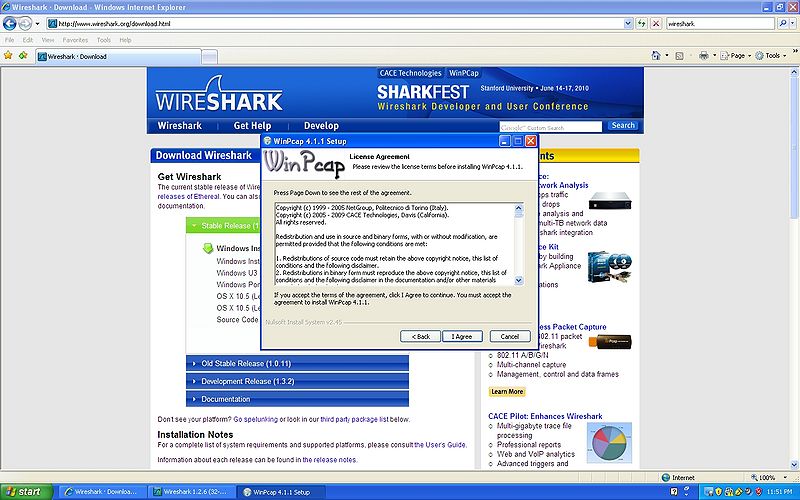
*Step 11 | |||
Click the Next button until you get to WinPcap License Agreement. | |||
[[File:Wireshark.17.jpg|800px]] | |||
*Step 12 | |||
Click the I Agree button. | |||
[[File:Wireshark.19.jpg|800px]] | |||
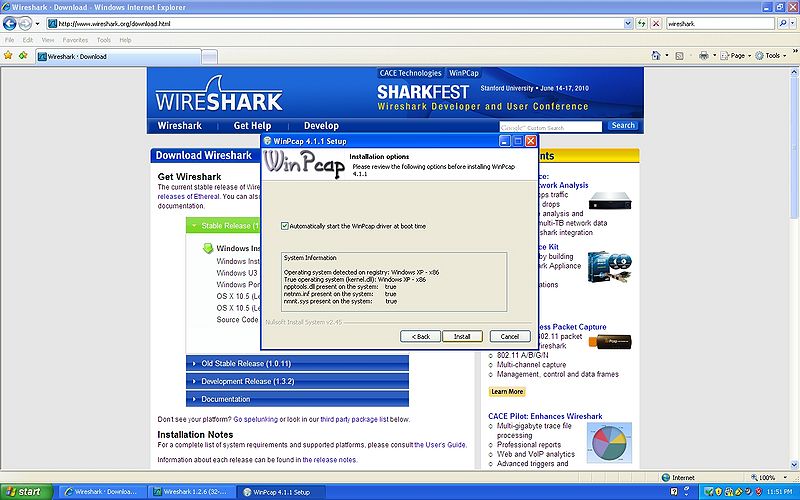
*Step 13 | |||
Click the Install button. | |||
[[File:Wireshark.20.jpg|800px]] | |||
*Step 14 | |||
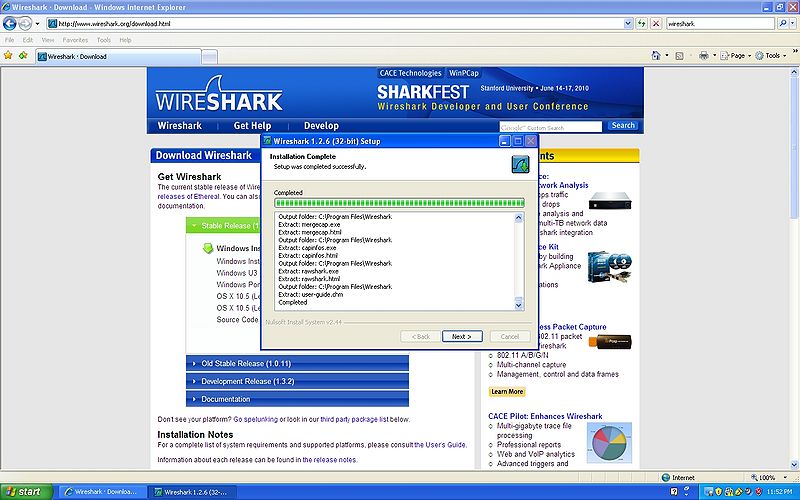
When installation is complete click the Next button. | |||
[[File:Wireshark.27.jpg|800px]] | |||
*Step 15 | |||
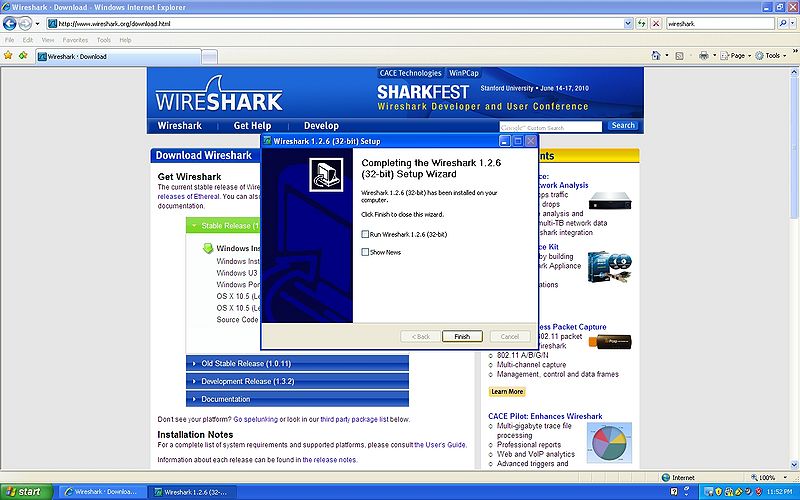
Click the Finish button. | |||
[[File:Wireshark.28.jpg|800px]] | |||
Revision as of 07:12, 28 February 2010
Package Tracer Instructions: Packet Tracer is a powerful network simulation program that allows us to create a network with an almost unlimited number of devices, encouraging practice, discovery, and troubleshooting. The main objective of Packet Tracer is to serve as a support tool for the Cisco Academy. This tool is extremely useful for both students and teachers. In this page, I will show you step by step of how to download, install and build a network that we use a lot in the CCNA1 using Package Tracer. This instruction is only for a student who have an account to login to the Cisco Networking Academy home page.
Downloading & Installing Package Tracer
Packet Tracer 5.2 is the latest version of Cisco's simulation software available. To download Package Tracer, follow the instruction below:
- Step 1
Go to Cisco Networking Academy home page
- NOTE: Make sure to hold control to open the link in a new tab.
Go to Cisco Networking Academy home page
- Step 2
Click on the Windows Installer (32-bit).
- Step 3
Click the Save button.
- Step 4
Click the Run button after the file has been downloaded.
- Step 5
If an older version is installed replace it by clicking the Yes button.
- Step 6
Click the Next button until you arrive at the Finish button.
- Step 7
Click the Finish button.
- Step 8
Click the I Agree button to start the install.
- Step 9
Click the Next button until you arrive at the Install WinPcap.
- Step 10
Click the Install button.
- Step 11
Click the Next button until you get to WinPcap License Agreement.
- Step 12
Click the I Agree button.
- Step 13
Click the Install button.
- Step 14
When installation is complete click the Next button.
- Step 15
Click the Finish button.
