Extend your wireless network: Difference between revisions
No edit summary |
No edit summary |
||
| (11 intermediate revisions by the same user not shown) | |||
| Line 13: | Line 13: | ||
[[File:extender.jpg]] | [[File:extender.jpg]] | ||
[[File:extender button.jpg]] | [[File:extender button.jpg]] | ||
'''If security is disabled:''' | |||
1. First verify the wireless network is operational. | |||
2. Plug the range expander into power next to your wireless router. | |||
3. If security is disabled in your wireless router, you can use the auto configuration button located on the side. Press button down for 5 seconds, then release. The LEDs will flash for about 1 minute. When both LEDs are solidly lit as blue, the extender is configured and ready for use. | |||
4. Unplug unit from the power outlet and place in the optimum location on the edge of your wireless network. The higher you place the unit, the better the performance will be. | |||
5. Connect the power plate to a power outlet, preferably a good quality surge protector. | |||
6. Unplug unit from the power outlet and place in the optimum location on the edge of your wireless network. The higher you place the unit, the better the performance will be. | |||
7. Connect the power plate to a power outlet, preferably a good quality surge protector. | |||
'''If security is enabled:''' | |||
1. First verify the wireless network is operational. | |||
2. Plug the range expander into power next to your wireless router. | |||
3. Insert the accompanying Setup Wizard CD into your wireless enabled computer (ex. Laptop). The program should run automatically. | |||
4. When you get to the “Welcome” screen, click the Setup button. | |||
5. Click Next. | |||
6. The Setup Wizard will search for the wireless network. Once found, you will need to confirm the settings are correct and click, Yes. | |||
7. Once the Setup Wizard finds the wireless router to communicate with, it will now search for the Range Expander. Select the one you want and click, Yes. | |||
8. Use the default password, admin and click Enter. | |||
9. Enter the IP address and appropriate subnet mask. Then enter the IP Address of your network gateway as well as a name for the Range Expander. If you are not sure what to ender, keep the default settings. Click Next. | |||
10. Review the settings and click Yes, to save them. | |||
11. Click the Online Registration to register the Expander or click Exit. | |||
12. Unplug unit from the power outlet and place in the optimum location on the edge of your wireless network. The higher you place the unit, the better the performance will be. | |||
13. Connect the power plate to a power outlet, preferably a good quality surge protector. | |||
For a free manual, see the following link. | |||
http://www.retrevo.com/d/ds/progress?doc=54950179a0f0d62314f803a8184a16c0&rk=0.6292766245115546 | |||
Now I can use my laptop on the deck or even out in our pergola in the backyard. | |||
[[File:deck.jpg]] | |||
[[File:pergola.jpg]] | |||
Latest revision as of 02:48, 27 July 2010
Extend Your Wireless Network
CNT2300-91 Service Project Ben Franske July 2010
By Michelle Buvik
Learning is always beneficial. Taking classes in the summer takes dedication. I did not want to be tied to the house so I extended the wireless network to include a larger area.
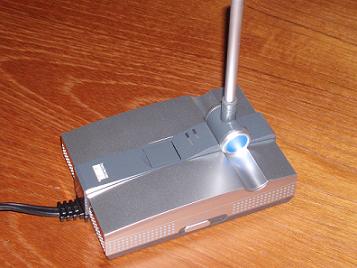
The Linksys (Cisco) Range Expander, WRE54G Ver. 3 enabled me to meet this goal.
If security is disabled:
1. First verify the wireless network is operational.
2. Plug the range expander into power next to your wireless router.
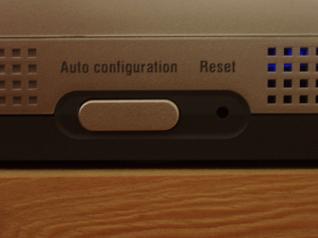
3. If security is disabled in your wireless router, you can use the auto configuration button located on the side. Press button down for 5 seconds, then release. The LEDs will flash for about 1 minute. When both LEDs are solidly lit as blue, the extender is configured and ready for use.
4. Unplug unit from the power outlet and place in the optimum location on the edge of your wireless network. The higher you place the unit, the better the performance will be.
5. Connect the power plate to a power outlet, preferably a good quality surge protector.
6. Unplug unit from the power outlet and place in the optimum location on the edge of your wireless network. The higher you place the unit, the better the performance will be.
7. Connect the power plate to a power outlet, preferably a good quality surge protector.
If security is enabled:
1. First verify the wireless network is operational.
2. Plug the range expander into power next to your wireless router.
3. Insert the accompanying Setup Wizard CD into your wireless enabled computer (ex. Laptop). The program should run automatically.
4. When you get to the “Welcome” screen, click the Setup button.
5. Click Next.
6. The Setup Wizard will search for the wireless network. Once found, you will need to confirm the settings are correct and click, Yes.
7. Once the Setup Wizard finds the wireless router to communicate with, it will now search for the Range Expander. Select the one you want and click, Yes.
8. Use the default password, admin and click Enter.
9. Enter the IP address and appropriate subnet mask. Then enter the IP Address of your network gateway as well as a name for the Range Expander. If you are not sure what to ender, keep the default settings. Click Next.
10. Review the settings and click Yes, to save them.
11. Click the Online Registration to register the Expander or click Exit.
12. Unplug unit from the power outlet and place in the optimum location on the edge of your wireless network. The higher you place the unit, the better the performance will be.
13. Connect the power plate to a power outlet, preferably a good quality surge protector.
For a free manual, see the following link.
http://www.retrevo.com/d/ds/progress?doc=54950179a0f0d62314f803a8184a16c0&rk=0.6292766245115546
Now I can use my laptop on the deck or even out in our pergola in the backyard.


