Windows XP File Sharing Lab: Difference between revisions
(Created page with ''''Wireshark Instructions''' This is a walk through to help new students learn how to install and run wireshark for future lab assignments. We will be doing all of this through y…') |
No edit summary |
||
| (10 intermediate revisions by the same user not shown) | |||
| Line 1: | Line 1: | ||
''' | '''Basic Networking Lab''' This is a walk through to help new students learn how to finish the Basic Networking Lab. Most of these steps you will have to complete on each computer. | ||
== | ==Lab Setup== | ||
This | This will show you how to setup your lab. | ||
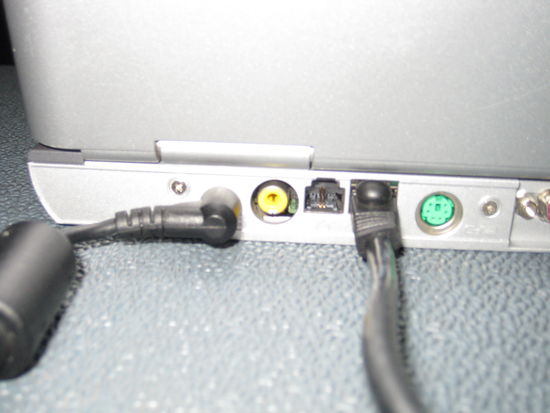
*Step 1 | *Step 1 | ||
Connect your two computers up with power cords and ethernet cords. | |||
[[File:Sharing1.JPG|550px]] | |||
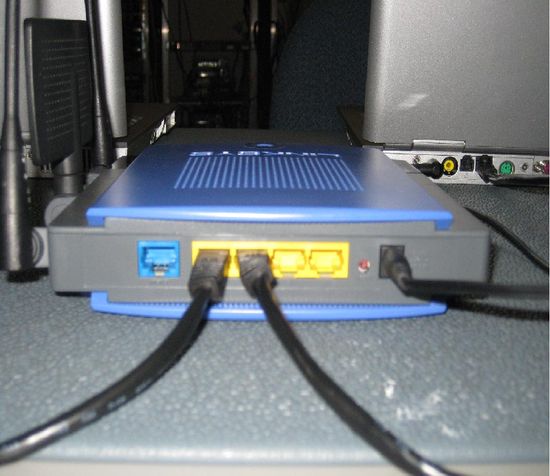
*Step 2 | |||
Connect each computers ethernet cord to the router. | |||
[[File:Sharing3.JPG|550px]] | |||
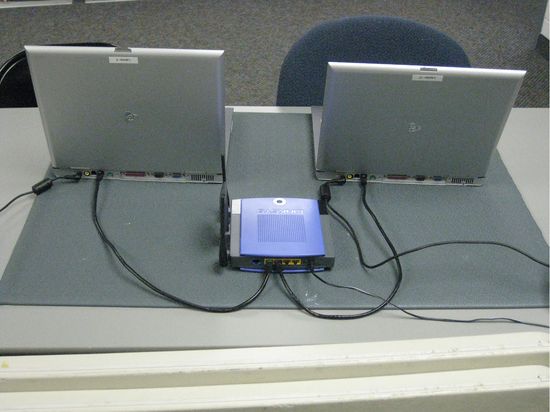
*Step 3 | |||
Your lab should look like this. | |||
[[File:Sharing4.JPG|550px]] | |||
==Network Setup== | |||
This will show you how to setup your computers to communicate with each other. | |||
*Step | *Step 1 | ||
Research online the Linksys 300N router, determine how to perform a factory reset as well as the default administrator username and password. | |||
*Step 2 | |||
Reset your router based your research. (usually a small hole on the back that you have to hold in untill the lights blink) | |||
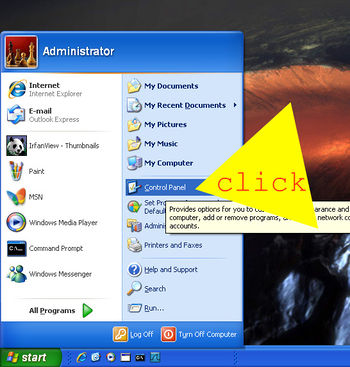
*Step | *Step 3 | ||
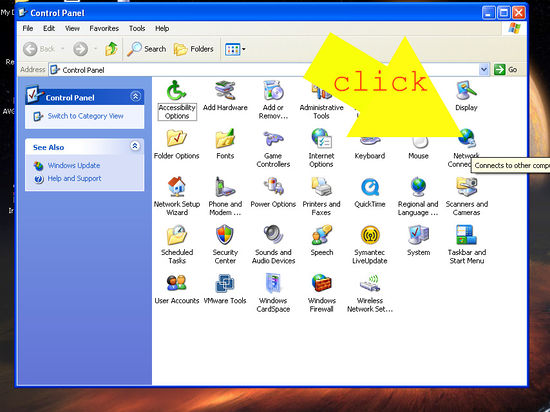
Click the | Click on the control pannel from the start menu. | ||
[[File: | [[File:Sharing5.jpg|350px]] | ||
*Step | *Step 4 | ||
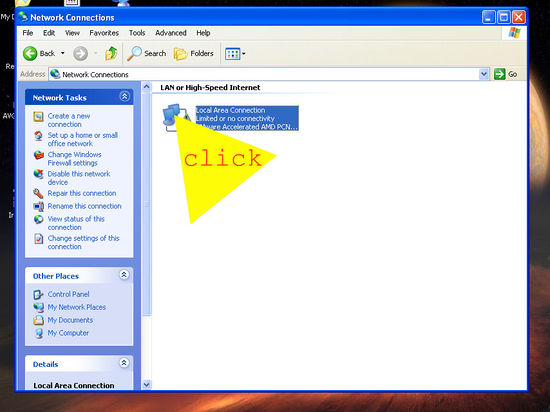
Double click on Network Connections. | |||
[[File: | [[File:Sharing6.jpg|550px]] | ||
*Step | *Step 5 | ||
Right click on Local Area Connections and click properties. | |||
[[File: | [[File:Sharing7.jpg|550px]] | ||
*Step | *Step 6 | ||
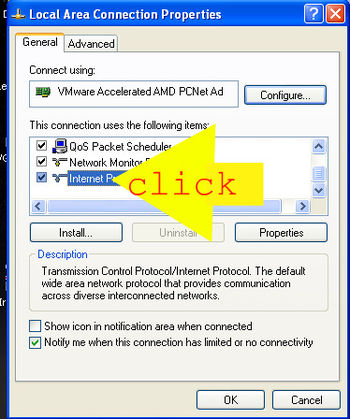
Scroll down to TCP/IP and double click. | |||
[[File: | [[File:Sharing8.jpg|350px]] | ||
*Step | *Step 7 | ||
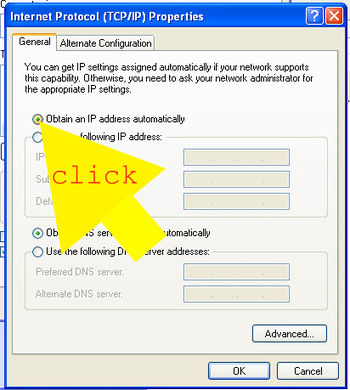
Click the | Click Obtain an IP address automatically and click ok, and close the window. | ||
[[File: | [[File:Sharing9.jpg|350px]] | ||
*Step | *Step 8 | ||
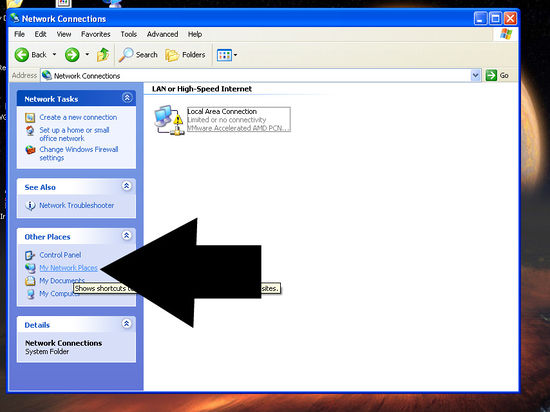
You will now have to assure that each of your computers are named differently and are on the same workgroup. From the Network Connections click on the left pane My network places. | |||
[[File: | [[File:Sharing10.jpg|550px]] | ||
*Step | *Step 9 | ||
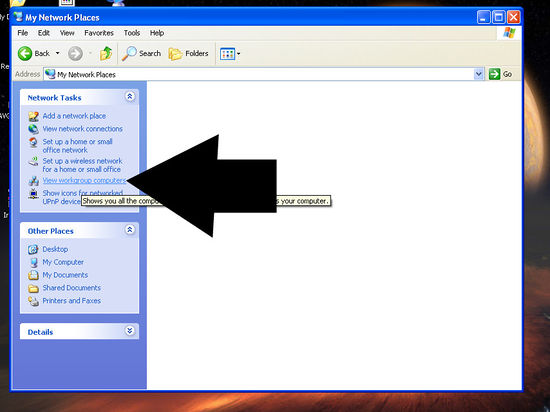
On the left pane click View workgroup computers. | |||
[[File: | [[File:Sharing11.jpg|550px]] | ||
*Step | *Step 10 | ||
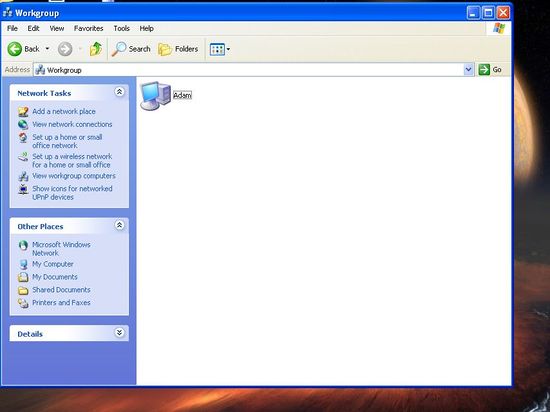
Make sure your computers are on the same workgroup mine was in Adam. | |||
[[File: | [[File:Sharing12.jpg|550px]] | ||
== | ==Pinging Your Computers== | ||
This will | This is where you will find your ip addresses for each labtop and ping each computer to assure that they are communicating correctly. | ||
*Step 1 | *Step 1 | ||
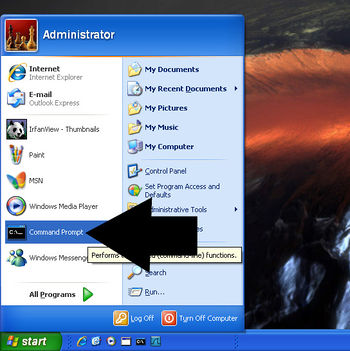
From the start menu click on the CMD icon or type cmd in the search window. | |||
[[File: | [[File:Sharing13.jpg|350px]] | ||
*Step 2 | *Step 2 | ||
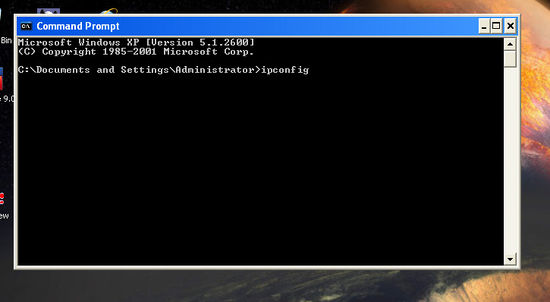
Type ipconfig. | |||
[[File: | [[File:Sharing14.jpg|550px]] | ||
*Step 3 | *Step 3 | ||
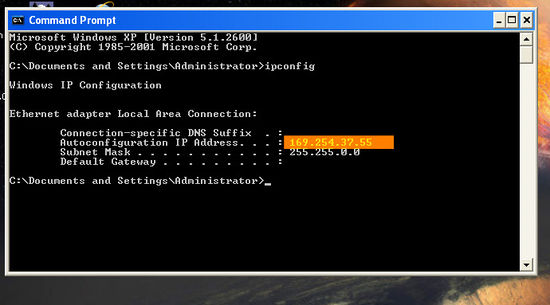
Highlighted is your ip address. | |||
[[File: | [[File:Sharing15.jpg|550px]] | ||
*Step 4 | *Step 4 | ||
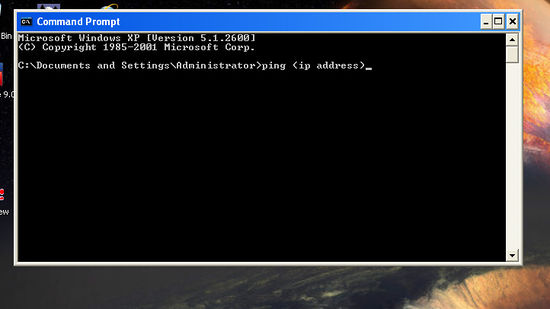
Type ping and the ip address of the computer you are trying to communicate with. | |||
[[File: | [[File:Sharing16.jpg|550px]] | ||
==Firewall Settings== | |||
This will show you how to locate the windows firewall settings and explore them. | |||
*Step 1 | |||
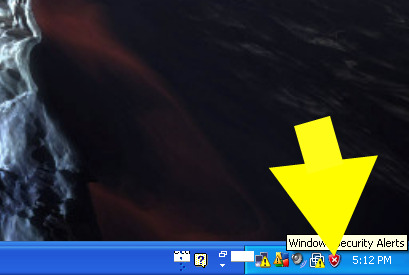
Double click on the bottom right in the system tray on the red shield. | |||
[[File:Sharing17.jpg|550px]] | |||
*Step 2 | |||
* | This is the windows firewall setting window enjoy exploring. | ||
[[File:Sharing18.jpg|550px]] | |||
==Sharing== | |||
This section will show you how to make a new shared folder and create a file to share. | |||
*Step 1 | |||
Right click on the desktop and create a new folder and name it what you would like I made mine Shared. | |||
[[File: | [[File:Sharing19.jpg|350px]] | ||
*Step 2 | |||
Right click the new folder and click Network Sharing to open the window. | |||
[[File: | [[File:Sharing20.jpg|350px]] | ||
*Step 3 | |||
Click the box Share this folder on the network. | |||
[[File: | [[File:Sharing21.jpg|350px]] | ||
*Step 4 | |||
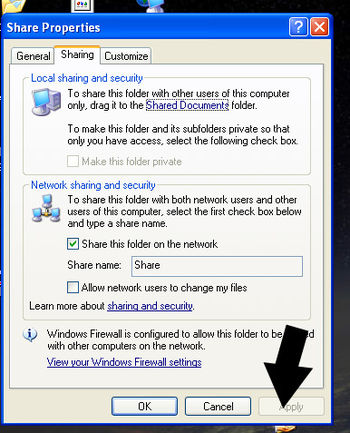
Click apply. | |||
[[File: | [[File:Sharing22.jpg|350px]] | ||
*Step 5 | |||
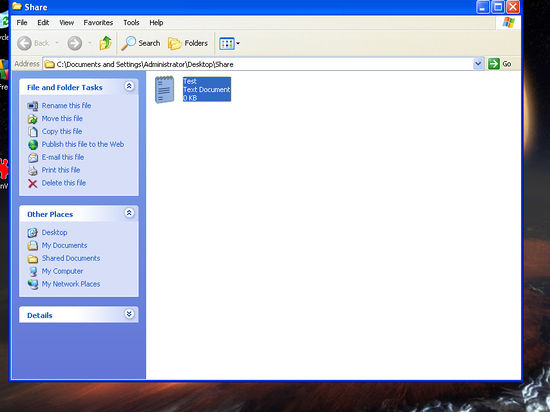
Open the new folder and right click and make a new text document. | |||
[[File:Sharing23.jpg|550px]] | |||
*Step 6 | |||
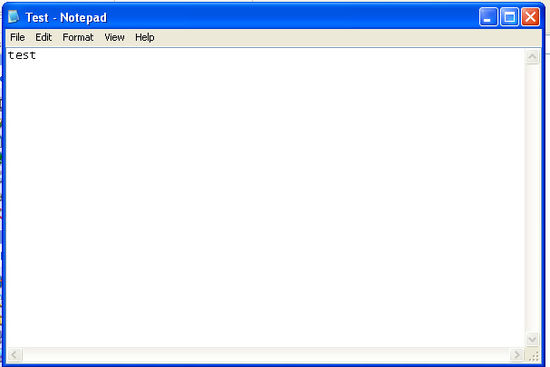
Open the new text document and type what ever you like I typed test. | |||
[[File:Sharing24.jpg|550px]] | |||
*Step 7 | |||
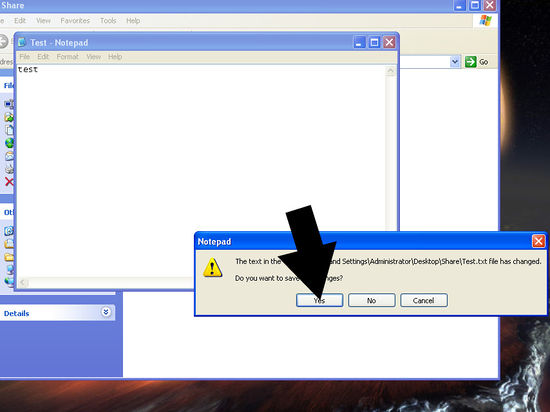
Close the window and SAVE. | |||
[[File:Sharing25.jpg|550px]] | |||
*Step 8 | |||
After you have completed all the steps on both computers you will now go to the sart menu and type //and the ip address of the computer you want to view folders you are sharing in the search window. You can now copy and add or delete files at will. | |||
*Step | |||
Latest revision as of 21:58, 22 July 2010
Basic Networking Lab This is a walk through to help new students learn how to finish the Basic Networking Lab. Most of these steps you will have to complete on each computer.
Lab Setup
This will show you how to setup your lab.
- Step 1
Connect your two computers up with power cords and ethernet cords.
- Step 2
Connect each computers ethernet cord to the router.
- Step 3
Your lab should look like this.
Network Setup
This will show you how to setup your computers to communicate with each other.
- Step 1
Research online the Linksys 300N router, determine how to perform a factory reset as well as the default administrator username and password.
- Step 2
Reset your router based your research. (usually a small hole on the back that you have to hold in untill the lights blink)
- Step 3
Click on the control pannel from the start menu.
- Step 4
Double click on Network Connections.
- Step 5
Right click on Local Area Connections and click properties.
- Step 6
Scroll down to TCP/IP and double click.
- Step 7
Click Obtain an IP address automatically and click ok, and close the window.
- Step 8
You will now have to assure that each of your computers are named differently and are on the same workgroup. From the Network Connections click on the left pane My network places.
- Step 9
On the left pane click View workgroup computers.
- Step 10
Make sure your computers are on the same workgroup mine was in Adam.
Pinging Your Computers
This is where you will find your ip addresses for each labtop and ping each computer to assure that they are communicating correctly.
- Step 1
From the start menu click on the CMD icon or type cmd in the search window.
- Step 2
Type ipconfig.
- Step 3
Highlighted is your ip address.
- Step 4
Type ping and the ip address of the computer you are trying to communicate with.
Firewall Settings
This will show you how to locate the windows firewall settings and explore them.
- Step 1
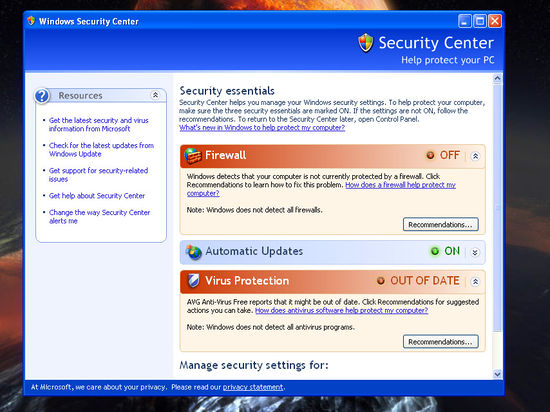
Double click on the bottom right in the system tray on the red shield.
- Step 2
This is the windows firewall setting window enjoy exploring.
Sharing
This section will show you how to make a new shared folder and create a file to share.
- Step 1
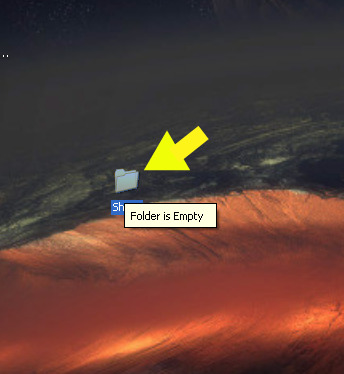
Right click on the desktop and create a new folder and name it what you would like I made mine Shared.
- Step 2
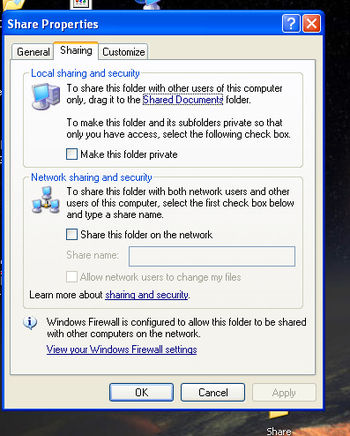
Right click the new folder and click Network Sharing to open the window.
- Step 3
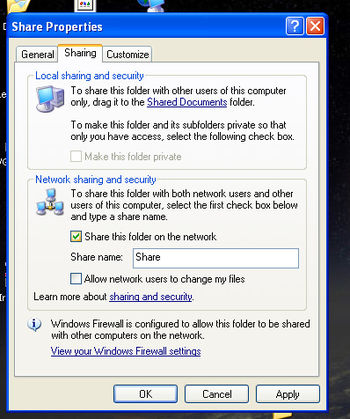
Click the box Share this folder on the network.
- Step 4
Click apply.
- Step 5
Open the new folder and right click and make a new text document.
- Step 6
Open the new text document and type what ever you like I typed test.
- Step 7
Close the window and SAVE.
- Step 8
After you have completed all the steps on both computers you will now go to the sart menu and type //and the ip address of the computer you want to view folders you are sharing in the search window. You can now copy and add or delete files at will.
