Packet Tracer Instructions: Difference between revisions
No edit summary |
|||
| (60 intermediate revisions by the same user not shown) | |||
| Line 1: | Line 1: | ||
''' | '''Packet Tracer Instructions''' | ||
Cisco Packet Tracer is a powerful network simulation program that allows us to create a network with an almost unlimited number of devices, encouraging practice, discovery, and troubleshooting. The main objective of Packet Tracer is to serve as a support tool for the Cisco Academy. This tool is extremely useful for both students and teachers | Cisco Packet Tracer is a powerful network simulation program that allows us to create a network with an almost unlimited number of devices, encouraging practice, discovery, and troubleshooting. The main objective of Packet Tracer is to serve as a support tool for the Cisco Academy. This tool is extremely useful for both students and teachers. | ||
==Downloading & Installing | In this page, I will walk you step by step through the process of downloading/installing and building a network using Packet Tracer. This instruction is best for students who have accounts to access Cisco Networking Academy home page. | ||
Packet Tracer 5.2 is the latest version of Cisco's simulation software available. To download | |||
==Downloading & Installing Packet Tracer== | |||
Packet Tracer 5.2 is the latest version of Cisco's simulation software available. To download Packet Tracer, follow the instruction below. | |||
===How to download=== | ===How to download=== | ||
*Step 1 | *'''Step 1''' | ||
[http://cisco.netacad.net Go to Cisco Networking Academy home page] | [http://cisco.netacad.net Go to Cisco Networking Academy home page] | ||
| Line 15: | Line 16: | ||
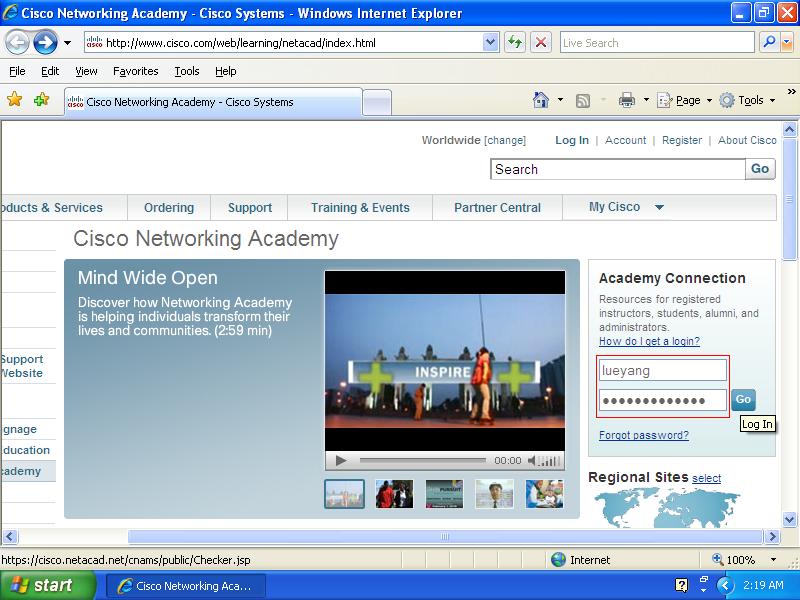
*Step 2 | *'''Step 2''' | ||
Login onto the Student Home using your username and password. | Login onto the Student Home using your username and password. | ||
[[File:pkt01. | [[File:pkt01.JPG|800px]] | ||
*Step 3 | *'''Step 3 | ||
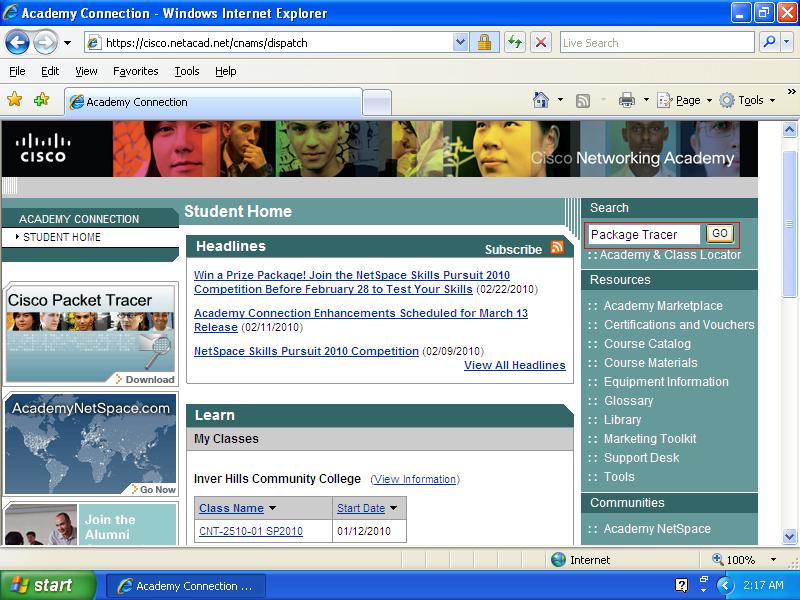
On the Student Home page, type ''' | On the Student Home page, type '''Packet tracer''' in the search box and press Enter key or click on the '''GO''' button to search for the software. | ||
[[File:pkt02. | [[File:pkt02.JPG|800px]] | ||
*Step 4 | *'''Step 4''' | ||
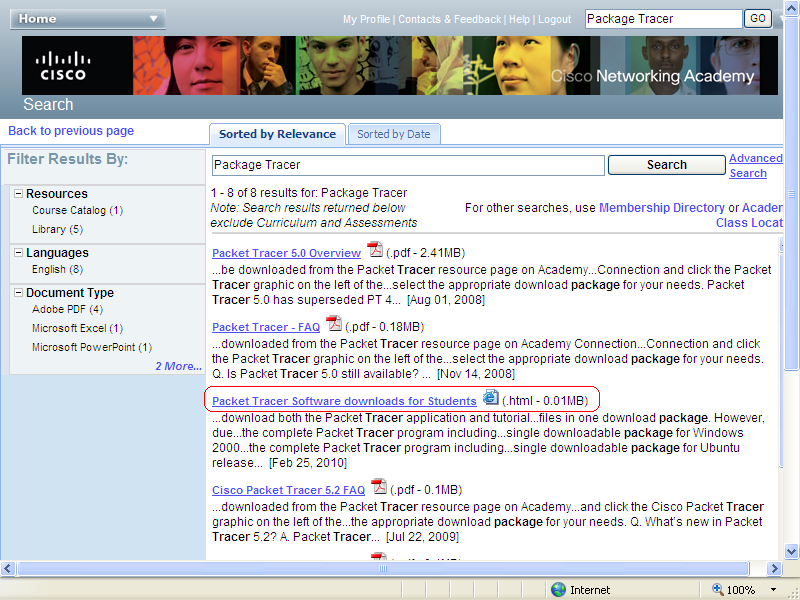
Scroll down to find '''Packet Tracer Software downloads for Students (.html - 0.01MB)'''. Click on the link and | Scroll down to find '''Packet Tracer Software downloads for Students (.html - 0.01MB)'''. Click on the link and you will see the search result, as show bellow. | ||
[[File:pkt03.PNG|800px]] | [[File:pkt03.PNG|800px]] | ||
*Step 5 | *'''Step 5''' | ||
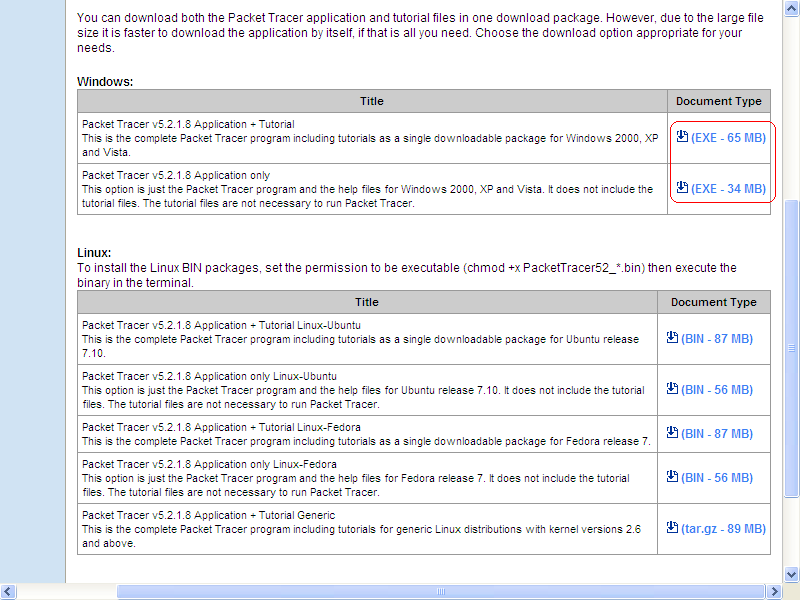
To download, click '''(EXE - 34 MB)''' | To download, click on '''(EXE - 34 MB)''' save it on your Desktop. | ||
[[File:pkt04.PNG|800px]] | [[File:pkt04.PNG|800px]] | ||
Next section will walk you through the process of installing Cisco Packet Tracer. | |||
===Installation=== | ===Installation=== | ||
*Step 1 | After downloading is completed, follow the steps bellow. | ||
And, then click '''Run''' to run the installation process | ---- | ||
*'''Step 1''' | |||
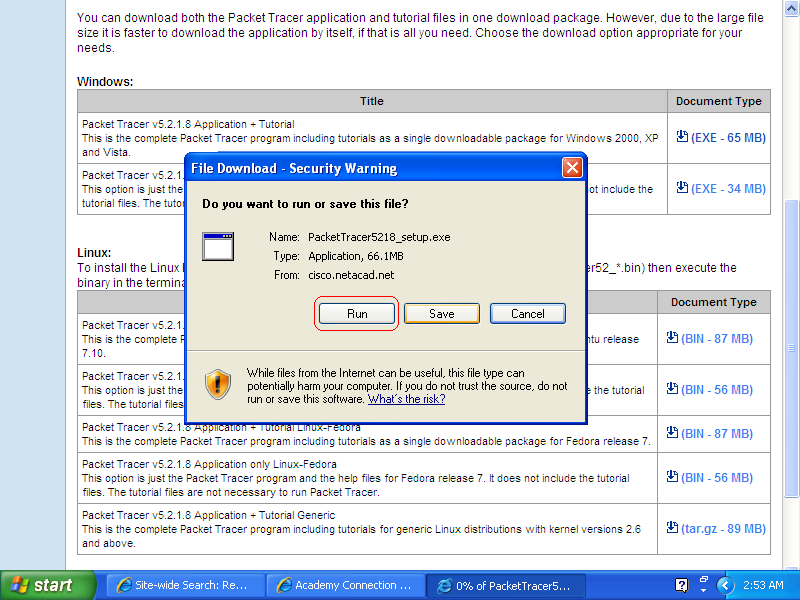
To install Cisco Packet Tracer, double click on the PacketTracer5218_setup_no_tutorials.exe file on your desktop. | |||
And, then click '''Run''' to run the installation process. | |||
[[File:pkt05.PNG|800px]] | [[File:pkt05.PNG|800px]] | ||
*'''Step 2''' | |||
*Step 2 | |||
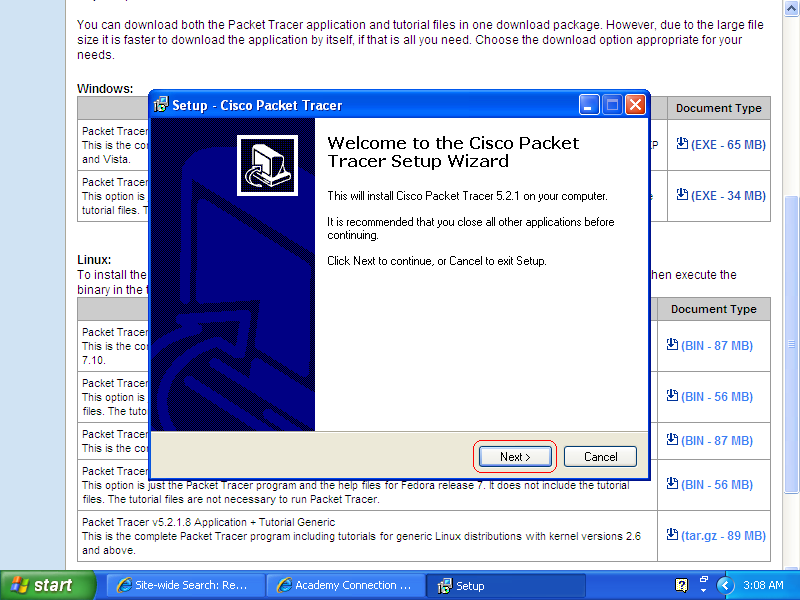
Click next | Click next | ||
| Line 56: | Line 63: | ||
*Step 3 | *'''Step 3''' | ||
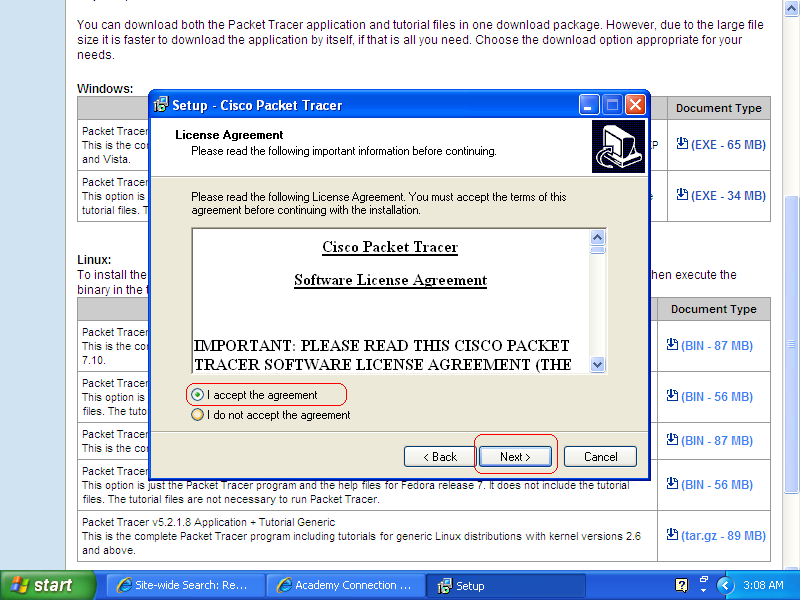
In oder to install the software, you must check '''I accept the agreement''' and click | In oder to install the software, you must check '''I accept the agreement''' and then click '''Next''' button. | ||
[[File:pkt07.PNG|800px]] | [[File:pkt07.PNG|800px]] | ||
*Step 4 | *'''Step 4''' | ||
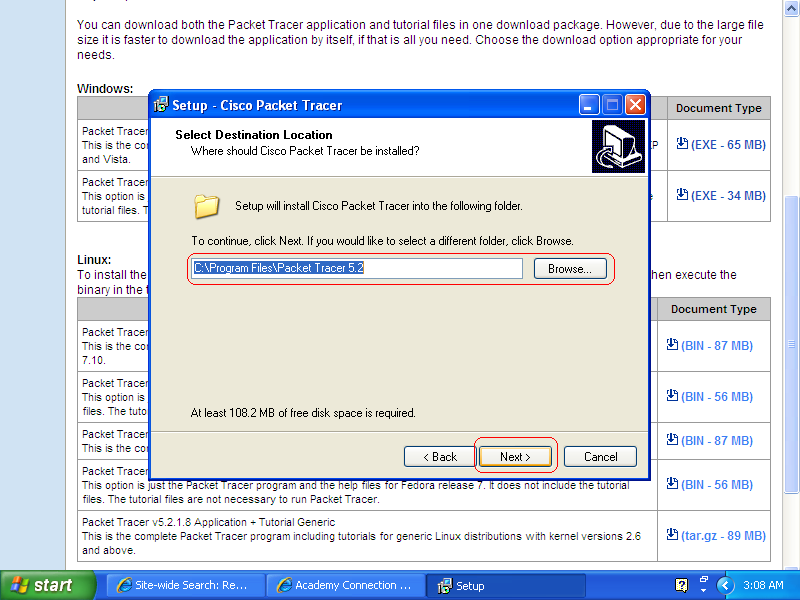
Click | Click '''Next''' button until the installation process is finished. | ||
[[File:pkt08.PNG|800px]] | [[File:pkt08.PNG|800px]] | ||
[[File:pkt09.PNG|800px]] | [[File:pkt09.PNG|800px]] | ||
*Step 5 | *'''Step 5''' | ||
Click the Finish button. | Click the Finish button. | ||
[[File:pkt10. | [[File:pkt10.jpg|800px]] | ||
Now you are completed with installation process. The next section will be showing you how to use Cisco Packet Tracer. | |||
==Using Cisco Packet Tracer== | |||
This section will show you how to use Packet Tracer by creating a basic network environment. | |||
Below is the topology diagram of the network. The IP address and Subnet mask in this topology will be using to configure the network connection in the next section. | |||
[[File:pktt00.PNG|658px]] | |||
---- | |||
===Creating Cisco Network Devices=== | |||
Follow the steps bellow to create the network devices base on the topology above. | |||
*'''Step 1''' | |||
Double click the '''Cisco Packet Tracer''' icon on your Desktop to run Cisco Packet Tracer. | |||
Cisco Packet Tracer' windows interface: | |||
[[File:pkt11.PNG|800px]] | [[File:pkt11.PNG|800px]] | ||
*Step 2 | *'''Step 2''' | ||
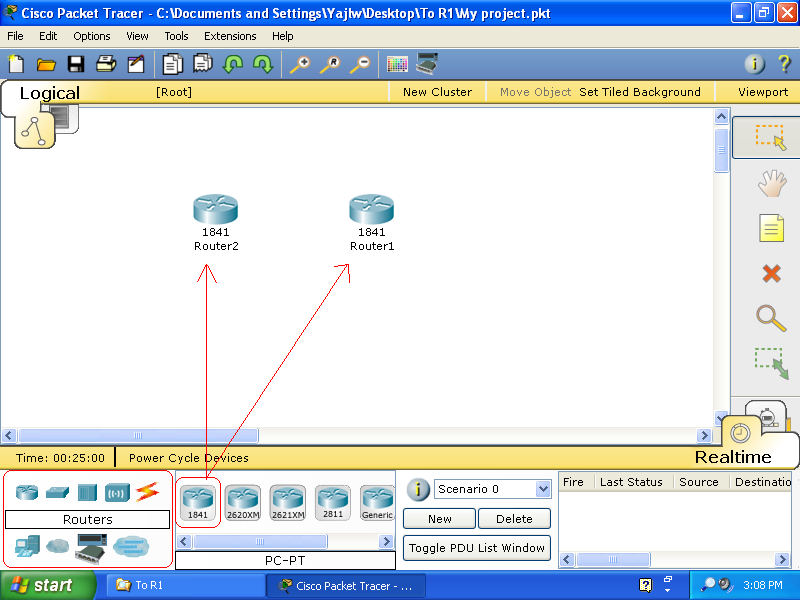
A router is created by clicking the '''Routers''' button that locates on the bellow left-hand conner, and the routers with its model names will appear next to the right. Click and draft the 1841 Router to the work area, and chang the name to Router1. Changing the router's name is optional. Create another router and name it Router2. | |||
[[File:pkt12.PNG|800px]] | [[File:pkt12.PNG|800px]] | ||
*Step 3 | *'''Step 3''' | ||
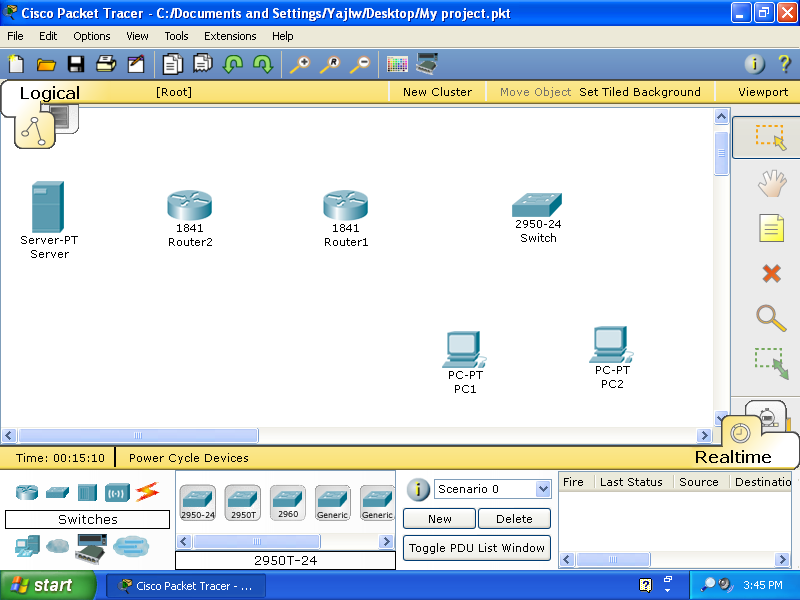
Follow the step above to create the '''Switches''', '''PC1''', '''PC2''', and the '''Server'''. | |||
[[File:pkt13.PNG|800px]] | [[File:pkt13.PNG|800px]] | ||
*Step 5 | *'''Step 5''' Adding Cisco Router's modules | ||
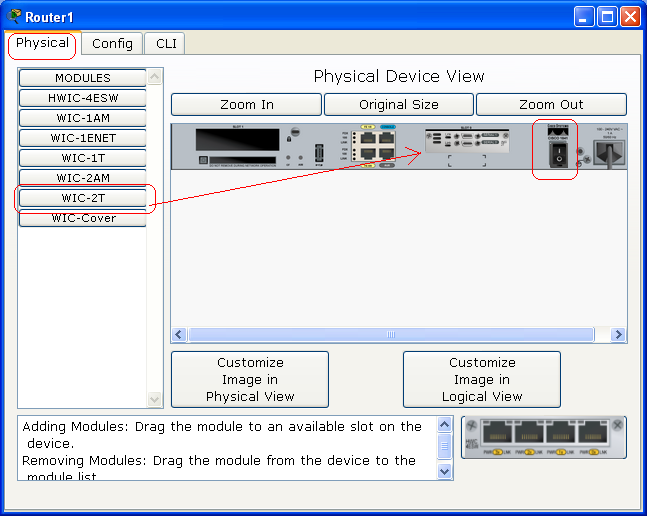
Click on Router1, under '''Physical''' tab, you will see the | Click on Router1, and under '''Physical''' tab, you will see the picture of the router's interface under "Physical Device View". Turn the power off, and then click and draft the '''WIC-2T''' module to the second slot of the expansion slots of the router. Turn the power of the router back on. | ||
[[File:pkt14.PNG|647px]] | |||
*'''Step 6'''Follow the same step above to add a module for Router2. | |||
===Connecting and Cabling === | ===Connecting and Cabling === | ||
---- | |||
To connect all the devices together, click the '''Connection''' button, and then click the cable button next to the right. Choose the right cable. | |||
*('''Note''') Make sure to choose the right cables. | |||
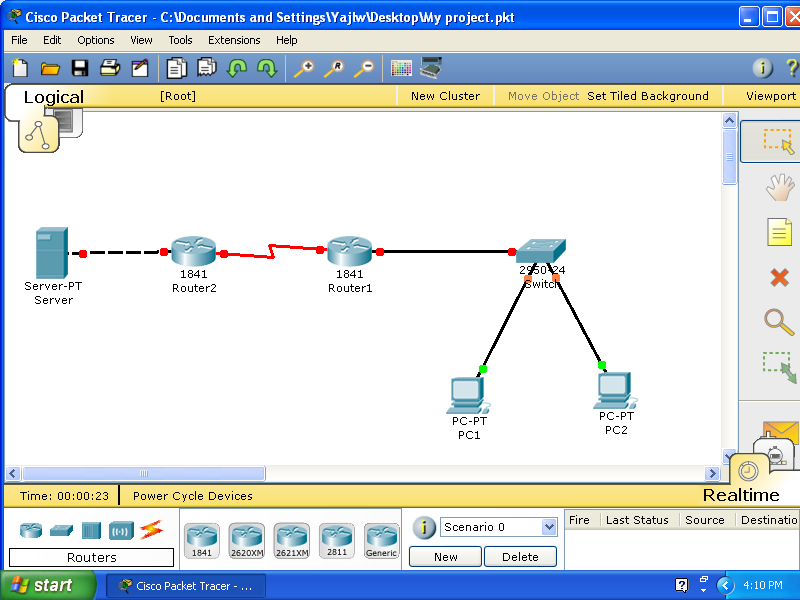
From '''PC1''', '''PC2''' and '''Router1''' to the '''Switch''', use '''Copper Straight-Through''' cables to make connection. Between '''Router1'''and '''Router2''', use Serial cable '''(DCE)'''. And, between the '''Router2''' and '''Server''', use '''Copper Cross-Over''' cable. | |||
Connection should look like this: | |||
[[File:pkt15.PNG|800px]] | [[File:pkt15.PNG|800px]] | ||
| Line 136: | Line 153: | ||
=== | === Configuring Devices === | ||
To make communication between the | ---- | ||
To make communication between the devices, each device needed to be configured correctly. | |||
*'''Configuration for the Server''': | *'''Configuration for the Server''': | ||
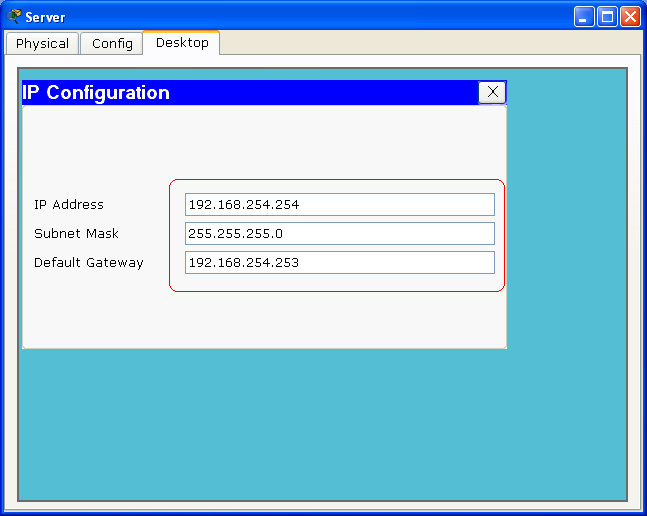
First, click on the Server and make sure the power is on. Under '''Desktop''' tab, click on the '''IP Configuration''' | First, click on the Server and make sure the power is on. Under '''Desktop''' tab, click on the '''IP Configuration''' button, and type in the '''IP Address''', '''Subnet Mask''', and '''Default Gateway''' into the appropriate box, and then close the configuration windows. | ||
[[File:pkt16.PNG|647px]] | [[File:pkt16.PNG|647px]] | ||
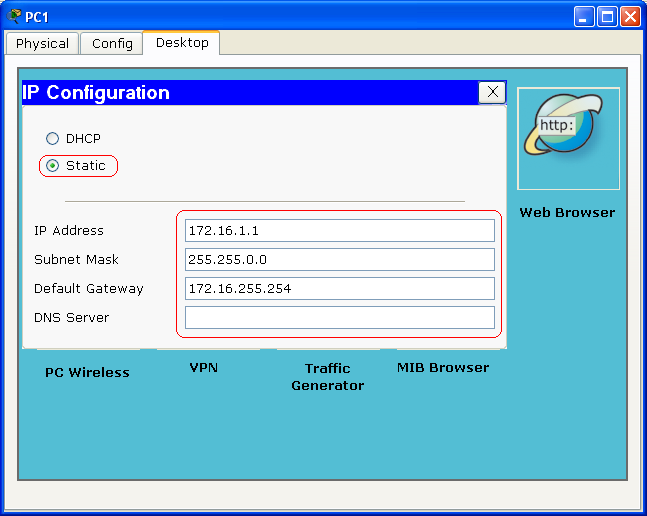
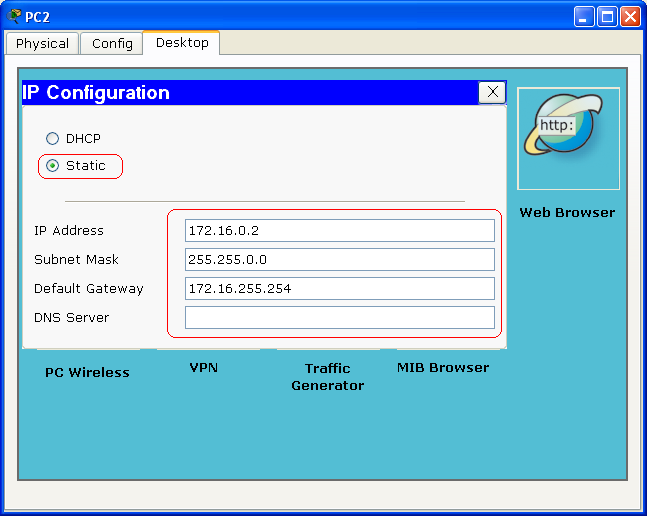
*'''PC1''' and '''PC2''' are Configured using the same step | *'''PC1''' and '''PC2''' are Configured using the same step above. | ||
| Line 156: | Line 175: | ||
*''' | *'''Router Configuration:''' | ||
Now you have all the end devices configured. The next step is to configure the two routers. | Now you have all the end devices configured. The next step is to configure the two routers. | ||
'''1. Router1 Configuration''' | |||
When you see "'''Router>'''", copy the | Click on the '''Router1''', make sure that the power of the router is on, and then click on the '''CLI''' tab. If you see a question says "Continue with configuration dialog? [yes/no]:", type no and press Enter key. Press Enter key couple times until you see "Router>" appear. | ||
When you see "'''Router>'''" appear, copy the codes (Commands) bellow, including the "!", and then past the codes into the '''CLI''' windows by clicking on the '''Paste''' button. | |||
| Line 199: | Line 220: | ||
<nowiki>copy running-config startup-config</nowiki> | <nowiki>copy running-config startup-config</nowiki> | ||
<nowiki>!</nowiki> | <nowiki>!</nowiki> | ||
| Line 209: | Line 230: | ||
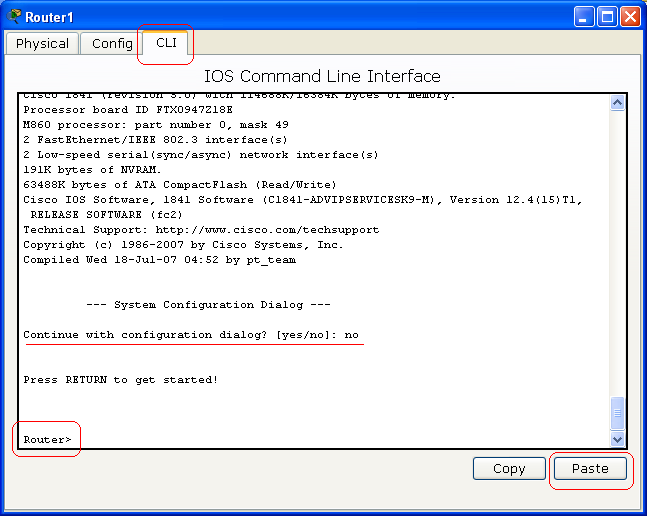
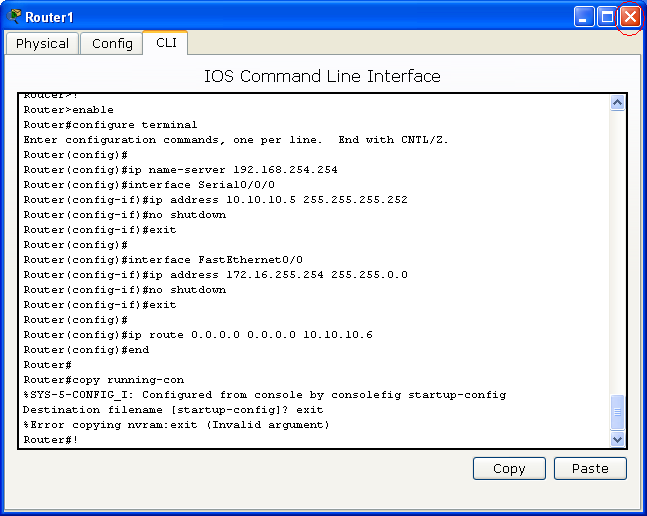
After you paste the command above, | After you paste the command above to the '''CLI''' windows, the output should looks like this: | ||
[[File:pkt120.PNG|647px]] | [[File:pkt120.PNG|647px]] | ||
Close this | Close Router1's windows. | ||
'''2. Router2 Configuration''' | |||
Use the same step above to configure Router2 by using the following codes: | |||
<nowiki>!</nowiki> | |||
<nowiki>enable</nowiki> | |||
<nowiki>configure terminal</nowiki> | |||
<nowiki>interface FastEthernet0/0</nowiki> | |||
<nowiki> ip address 192.168.254.253 255.255.255.0</nowiki> | |||
<nowiki>no shutdown</nowiki> | |||
<nowiki> exit</nowiki> | |||
<nowiki>interface Serial0/0/0</nowiki> | |||
<nowiki> ip address 10.10.10.6 255.255.255.252</nowiki> | |||
<nowiki> clock rate 64000</nowiki> | |||
<nowiki> no shutdown</nowiki> | |||
<nowiki> exit</nowiki> | |||
<nowiki>ip route 172.16.0.0 255.255.0.0 10.10.10.5</nowiki> | |||
<nowiki>end</nowiki> | |||
<nowiki>copy running-config startup-config</nowiki> | |||
<nowiki>!</nowiki> | |||
Now you are done with the configuration. | |||
== Examining Devices Communication == | |||
In this section I will use the ''ping'' and ''tracert'' or ''tracerout''command to examining the network connectivity to make sure that every device on the network can communicate with each other properly. | |||
In this section, we are examining the communication between PC1 and server. | |||
=== Realtime Mode === | |||
Use the Realtime Mode to test network connectivity in realtime. | |||
*'''Examining by using ping and tracert commands''' | |||
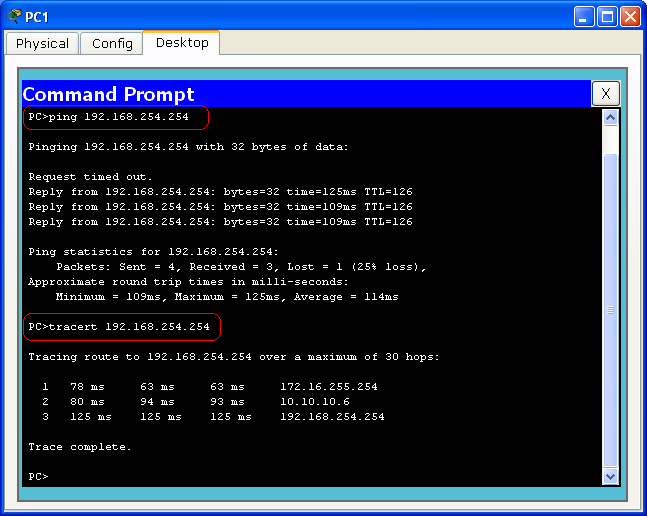
Click on '''PC1'''. Under '''Desktop''' tab, click on the '''Command Prompt''' or '''Run''' button. After the command prompt opened, type '''ping 192.168.254.254''' and press Enter key to see if PC1 can communicate with the Server. Type '''ping 192.168.254.254''' to see how PC1 can route the packets to the Sever. The screen shot bellow shows the examples of the ping and tracert command output. | |||
[[file:pkt21.png|647px]] | |||
*'''Examining by using Web Browser(HTTP)''' | |||
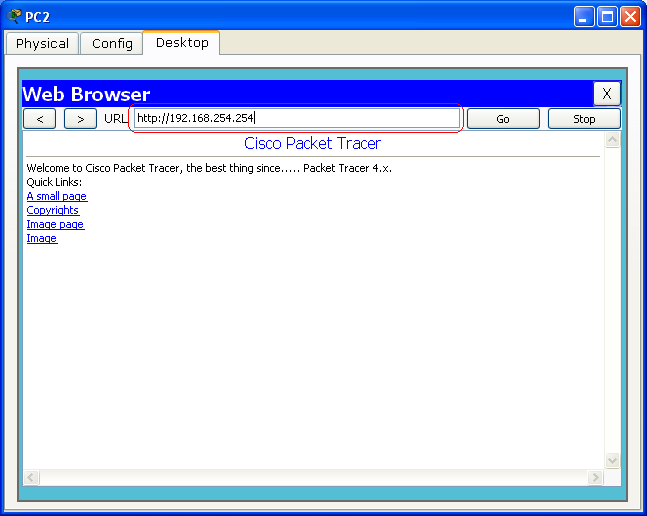
Click '''PC2''', and then click '''Desktop''' tab. Under Desktop tab, click '''Web Browser''' button and type '''192.168.254.254''' and press Enter key. | |||
[[file:pkt22.png|647px]] | |||
=== Simulation Mode === | |||
If you want to see how packets travel across the network, use the Simulation Mode. | |||
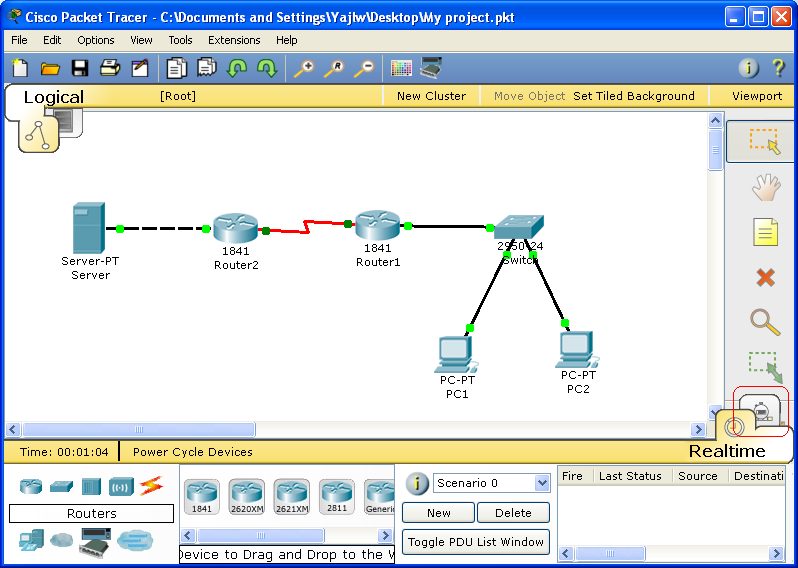
To switch from Realtime Mode to Simulation Mode, click on the tab behind the Realtime Mode. | |||
Simulation Mode: | |||
[[file:pkt23.png|800px]] | |||
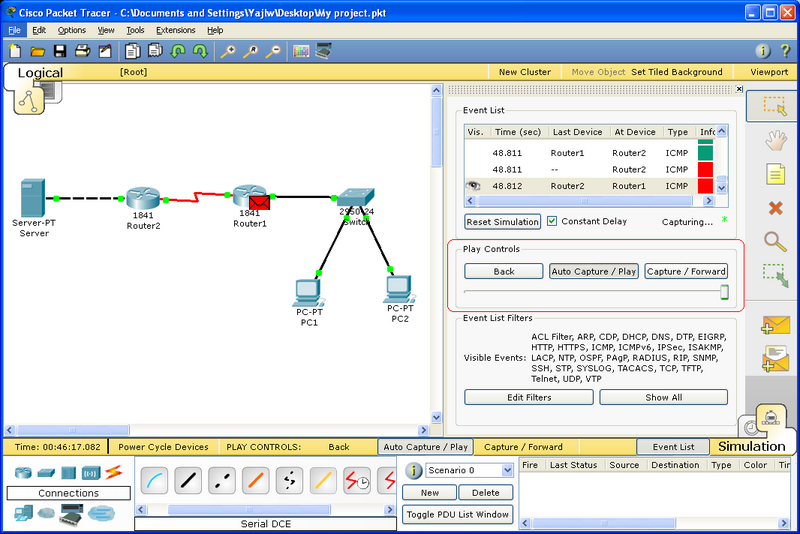
The Simulation Mode lets you capture packets automatically or manually. Use Simulation Mode to capture packets by using '''ping''' and '''tracrt''' command or any other method to perform for the task. | |||
Play Control of Simulation Mod | |||
[[file:pkt24.png|800px]] | |||
There are several methods to test network connectivity. However, I will not walk you through all the methods. Up to this point, you should know the basic operation of Cisco Packet Tracer, and be able to build your own network for your needed. | |||
Now, you have a working network environment. Save your project if you want to be use latter. | |||
Enjoy! | |||
== References == | |||
[http://www.cisco.com/web/learning/netacad/course_catalog/PacketTracer.html Cisco Packet Tracer] February 28, 2010. [http://www.cisco.com/ Cisco Systems, Inc.] | |||
Latest revision as of 22:57, 5 March 2010
Packet Tracer Instructions
Cisco Packet Tracer is a powerful network simulation program that allows us to create a network with an almost unlimited number of devices, encouraging practice, discovery, and troubleshooting. The main objective of Packet Tracer is to serve as a support tool for the Cisco Academy. This tool is extremely useful for both students and teachers.
In this page, I will walk you step by step through the process of downloading/installing and building a network using Packet Tracer. This instruction is best for students who have accounts to access Cisco Networking Academy home page.
Downloading & Installing Packet Tracer
Packet Tracer 5.2 is the latest version of Cisco's simulation software available. To download Packet Tracer, follow the instruction below.
How to download
- Step 1
Go to Cisco Networking Academy home page
(NOTE: Make sure to hold Ctrl key to open the link in a new tab.)
- Step 2
Login onto the Student Home using your username and password.
- Step 3
On the Student Home page, type Packet tracer in the search box and press Enter key or click on the GO button to search for the software.
- Step 4
Scroll down to find Packet Tracer Software downloads for Students (.html - 0.01MB). Click on the link and you will see the search result, as show bellow.
- Step 5
To download, click on (EXE - 34 MB) save it on your Desktop.
Next section will walk you through the process of installing Cisco Packet Tracer.
Installation
After downloading is completed, follow the steps bellow.
- Step 1
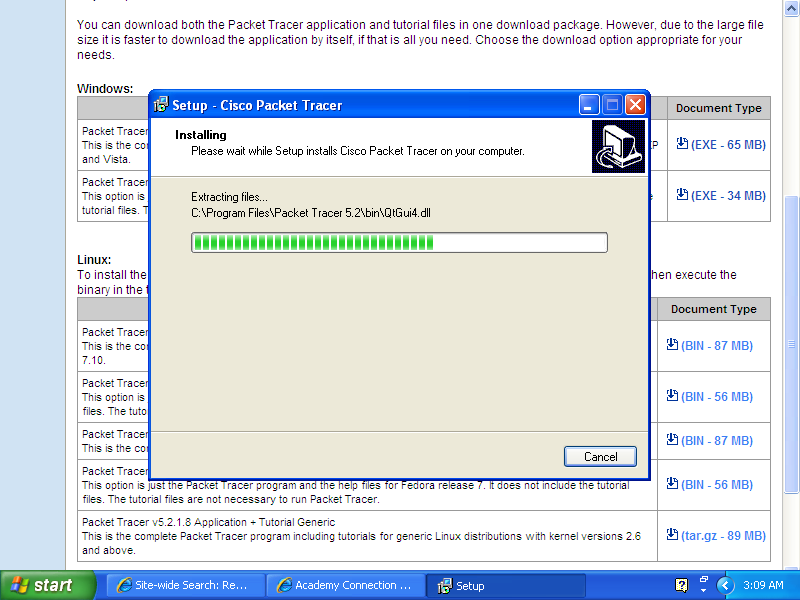
To install Cisco Packet Tracer, double click on the PacketTracer5218_setup_no_tutorials.exe file on your desktop.
And, then click Run to run the installation process.
- Step 2
Click next
- Step 3
In oder to install the software, you must check I accept the agreement and then click Next button.
- Step 4
Click Next button until the installation process is finished.
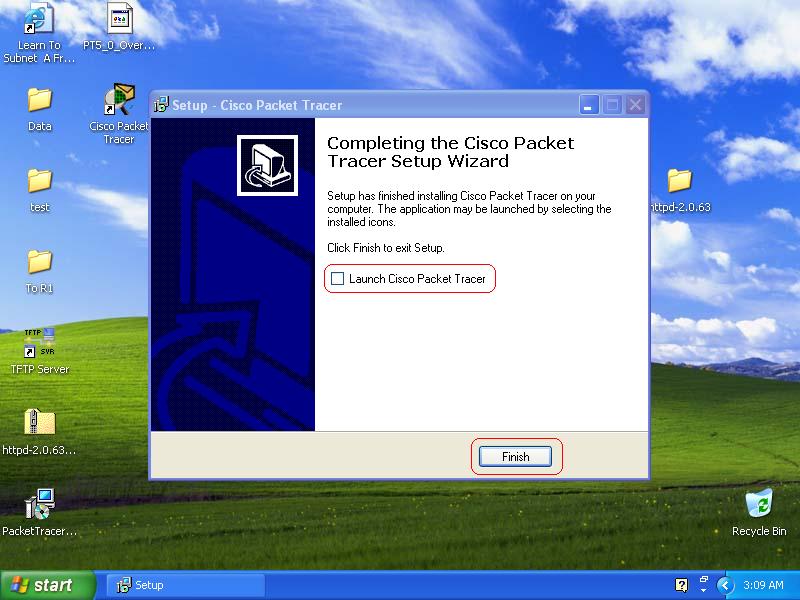
- Step 5
Click the Finish button.
Now you are completed with installation process. The next section will be showing you how to use Cisco Packet Tracer.
Using Cisco Packet Tracer
This section will show you how to use Packet Tracer by creating a basic network environment.
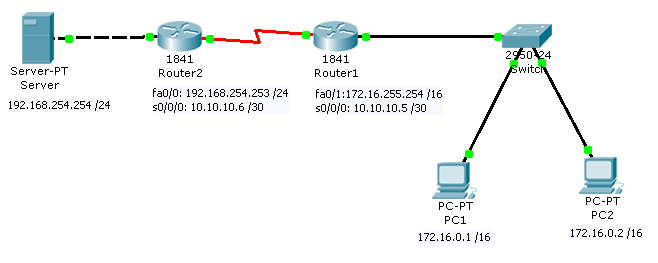
Below is the topology diagram of the network. The IP address and Subnet mask in this topology will be using to configure the network connection in the next section.
Creating Cisco Network Devices
Follow the steps bellow to create the network devices base on the topology above.
- Step 1
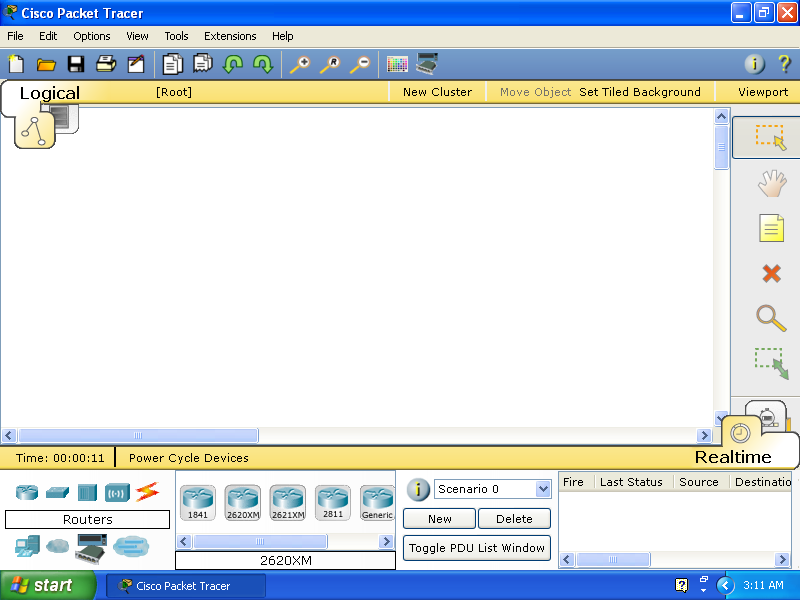
Double click the Cisco Packet Tracer icon on your Desktop to run Cisco Packet Tracer.
Cisco Packet Tracer' windows interface:
- Step 2
A router is created by clicking the Routers button that locates on the bellow left-hand conner, and the routers with its model names will appear next to the right. Click and draft the 1841 Router to the work area, and chang the name to Router1. Changing the router's name is optional. Create another router and name it Router2.
- Step 3
Follow the step above to create the Switches, PC1, PC2, and the Server.
- Step 5 Adding Cisco Router's modules
Click on Router1, and under Physical tab, you will see the picture of the router's interface under "Physical Device View". Turn the power off, and then click and draft the WIC-2T module to the second slot of the expansion slots of the router. Turn the power of the router back on.
- Step 6Follow the same step above to add a module for Router2.
Connecting and Cabling
To connect all the devices together, click the Connection button, and then click the cable button next to the right. Choose the right cable.
- (Note) Make sure to choose the right cables.
From PC1, PC2 and Router1 to the Switch, use Copper Straight-Through cables to make connection. Between Router1and Router2, use Serial cable (DCE). And, between the Router2 and Server, use Copper Cross-Over cable.
Connection should look like this:
Configuring Devices
To make communication between the devices, each device needed to be configured correctly.
- Configuration for the Server:
First, click on the Server and make sure the power is on. Under Desktop tab, click on the IP Configuration button, and type in the IP Address, Subnet Mask, and Default Gateway into the appropriate box, and then close the configuration windows.
- PC1 and PC2 are Configured using the same step above.
- Router Configuration:
Now you have all the end devices configured. The next step is to configure the two routers.
1. Router1 Configuration
Click on the Router1, make sure that the power of the router is on, and then click on the CLI tab. If you see a question says "Continue with configuration dialog? [yes/no]:", type no and press Enter key. Press Enter key couple times until you see "Router>" appear.
When you see "Router>" appear, copy the codes (Commands) bellow, including the "!", and then past the codes into the CLI windows by clicking on the Paste button.
!
enable
configure terminal
ip name-server 192.168.254.254
interface Serial0/0/0
ip address 10.10.10.5 255.255.255.252
no shutdown
exit
interface FastEthernet0/0
ip address 172.16.255.254 255.255.0.0
no shutdown
exit
ip route 0.0.0.0 0.0.0.0 10.10.10.6
end
copy running-config startup-config
!
After you paste the command above to the CLI windows, the output should looks like this:
Close Router1's windows.
2. Router2 Configuration
Use the same step above to configure Router2 by using the following codes:
!
enable
configure terminal
interface FastEthernet0/0
ip address 192.168.254.253 255.255.255.0
no shutdown
exit
interface Serial0/0/0
ip address 10.10.10.6 255.255.255.252
clock rate 64000
no shutdown
exit
ip route 172.16.0.0 255.255.0.0 10.10.10.5
end
copy running-config startup-config
!
Now you are done with the configuration.
Examining Devices Communication
In this section I will use the ping and tracert or traceroutcommand to examining the network connectivity to make sure that every device on the network can communicate with each other properly.
In this section, we are examining the communication between PC1 and server.
Realtime Mode
Use the Realtime Mode to test network connectivity in realtime.
- Examining by using ping and tracert commands
Click on PC1. Under Desktop tab, click on the Command Prompt or Run button. After the command prompt opened, type ping 192.168.254.254 and press Enter key to see if PC1 can communicate with the Server. Type ping 192.168.254.254 to see how PC1 can route the packets to the Sever. The screen shot bellow shows the examples of the ping and tracert command output.
- Examining by using Web Browser(HTTP)
Click PC2, and then click Desktop tab. Under Desktop tab, click Web Browser button and type 192.168.254.254 and press Enter key.
Simulation Mode
If you want to see how packets travel across the network, use the Simulation Mode.
To switch from Realtime Mode to Simulation Mode, click on the tab behind the Realtime Mode.
Simulation Mode:
The Simulation Mode lets you capture packets automatically or manually. Use Simulation Mode to capture packets by using ping and tracrt command or any other method to perform for the task.
Play Control of Simulation Mod
There are several methods to test network connectivity. However, I will not walk you through all the methods. Up to this point, you should know the basic operation of Cisco Packet Tracer, and be able to build your own network for your needed.
Now, you have a working network environment. Save your project if you want to be use latter.
Enjoy!
References
Cisco Packet Tracer February 28, 2010. Cisco Systems, Inc.
